
Essentials for Growing
To begin your microgreen journey, gather the necessary materials. You will need high-quality chia seeds, a shallow tray (a repurposed food container will do),
a spray bottle, a well-draining growing medium like coconut coir or seed starting mix, and a sunny spot on your balcony. Make sure your chosen tray has drainage holes to prevent waterlogging. A small pair of scissors for harvesting and a light source, like a grow lamp, can be helpful if natural light is limited. The success of your microgreen cultivation depends on the quality of your seeds and the environment you create for them. These materials set the foundation for your microgreen endeavor.
Preparing the Seeds
Before you start sowing, prepare your chia seeds. Soaking them for 10-15 minutes prior to sowing can significantly improve germination rates. This process softens the seeds, encouraging them to sprout more quickly and uniformly. Once soaked, drain off any excess water. Now, evenly distribute the seeds across the surface of your prepared growing medium within the tray. Avoid overcrowding; a sparse distribution ensures each seed has enough space to grow and receive adequate light. Gently press the seeds into the soil to promote good contact, but do not bury them deeply. Proper seed preparation is crucial for kickstarting the growth process, which in turn leads to a good harvest.
Sowing and Watering
After sowing, gently mist the seeds with water, ensuring the growing medium is lightly moistened but not saturated. Overwatering can lead to mold and rot, so maintain a careful balance. Cover the tray with a lid or plastic wrap to maintain humidity, as chia seeds thrive in humid conditions. Place the tray in a location that receives indirect sunlight or under a grow light. Check the seeds daily and mist them as needed to keep the soil consistently moist. During this stage, patience is key. You can expect to see tiny sprouts emerge within a few days, signaling the start of your microgreen adventure. Consistent moisture and appropriate lighting are critical for successful germination.
Light and Airflow
Once the seeds have germinated, remove the cover and move the tray to a location that receives adequate sunlight, which will accelerate the growth of your microgreens. Ensure your balcony provides sufficient light exposure, or supplement with grow lights. Adequate airflow is vital to prevent mold and fungal diseases. Ensure good ventilation in the growing area. Microgreens need air to breathe, and airflow also helps dry any excess moisture from the surface. In the absence of enough airflow, the chances of mold formation increase, which can ruin your entire harvest. Proper light and airflow create the best environment for your microgreens.
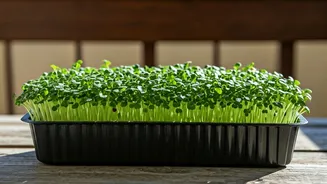
Ongoing Care and Harvest
Water your chia microgreens regularly, but avoid overwatering. Monitor the soil moisture by inserting your finger into the medium. The soil should be consistently moist, not soggy. The microgreens are ready to harvest when they have developed their first set of true leaves, which usually happens around 1-2 weeks after sowing. Using clean scissors, snip the greens just above the soil line. Harvest them as needed for immediate use, or store them in a refrigerator for a few days. Regularly cleaning your trays after each harvest keeps the process clean, which helps in getting the best quality microgreens.
Uses and Benefits
Chia seed microgreens are a nutritional powerhouse. They are packed with vitamins, minerals, antioxidants, and essential fatty acids. Add them to salads, smoothies, sandwiches, or use them as a garnish for extra flavor and nutrients. Including them in your diet can improve gut health, provide glowing skin, and boost your overall well-being. These microgreens are easy to incorporate into your daily meals, providing a quick and effective way to elevate your nutritional intake. Regular consumption can have remarkable health benefits.