
Choosing the Seeds
The journey to a bountiful bottle gourd harvest starts with selecting the right seeds. Opt for seeds that are fresh and of good quality, ideally sourced
from a reputable garden center or a trusted online retailer. Consider the variety of bottle gourd you want to grow; some are long and slender, while others are rounder. The best time to sow the seeds is when the weather is warm and settled, usually during spring or early summer. Soak the seeds in water for approximately 24 hours before planting. This process, which softens the seed coat, encourages faster germination. This pre-soaking is an important first step because it can significantly influence the success of your efforts. Ensure the seeds are from a trusted source to maximize your chances of a productive crop.
Preparing the Soil
Bottle gourds thrive in well-draining soil that is rich in organic matter. For your balcony garden, the best approach is to use a potting mix that’s specially formulated for vegetables, available at any gardening store. Prepare your pots or containers, making sure they have adequate drainage holes to prevent waterlogging. Mix the potting mix with compost or well-rotted manure to enhance its fertility. Bottle gourds prefer a slightly acidic to neutral soil pH (6.0 to 7.0). Before planting, lightly water the soil to ensure it is moist but not overly saturated. Ensuring these soil conditions is critical because it creates the foundation for healthy root development and consequently, robust plant growth. This is a very important point to consider to ensure success.
Sowing and Planting
Once your seeds are ready, and your soil is prepared, it's time to sow. Plant the seeds directly into the soil, one or two seeds per pot or container. Sow the seeds about 1 inch deep. After sowing, cover the seeds lightly with soil and gently water them. Be careful not to disturb the seeds. Position your pots in a location on your balcony where they receive at least 6 hours of direct sunlight per day. Sunlight is essential for the process of photosynthesis, fueling the plant's growth. After planting, maintain consistent soil moisture, but avoid overwatering, which can lead to fungal diseases. Monitoring the soil moisture and sunlight exposure are major factors to determine your success at this phase of the process.
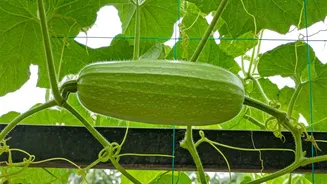
Watering and Support
Consistent watering is crucial for bottle gourd plants, especially during the growing and fruiting stages. Water your plants deeply, but less frequently, allowing the soil to dry slightly between waterings. Avoid wetting the leaves, as this can promote fungal diseases. Bottle gourd vines are climbers, so providing support is essential. Use a trellis, a sturdy bamboo structure, or even a netting system to allow the vines to climb upwards. This not only supports the plant but also promotes better air circulation, which can help prevent diseases. Proper support also makes harvesting easier. Regular watering and appropriate structural support are critical for the healthy development of these fast-growing vines. These actions are important.
Care and Harvesting
Bottle gourd plants benefit from regular feeding. You can feed the plants with a balanced liquid fertilizer every two to three weeks, following the instructions on the product label. Monitor your plants for pests and diseases. Common issues include aphids and powdery mildew. Address any problems promptly with organic pest control methods, such as neem oil or insecticidal soap. Bottle gourds are typically ready to harvest about 50–60 days after planting. The gourds are usually harvested when they reach the desired size and the skin is still tender and easy to pierce with a fingernail. Gently cut the gourds from the vine, leaving a small portion of the stem attached. Enjoy your fresh, homegrown lauki! These simple steps will help you enjoy the harvest from your balcony.