Learn to craft the perfect Indian samosa from scratch! Master dough making, flavorful fillings, and expert frying techniques. Read more for a culinary adventure!
Namaste, food lovers! Are you craving that
crispy, golden, and oh-so-delicious Indian snack that's perfect with a cup of chai? Yes, we're talking about the beloved samosa!
Making samosas at home might seem daunting, but trust us, with this step-by-step guide, you'll be frying up a perfect batch in no time. We'll break down each stage, from preparing the dough to creating the flavorful filling, and even teach you the art of folding the perfect samosa shape.
So, grab your aprons, and let's get started on this culinary adventure!
Part 1: Crafting the Perfect Samosa Dough
The foundation of any good samosa is its crispy, flaky crust. And that starts with the dough.
You'll need simple ingredients: all-purpose flour (maida), a pinch of salt, ajwain (carom seeds) for that characteristic flavor, oil for shortening, and water for binding. In a large bowl, mix the flour, salt, and ajwain.
Now, add the oil and rub it into the flour with your fingertips until the mixture resembles breadcrumbs. This step is crucial for creating a flaky crust. The fat coats the flour particles, preventing gluten development and resulting in a tender dough.
Next, gradually add water, a little at a time, and knead the mixture into a firm but pliable dough. Don't over-knead! A stiff dough is what we want for that signature crispness. Cover the dough with a damp cloth and let it rest for at least 30 minutes.
This allows the gluten to relax, making the dough easier to roll out later. Resting also improves the texture of the final product.
While the dough is resting, let's move on to the heart of the samosa – the filling.
Aloo (potato) filling is a classic, but you can experiment with other vegetables like peas, carrots, or even paneer (Indian cheese). The key is to create a flavorful and well-seasoned filling that complements the crispy crust.
For the aloo filling, you'll need boiled and mashed potatoes, green peas (fresh or frozen), ginger-garlic paste, green chilies (adjust to your spice level), and a medley of spices like coriander powder, cumin powder, turmeric powder, red chili powder (again, adjust to taste), amchur (dry mango powder) for tanginess, and garam masala for that aromatic touch.
Heat a little oil in a pan. Add the ginger-garlic paste and green chilies, and sauté for a minute until fragrant. Be careful not to burn them! Now, add the spices – coriander powder, cumin powder, turmeric powder, and red chili powder – and sauté for another minute.
This allows the spices to bloom and release their flavors. Add the mashed potatoes and green peas to the pan. Mix well, ensuring that the spices are evenly distributed. Add salt, amchur, and garam masala.
Mix again and cook for a few minutes, stirring occasionally, until the filling is heated through. Taste and adjust the seasoning as needed. The filling should be flavorful, slightly tangy, and perfectly spiced. Set the filling aside to cool completely before using it to fill the samosas.
Part 2: Assembling and Frying the Samosas
Now comes the fun part – assembling the samosas! Divide the rested dough into small, equal-sized balls. Roll out each ball into a thin, oval shape. Cut the oval in half along its length. Take one half and apply a little water along the straight edge.
This will act as a glue to seal the samosa. Bring the two straight edges together to form a cone shape. Press the edges firmly to seal, ensuring there are no gaps. Now, fill the cone with a generous spoonful of the cooled potato filling. Don't overfill it, or it will be difficult to seal.
Seal the top edge of the samosa by pressing the edges together tightly. You can also create a decorative pleat along the top edge for a more professional look. Repeat this process with the remaining dough and filling. Heat oil in a deep frying pan or kadai over medium heat.
The oil should be hot enough to fry the samosas to a golden brown, but not so hot that they burn quickly. Gently slide the samosas into the hot oil, a few at a time. Avoid overcrowding the pan, as this will lower the oil temperature and result in soggy samosas.
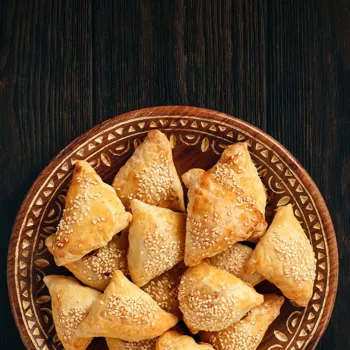
Fry the samosas until they are golden brown and crispy on all sides, turning them occasionally to ensure even cooking. This should take about 8-10 minutes. Remove the samosas from the oil and place them on a wire rack lined with paper towels to drain excess oil.
Serve the hot and crispy samosas with your favorite chutney – mint-coriander chutney, tamarind chutney, or even tomato ketchup. A cup of hot chai is the perfect accompaniment to complete the snack experience.
With a little practice, you'll be making perfect samosas that are sure to impress your family and friends. Don't be afraid to experiment with different fillings and spice levels to create your own signature samosa.
Tips for Samosa Success
Dough Consistency
The dough should be firm and not sticky. If it's too sticky, add a little more flour. If it's too dry, add a little more water.
Filling Cool Down
Always let the filling cool completely before filling the samosas. Hot filling can make the dough soggy.
Sealing the Samosas
Make sure to seal the edges of the samosas tightly to prevent the filling from leaking out during frying.
Oil Temperature
Maintain the oil temperature at medium heat for even cooking and crispy samosas.
Don't Overcrowd
Avoid overcrowding the pan while frying to maintain the oil temperature.
Storage
You can store uncooked samosas in the freezer for up to a month. When ready to fry, thaw them slightly and then fry as usual.
Comprehensive guide to making perfect Indian samosa
So there you have it – a comprehensive guide to making the perfect Indian samosa. Enjoy the process, experiment with flavors, and most importantly, savor the delicious results! Happy cooking!