Discover the art of making Indian flatbreads in your kitchen! Learn the secrets to perfect roti, paratha, and naan. Don't miss out on becoming a pro at flatbreads!
Namaste, food lovers! Are you craving
the warm, comforting taste of homemade Indian flatbreads? Whether it's roti, paratha, or naan, these breads are a staple in Indian cuisine, and guess what? Making them at home is easier than you think!
Forget ordering in; with this comprehensive guide, you'll be whipping up delicious flatbreads in your own kitchen in no time. So, grab your rolling pin, get ready to knead, and let's embark on this culinary journey together!
We will cover everything from the basic ingredients to helpful tips and tricks to achieve that perfect, soft, and fluffy flatbread every single time. Get ready to impress your family and friends with your newfound skills!
Master flatbread essentials for delicious results at home
First, let's delve into the essentials: the ingredients. This is where your flatbread journey begins. For the most common flatbread, roti, you'll only need three things: whole wheat flour (atta), water, and a pinch of salt. That's it! However, the quality of your ingredients matters.
Opt for high-quality atta for the best results. The type of water you use can also have an impact. Filtered water is always a good choice. Now, let's talk about other flatbreads. For paratha, you'll need the same ingredients as roti, plus ghee or oil for layering and frying.
Naan, which is traditionally cooked in a tandoor oven, requires all-purpose flour (maida), yeast, sugar, salt, milk, yogurt, and oil. Don't be intimidated by the longer ingredient list for naan; the process is still manageable at home.
The secret to many good Indian dishes and flatbreads, is to take it with love, and patience to knead. This article is going to make you a pro at flatbreads in a few days and you are going to be loved for it.
Kneading dough: essential for perfect roti, paratha, and naan
Now that you've gathered your ingredients, it's time for the most crucial step: kneading the dough. This is where the magic happens! For roti, start by mixing the atta and salt in a large bowl. Gradually add water, a little at a time, while mixing with your hands.
The goal is to form a soft, pliable dough that is not sticky. Once the dough comes together, knead it for at least 8-10 minutes. This develops the gluten, which gives the roti its elasticity and prevents it from becoming tough. For paratha dough, follow the same procedure as roti.
For naan dough, combine the flour, yeast, sugar, and salt in a bowl. Add milk, yogurt, and oil, and mix well. Knead the dough for 8-10 minutes until it is smooth and elastic. Cover the dough and let it rise in a warm place for about 1-2 hours, or until doubled in size.
This step is crucial for naan's signature fluffy texture. The more you knead, the better the texture. If you think you’ve done enough, do it for another 5 minutes. Don’t be afraid to use some elbow grease. Do not also be afraid to knead it for upto 40 minutes, its no harm.
Rolling out dough for flatbreads takes practice and patience
Once your dough is ready, it's time to roll it out! This is where practice makes perfect. For roti and paratha, divide the dough into small, equal-sized balls. On a lightly floured surface, roll each ball into a thin, circular disc. For roti, aim for a thickness of about 1-2 mm.
For paratha, you can roll it out slightly thicker. If you're making naan, punch down the risen dough and divide it into equal portions. Roll each portion into an oval or teardrop shape, about 1/4 inch thick.
To prevent the dough from sticking, use a light dusting of flour on the rolling surface and the rolling pin. Remember, patience is key! If the dough is resisting or shrinking back, let it rest for a few minutes before rolling it out again.
This allows the gluten to relax and makes it easier to work with. Don’t get disheartened if the shape isn’t perfect during first few days, eventually one does get better. With regular practice, your flatbreads will start looking great over time.
Keep practicing and experimenting with different shapes and sizes.
Cook flatbreads: roti puffs, paratha crispy, naan browns
Now comes the fun part: cooking the flatbreads! For roti, heat a flat griddle or tawa over medium-high heat. Place the rolled-out roti on the hot tawa and cook for about 30 seconds on each side, or until small bubbles start to appear. Flip the roti and cook for another 30 seconds.
Now, using a clean kitchen towel or tongs, gently press down on the roti to encourage it to puff up. This is what makes roti soft and fluffy. For paratha, heat a tawa over medium heat. Place the rolled-out paratha on the tawa and cook for about 1 minute on each side.
Drizzle a little ghee or oil around the edges and cook until golden brown and crispy. For naan, you can cook it on a tawa or under a broiler in your oven. If using a tawa, heat it over medium-high heat.
Place the naan on the tawa and cook for about 1-2 minutes on each side, or until lightly browned. If using a broiler, preheat it to high. Place the naan on a baking sheet and broil for about 1-2 minutes per side, or until golden brown and bubbly.
It's important to keep an eye on the flatbreads while they're cooking to prevent them from burning. Adjust the heat as needed.
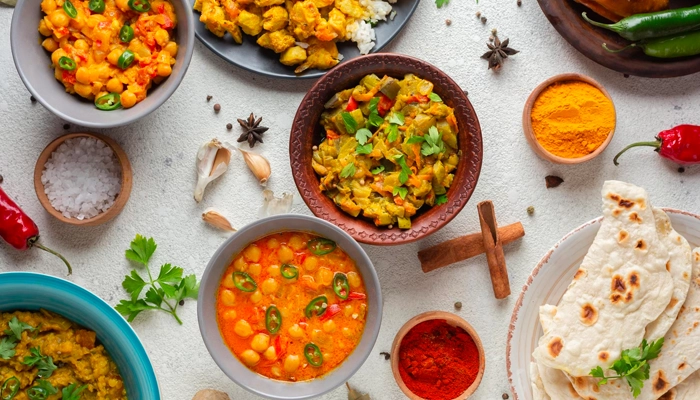
Serve hot, enjoy with Indian dishes, store for later
Once your flatbreads are cooked, it's time to serve and enjoy! Roti is best served hot and fresh, ideally with your favorite Indian dishes like dal, vegetables, or curries. You can also spread a little ghee or butter on top for extra flavor.
Paratha is also delicious served hot with dal, yogurt, or chutney. It can also be enjoyed as a standalone snack or breakfast. Naan is perfect for scooping up curries, soups, or stews. It's also a great accompaniment to tandoori dishes.
Store leftover flatbreads in an airtight container at room temperature for up to 2 days. You can reheat them on a tawa or in the microwave. For longer storage, you can freeze them in a freezer-safe bag.
To reheat frozen flatbreads, simply thaw them at room temperature and then reheat on a tawa or in the microwave. No matter how you choose to serve them, homemade Indian flatbreads are sure to be a hit with your family and friends. Enjoy the fruits of your labor!
Don’t forget to share photos of your flatbreads!
Guide to making delicious Indian flatbreads at home
So there you have it! A comprehensive guide to making Indian flatbreads at home. With a little patience and practice, you'll be able to whip up delicious, soft, and fluffy flatbreads that rival those from your favorite Indian restaurant. Remember, the most important ingredient is love!
And don't be afraid to experiment with different flours, seasonings, and fillings to create your own unique flatbread creations. Happy cooking! Now go forth and create some delicious flatbreads of your own! You will not regret it.
Experiment with different flour types, such as millet or sorghum flour, to add a unique flavour to your flatbreads. The possibilities are endless.
AI Generated Content. Glance/InMobi shall have no liability for the content