
Discover the art of making perfect paneer at home with our step-by-step guide. Dive into the world of Indian cheese!
Paneer, that milky-white, versatile cheese, is a staple in Indian cuisine. From matar
paneer to palak paneer, and even paneer tikka, this ingredient lends itself beautifully to a variety of dishes. But have you ever considered making paneer at home?
It's surprisingly simple, and the taste of fresh, homemade paneer is unmatched. This guide will take you through the process, step-by-step, ensuring you create the perfect paneer every time. Forget the store-bought versions; get ready to impress your family and friends with your culinary skills!
Make paneer at home with milk and acidic agent
First things first, you need the right ingredients. This recipe is all about simplicity, so you'll only need two things: full-cream milk and an acidic agent. Full-cream milk is crucial because the fat content is what gives paneer its rich, creamy texture. Skimmed milk just won't cut it.
For the acidic agent, you have a few options: lemon juice, vinegar, or even yogurt. Lemon juice is a popular choice because it imparts a subtle flavor, while vinegar is more readily available in most households. Yogurt will give the paneer a slight tang, which some people prefer.
The choice is yours! When it comes to quantities, you'll generally need about one tablespoon of lemon juice or vinegar for every liter of milk. Remember, this is just a guideline; you might need to adjust the amount depending on the acidity of your chosen agent.
Always start with less and add more as needed. Now, let's talk equipment. You don't need fancy tools for this recipe. A large, heavy-bottomed pot is essential to prevent the milk from scorching. A muslin cloth (also known as cheesecloth) is necessary for straining the paneer.
If you don't have muslin cloth, a clean cotton kitchen towel will work in a pinch. You'll also need a strainer or colander to hold the muslin cloth, and a heavy object to press the paneer. This could be anything from a stack of books to a heavy pan filled with water.
Heat milk, add acidic agent, curdle, separate curds from whey for paneer
The first step in the paneer-making process is to heat the milk. Pour the milk into your heavy-bottomed pot and place it over medium heat. Keep a close eye on the milk, stirring occasionally to prevent it from sticking to the bottom. You want to bring the milk to a gentle boil.
Watch carefully as the milk rises; as soon as it starts to boil, reduce the heat to low. This is crucial because boiling the milk too vigorously can result in tough, rubbery paneer. Once the milk is simmering gently, it's time to add the acidic agent.
If you're using lemon juice, strain it first to remove any seeds or pulp. Slowly pour the lemon juice (or vinegar or yogurt) into the milk, stirring gently. As you add the acidic agent, you'll notice the milk starting to curdle. This is exactly what you want!
Continue stirring gently as the curds separate from the whey (the watery liquid). The amount of time this takes will vary depending on the acidity of your agent and the temperature of the milk.
If the milk isn't curdling properly, you can add a little more lemon juice or vinegar, a teaspoon at a time. Be patient! It may take a few minutes for the curds to fully separate. You'll know it's ready when the whey is a clear, yellowish color and the curds are distinct and floating in the liquid.
Strain curds with muslin cloth, rinse paneer for perfect texture
Once the curds have separated completely, it's time to strain them. Line your strainer or colander with the muslin cloth, making sure the cloth is large enough to cover the curds completely. Carefully pour the curdled milk into the lined strainer.

The whey will drain through the muslin cloth, leaving the curds behind. Once all the whey has drained, gather the edges of the muslin cloth together to form a bundle. Gently twist the bundle to squeeze out any remaining whey. The more whey you remove, the firmer your paneer will be.
Be careful not to squeeze too hard, as this can make the paneer dry. Now, it's time to rinse the paneer. This step is important because it removes any residual flavor from the acidic agent. Gently untie the muslin cloth and pour cold water over the paneer, rinsing it thoroughly.
Retie the cloth and gently squeeze out any excess water. This step will also help to cool the paneer down quickly.
The perfect paneer starts with choosing the correct ingredient, you will need to be able to make sure that the ingredient is top notch and you would be able to deliver a great quality final product.
Press paneer to desired firmness for versatile use in dishes
Now comes the crucial step of pressing the paneer. This is what gives it its firm, consistent texture. Place the bundle of paneer on a flat surface. Put a heavy object on top of the bundle. The weight will press the paneer, removing any remaining whey and solidifying it into a block.
The amount of time you press the paneer for will determine its firmness. For a softer paneer, press it for about 30 minutes. For a firmer paneer, press it for an hour or longer. You can even press it overnight in the refrigerator for a very firm paneer.
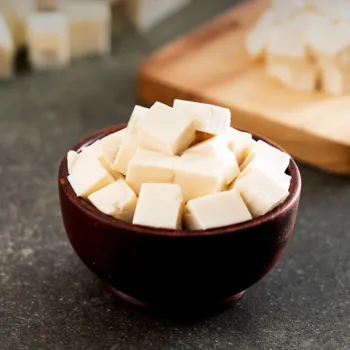
Keep an eye on the paneer while it's being pressed. If you notice any whey seeping out, you can dab it away with a paper towel. Once the paneer has been pressed to your desired firmness, remove it from the muslin cloth. You'll now have a beautiful, firm block of homemade paneer.
This paneer can be used in variety of dishes and cuisines. You can also make a lot of fried items made of this paneer itself. Now that you are equipped you can start making dishes made of paneer and explore so many possiblities yourself.
And of course, everyone is unique, experiment to find what works best for you.
Homemade paneer: versatile in dishes, store refrigerated or freeze
Congratulations! You've successfully made paneer at home. Now comes the best part: using it in your favorite dishes. Homemade paneer is incredibly versatile. You can cube it and add it to curries like matar paneer or palak paneer. You can crumble it and use it as a filling for parathas or samosas.
You can grill it and make paneer tikka. The possibilities are endless! When storing your homemade paneer, it's important to keep it refrigerated and submerged in water. This will prevent it from drying out and keep it fresh for up to a week. Change the water every day to maintain its quality.
If you're not planning on using the paneer within a week, you can also freeze it. Wrap it tightly in plastic wrap and store it in the freezer for up to two months. When you're ready to use it, thaw it in the refrigerator overnight.
While frozen paneer may not have exactly the same texture as fresh paneer, it's still perfectly delicious in cooked dishes. Making paneer at home is a rewarding experience. It's simple, economical, and allows you to control the quality and texture of your paneer.
So, ditch the store-bought stuff and give it a try! You might just discover your new favorite kitchen skill. With a little practice, you'll be making perfect paneer every time. Happy cooking! And it's so good to make with your own hands.
Making perfect paneer is a journey, not a destination
Finally, remember that making perfect paneer is a journey, not a destination. Don't be discouraged if your first attempt isn't perfect. Experiment with different types of milk, acidic agents, and pressing times to find what works best for you.

Pay attention to the details, like the temperature of the milk and the amount of acidic agent you use. And most importantly, have fun! Cooking should be enjoyable, and making your own paneer is a great way to connect with your food and your culture.
So, put on some music, gather your ingredients, and get ready to create some culinary magic! Whether you're a seasoned cook or a beginner, this guide will empower you to make your own perfect paneer.
This soft cheese is a staple in many Indian dishes, and making it at home is a simple and rewarding experience. You'll not only save money, but you'll also have the satisfaction of knowing exactly what goes into your food.
With this step-by-step guide, you'll be enjoying fresh, homemade paneer in no time!
AI Generated Content. Glance/InMobi shall have no liability for the content