Discover the art of crafting perfect homemade paneer: a culinary journey awaits! Learn the secrets to creating this versatile cheese
Paneer, the quintessential Indian cheese, is a staple in vegetarian households
across the country. Whether it's simmering in a rich, creamy butter masala or adding protein to a vibrant palak paneer, this versatile ingredient is a culinary chameleon.
While readily available in stores, the satisfaction of crafting your own paneer at home is unparalleled. Not only can you control the quality and freshness, but you can also customize it to your preferred texture and taste.
Forget store-bought versions; with a little know-how, you can easily make fresh, soft, and delicious paneer right in your very own kitchen. So, chuck that packaged paneer aside and get ready to embark on a delicious journey of homemade paneer perfection!
Let's unlock the secrets to making this delightful cheese.
Homemade paneer: simple beauty in milk and acid
The beauty of homemade paneer lies in its simplicity. It needs just two ingredients: milk and an acid. Full-cream milk is the key to a rich and creamy paneer. Avoid using toned or skimmed milk, as they won't yield enough solids. The acid helps to separate the milk solids from the whey.
Common options include lemon juice, vinegar (white or apple cider), or even yogurt. The choice of acid can subtly influence the flavor of the paneer. Lemon juice imparts a slightly citrusy tang, while vinegar offers a more neutral profile. Experiment to find your personal favorite.
Equip yourself with a large, heavy-bottomed pot, a muslin cloth or cheesecloth, and a colander. With these simple tools and ingredients, you're well on your way to becoming a paneer-making pro. Remember, fresh is best, and the taste of homemade paneer is an experience you won't forget.
Heat milk slowly, add acid gradually for perfect paneer
The process begins with heating the milk in your heavy-bottomed pot. It's crucial to heat the milk slowly and evenly to prevent scorching at the bottom. Stir it frequently to ensure the heat is distributed uniformly. Once the milk comes to a boil, reduce the heat to a simmer.
This prevents the milk from boiling over and making a mess. Now, add the chosen acid gradually, a tablespoon at a time, while gently stirring. You'll notice the milk starting to curdle; the solids will begin to separate from the whey, forming clumps.
Continue adding the acid until the whey turns a clear, yellowish-green color. This indicates that the separation process is complete. Avoid adding too much acid, as it can make the paneer tough and rubbery. Patience is key here. Once properly curdled, take it off the heat and let it cool down.
Gently drain whey to achieve perfect paneer texture
Next, gently pour the curdled mixture into the muslin cloth-lined colander. The muslin cloth will act as a filter, allowing the whey to drain away while retaining the paneer solids. Gather the edges of the cloth to form a bundle, squeezing gently to remove excess whey.
This step is crucial for achieving the desired paneer texture. The more whey you remove, the firmer the paneer will be. For a softer paneer, squeeze less. For a firmer paneer, squeeze more. Once you've squeezed out as much whey as possible, tie the bundle tightly.
Think of it as giving your paneer a gentle hug, not a wrestling match. It's important to be gentle in the squeezing process not to crumble the paneer. The aim is to remove whey and not ruin the paneer texture.
Shape and set paneer with weight for desired firmness, then store
Now comes the shaping and setting the paneer. Place the bundle on a flat surface and place a heavy object on top of it. This pressing process helps to further remove whey and gives the paneer a firm, compact shape. A stack of books, a heavy pan, or even a mortar and pestle will do the trick.
The duration of pressing depends on the desired firmness. For a softer paneer, press for about 30 minutes. For a firmer paneer, press for an hour or more. Once the pressing is complete, carefully unwrap the paneer from the muslin cloth. You'll be greeted with a smooth, firm block of fresh paneer.
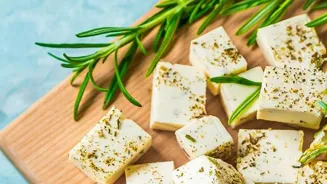
Cut it into your desired shapes and sizes, and it's ready to be used in your favorite recipes. You can store this delicious homemade paneer in the fridge for up to three days.
Homemade paneer elevates Indian cuisine with endless possibilities
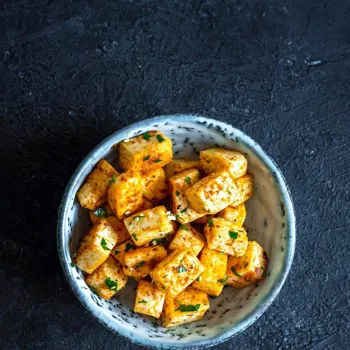
Homemade paneer opens up a world of culinary possibilities. Use it in classic Indian dishes like paneer butter masala, palak paneer, shahi paneer, or paneer tikka masala. Explore regional variations like paneer bhurji (scrambled paneer) or matar paneer (paneer with peas).
Don't limit yourself to traditional recipes; paneer can also be a fantastic addition to salads, sandwiches, and wraps. Marinate paneer cubes in spices and grill them for a healthy and flavorful snack. Crumble paneer over pasta or add it to vegetable stir-fries for a protein boost.
The possibilities are endless! Experiment with different flavors and techniques to discover your own signature paneer creations. Enjoy the satisfaction of knowing you've created something delicious and wholesome from scratch.
Now that you can make and enjoy the deliciousness of this fresh, homemade paneer.
AI Generated Content. Glance/InMobi shall have no liability for the content