


Discover the art of making homemade paneer! Easy steps to create this versatile ingredient. Read on for a culinary adventure!
Paneer, that soft, milky cheese, is a staple in many Indian households. Whether
it's saag paneer, paneer butter masala, or a simple paneer tikka, this versatile ingredient adds a creamy richness to any dish.
While you can easily buy paneer from the store, making it at home is surprisingly simple and guarantees a fresh, delicious product. Plus, you know exactly what's going into your paneer, avoiding any unwanted additives or preservatives.
This article will guide you through an easy-to-follow recipe for making perfect, restaurant-quality paneer right in your own kitchen. So, ditch the store-bought stuff and let’s get started on this culinary adventure!
Get ready to impress your family and friends with your newfound paneer-making skills.
Homemade paneer: simple recipe with milk and acid for customization
The beauty of homemade paneer lies in its simplicity. You only need two ingredients: milk and an acid like lemon juice or vinegar. Full-fat milk is essential for a rich, creamy paneer; skim milk will result in a drier, less flavorful product.
The acid helps to curdle the milk, separating the solids (paneer) from the whey (the watery liquid). The process is straightforward, but attention to detail is key to achieving the perfect texture.
Making paneer at home not only allows you to control the ingredients but also gives you the satisfaction of creating something from scratch. It's a great way to connect with your food and appreciate the process of transforming simple ingredients into something delicious.
And the best part is, once you’ve mastered the technique, you can customize it with different flavors and herbs to create your own signature paneer. Imagine adding some chili flakes for a spicy kick, or fresh herbs like coriander or mint for a refreshing twist. The possibilities are endless!
Gather ingredients, prep workspace, drain paneer with cheesecloth-lined colander
First, gather your ingredients and equipment. You'll need 1 gallon (approximately 4 liters) of full-fat milk, ½ cup of lemon juice (or vinegar), a large pot with a heavy bottom (to prevent scorching), a cheesecloth-lined colander, and a large bowl.
Prepare a clean workspace and ensure all your utensils are clean and dry. This will help to prevent any contamination and ensure the best possible result. Before you start heating the milk, line a colander with a double layer of cheesecloth.
Make sure the cheesecloth is large enough to hang over the sides of the colander. Place the colander over a large bowl to collect the whey. This setup is crucial for draining the paneer properly.
Heat milk, add lemon juice, curdle milk to make cheese
Now, pour the milk into the large pot and heat it over medium heat, stirring occasionally to prevent it from sticking to the bottom. Keep a close eye on the milk as it heats up, and be careful not to let it boil over.
Once the milk reaches a simmer, reduce the heat to low and slowly add the lemon juice (or vinegar) while stirring gently. You'll notice the milk starting to curdle, separating into solid curds and a watery, yellowish liquid (whey).
Continue stirring gently until the whey looks clear and the curds have completely separated. If the milk doesn't curdle completely, add a little more lemon juice (or vinegar) until the separation occurs.
Strain curdled milk through cheesecloth to make firm paneer
Once the milk has curdled and the whey is clear, carefully pour the mixture into the cheesecloth-lined colander. The cheesecloth will catch the paneer curds while allowing the whey to drain into the bowl below.
Once all the mixture has been poured into the colander, gently gather the edges of the cheesecloth and twist it to form a tight bundle, squeezing out excess whey. This step is important for removing as much moisture as possible from the paneer, resulting in a firmer texture.
Be careful not to squeeze too hard, as this can make the paneer dry and crumbly.
Press paneer with heavy object, cut, store for use
Finally, place a heavy object (like a stack of books or a heavy pot) on top of the bundle to press the paneer and remove even more moisture. The longer you press the paneer, the firmer it will become. For a softer paneer, press for about 30 minutes; for a firmer paneer, press for 1-2 hours.
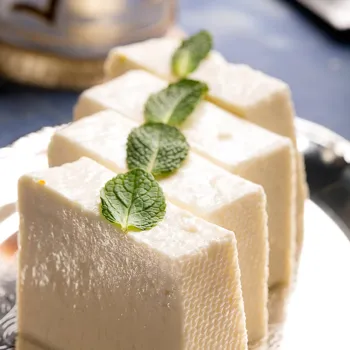
Once the paneer has been pressed to your desired consistency, remove it from the cheesecloth and cut it into cubes or slices. Your fresh, homemade paneer is now ready to use in your favorite recipes. Store the paneer in an airtight container in the refrigerator for up to 3-4 days.
Homemade paneer is versatile for various dishes, snacks, and fillings
Homemade paneer is not only delicious but also incredibly versatile. Use it in classic Indian dishes like palak paneer, shahi paneer, or matar paneer. You can also grill or bake it for a healthy snack or appetizer. Paneer can even be crumbled and used as a filling for sandwiches or wraps.
When cooking with paneer, be gentle, as it can sometimes crumble easily. Adding paneer to your diet is a great way to increase your protein intake and enjoy a satisfying and flavorful meal.
Experiment with different recipes and cooking methods to discover your favorite ways to use this versatile ingredient. Enjoy the satisfaction of creating your own homemade paneer and savor the delicious flavors it brings to your dishes. And remember, practice makes perfect!
The more you make paneer at home, the better you'll become at it.