Delve into the art of making authentic Indian roti at home, from kneading to cooking, with helpful tips for perfect results! Embark on this culinary journey and master the basics of roti making. Your kitchen
awaits!
For many Indians, roti is more than just food; it's a daily staple, a comfort, and a connection to home. But for many, especially those living away from family or new to cooking, making perfect roti can seem like a daunting task. Fear not!
This guide breaks down the roti-making process, step-by-step, ensuring you can create soft, fluffy, and utterly satisfying roti in your own kitchen. Let's embark on this culinary journey and master the art of roti making!
The key to perfect roti lies in kneading the dough correctly
The heart of any good roti lies in the dough. The ingredients are simple: whole wheat flour (atta), water, and a touch of oil or ghee. The quality of your atta matters, so opt for a well-known brand or one that's freshly ground if possible. Start by taking two cups of atta in a large bowl.
Add a teaspoon of oil or ghee – this helps make the roti softer. Now, gradually add warm water, mixing with your hand or a spoon. Don't pour all the water at once; add it little by little, mixing until the dough starts to come together. The key is to knead, knead, knead!
Kneading develops the gluten in the flour, which is what gives the roti its elasticity and prevents it from becoming too hard. Continue kneading for at least 8-10 minutes until the dough is smooth, soft, and pliable. It should be slightly sticky but not sticking to your hands.
Once kneaded, cover the dough with a damp cloth and let it rest for at least 30 minutes. This resting period allows the gluten to relax, resulting in softer roti. Many make simple mistakes at this stage. Do not add too much water in the first go and do not be impatient, kneading will take time.
Shape roti with rested dough, roll evenly for perfect circles
With the dough properly rested, it's time to shape the roti. Gently punch down the dough and knead it for another minute or two. Divide the dough into small, equal-sized portions. The size depends on how big you want your roti to be. Roll each portion into a smooth ball.
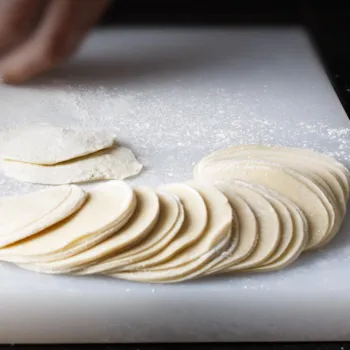
Now, take one ball and flatten it slightly between your palms. Dip it in dry atta, coating it evenly. This will prevent the roti from sticking to the rolling surface.
Place the dough on a clean, flat surface (a rolling board or your kitchen counter will do) and use a rolling pin to gently roll it out into a circular shape. Aim for a thin and even circle, but don't worry if it's not perfectly round; practice makes perfect!
To prevent sticking, occasionally dust the roti and the rolling surface with dry atta. If the roti tears while rolling, it means the dough hasn't rested enough, or you're applying too much pressure. Don’t be afraid if you don’t get it right at the first go.
The process needs to be done seamlessly for you to get a perfect roti. Try to give it equal pressure and evenly roll it out.
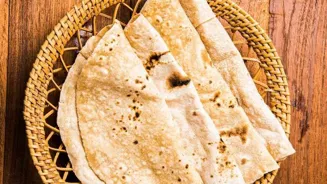
Cook roti on tava, puff up evenly, char over flame for flavor
Now comes the crucial step: cooking the roti. Heat a flat griddle or tava over medium-high heat. Make sure the tava is hot before you place the roti on it. Gently place the rolled-out roti on the hot tava. Let it cook for about 20-30 seconds, or until small bubbles start to appear on the surface.
Flip the roti and cook for another 20-30 seconds on the other side. Now, using a clean cloth or a roti press, gently press down on the roti around the edges. This helps it puff up evenly. Flip the roti again and press down firmly until it starts to puff up like a balloon.
If you have a gas stove, you can carefully place the puffed-up roti directly over the flame for a few seconds on each side. This will give it a slightly charred and smoky flavor. Be careful not to burn it!
If you're using an electric stove, you can skip this step and simply cook the roti on the tava until it's golden brown and cooked through. This step needs to be done carefully, or else the roti will not be cooked well.
Be very careful when placing the roti with bare hands, always use a cloth or roti press.
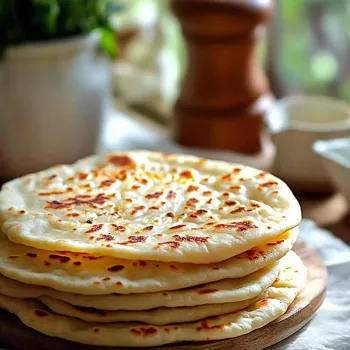
To keep roti soft: cook lightly, add ghee, stack with cloth
The secret to soft roti lies in a few simple techniques. First, don't overcook the roti on the tava. Overcooked roti becomes dry and hard. Cook it just until it's lightly golden brown and puffed up. Second, immediately after removing the roti from the tava, brush it with ghee or butter.
This adds moisture and flavor, keeping the roti soft and pliable. Finally, stack the cooked roti in a roti basket or a container lined with a clean cloth. This traps the steam and prevents the roti from drying out. Many people make the mistake of stacking the roti without butter or ghee.
The second mistake that people make is overcooking the roti. The key is not to overcook the roti. Try to make the roti quickly!
Roti is versatile with various accompaniments; try unique fillings and spices for flavor
Roti is incredibly versatile and can be enjoyed with a variety of accompaniments. It's a perfect partner for dal (lentil soup), sabzi (vegetable curry), raita (yogurt dip), or even just a dollop of butter and a sprinkle of sugar.
You can also use roti to make delicious wraps or rolls by filling them with your favorite ingredients. Experiment with different fillings like paneer (Indian cheese), chicken tikka, or even leftover sabzi. You can also add different spices to the dough itself!
A pinch of ajwain (carom seeds) or kasuri methi (dried fenugreek leaves) can add a unique flavor to your roti. Consider experimenting with different doughs as well. You can try adding a little bit of besan (gram flour) or sooji (semolina) to the atta for a different texture.
Master roti making for tasty results and shared joy
Mastering roti making takes time and practice, so don't get discouraged if your first few attempts aren't perfect. The beauty of roti lies in its simplicity and the joy of creating something from scratch.
With a little patience and these helpful tips, you'll be making soft, fluffy, and delicious roti in no time. So, get into your kitchen, gather your ingredients, and start rolling! The aroma of freshly cooked roti will fill your home, bringing with it the warmth and comfort of Indian cuisine.
And remember, even imperfect roti is still delicious, especially when shared with loved ones. Happy cooking! Your family and friends will appreciate you for this skill! Remember that the joy of cooking is sharing with others.