Discover the art of making homemade paneer, a delightful cheese for Indian dishes. Learn the simple steps to create this wholesome delight!
Paneer, that delightful, milky-white cheese that graces countless
Indian dishes, is surprisingly simple to make at home. Forget grabbing expensive store-bought paneer; with just a few ingredients and a little patience, you can whip up a fresh, soft batch right in your own kitchen.

This guide will walk you through the process, ensuring even beginners can achieve paneer perfection. Making paneer at home is not only cost effective but also gives you control over the ingredients, ensuring a pure and wholesome product free from preservatives or additives.
Get ready to impress your family and friends with your newfound culinary skill! This article offers an Indian perspective on home made culinary delights.
Homemade paneer made simple with milk and souring agent tips
The beauty of homemade paneer lies in its simplicity. All you need is full-cream milk and a souring agent like lemon juice or vinegar. The quality of the milk is crucial, so opt for fresh, full-cream milk for the best results. Avoid using ultra-pasteurized milk, as it often doesn't curdle well.
When it comes to the souring agent, lemon juice offers a slightly tangy flavour, while vinegar provides a more neutral taste. Choose the one you prefer or experiment to find your perfect balance. Remember that precise measurements are key to achieving the desired texture.
Too much or too little souring agent can affect the final product. Once you master the basic technique, you can further experiment with other techniques.
Make paneer by curdling milk with souring agent gradually
Let's start with the basic process. Pour the milk into a large, heavy-bottomed pot. Bring it to a boil over medium heat, stirring occasionally to prevent it from sticking to the bottom. Once the milk reaches a rolling boil, reduce the heat slightly and add the souring agent gradually.
Stir gently as you add the lemon juice or vinegar. You'll notice the milk starting to curdle and separate into solids (the paneer) and whey (the watery liquid). If the milk doesn't curdle properly, add a little more souring agent, a teaspoon at a time, until the separation occurs.
Be patient and avoid adding too much souring agent at once, as it can make the paneer tough. It's important to note that the type of milk and the acidity of the souring agent can influence the amount required for curdling, so adjust accordingly.
Separate paneer from whey by draining curdled milk
Now that the milk has curdled, it's time to separate the paneer from the whey. Line a colander with a clean muslin cloth or cheesecloth. Carefully pour the curdled milk into the lined colander. The muslin cloth will trap the paneer solids while allowing the whey to drain through.
Once all the curdled milk is in the cloth, gather the edges of the muslin cloth and twist it gently to squeeze out any excess whey. Be careful not to squeeze too hard, as this can make the paneer dry and crumbly.
The amount of whey you squeeze out will determine the final moisture content of your paneer. If you prefer a softer paneer, leave a little more whey. For a firmer paneer, squeeze out as much whey as possible.
At this stage, you can also rinse the paneer with cold water to remove any lingering sour taste from the souring agent.
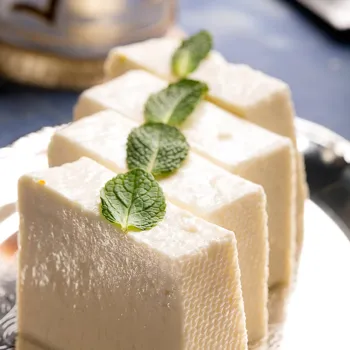
Shape paneer by pressing with weight for desired firmness
To shape the paneer, place the wrapped paneer parcel on a flat surface. Put a heavy object on top of it, such as a stack of books or a heavy pan. This will help to compress the paneer and give it a firm, even shape. The longer you press the paneer, the firmer it will become.
For a softer paneer, press it for about 30 minutes. For a firmer paneer, press it for an hour or more. Once the paneer has been pressed to your desired consistency, remove it from the muslin cloth and cut it into cubes or any other shape you prefer. Voila!
Your homemade paneer is ready to use in your favourite dishes.
Guide to storing and using homemade paneer for tasty dishes
Homemade paneer is best enjoyed fresh, but you can also store it in the refrigerator for up to 2-3 days. To store, place the paneer cubes in an airtight container and cover them with fresh water. Change the water daily to keep the paneer fresh.
You can use your homemade paneer in a variety of dishes, from classic paneer butter masala and palak paneer to paneer tikka and paneer bhurji. The possibilities are endless! Experiment with different spices and flavours to create your own unique paneer recipes.
And there you have it – a simple guide to making homemade paneer that is nutritious as its rich in protein and is also calcium packed. Enjoy the reward of healthy and delicious meals.
AI Generated Content. Glance/InMobi shall have no liability for the content