


Gather Your Supplies
The magic of creating your own Eidi envelopes lies in its simplicity. You don't need a craft store haul; common household items suffice. Begin with a plain
sheet of paper, which can be anything from standard printer paper to pages from an old notebook. Colored paper or even remnants of old greeting cards can add an immediate festive touch. Essential tools include basic stationery like glue and scissors. For decoration, sketch pens, crayons, or even markers are perfect for adding color and design. The beauty of handmade items is their imperfection; don't worry if your materials aren't pristine or if the final product isn't flawlessly uniform. This adds to the charm and authenticity of your creation, making it feel truly personal and heartfelt.
Folding the Base
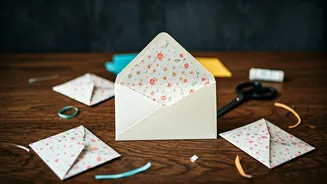
To begin shaping your Eidi envelope, take a sheet of paper and lay it flat. Fold the bottom edge upwards, ensuring there's a small margin left at the top. This lower section will serve as the pocket to hold your Eidi. Next, fold in the sides of the paper towards the center, much like you are securing a small pocket or pouch. It's natural for these folds to appear a bit uneven at first. Gently use your fingers to adjust and press down the creases firmly. As you refine these folds, you'll start to see the distinct shape of an envelope emerge, signaling the exciting phase of personalization is just around the corner. This foundational step is key to building a sturdy and presentable envelope.
Securing the Sides
Once the basic folds are in place, it's time to secure the sides of your nascent envelope. Apply a thin layer of glue along the inner edges where the sides meet. It's important not to use too much adhesive, as excessive glue can cause the paper to wrinkle or warp, detracting from the neat appearance. Press the glued sections gently and hold them for a few moments to allow the glue to set properly. This step solidifies the envelope's structure, transforming the folded paper into a recognizable envelope ready for further adornment and for holding your special Eidi. You've now created the fundamental, plain envelope, a blank canvas brimming with potential for festive customization.
Decorating with Flair
This is where the true spirit of Eid comes alive, especially for younger crafters, and there's no single 'correct' way to decorate. Let your imagination run wild! You could draw iconic Eid symbols like a crescent moon and stars, or perhaps depict tiny, festive lanterns. Alternatively, write 'Eid Mubarak' in bold, colorful lettering. Many enjoy creating intricate patterns, dots, lines, or swirls that, while abstract, exude a festive atmosphere. Don't hesitate to incorporate any craft supplies you have on hand, such as glitter, stickers, or even colorful scraps from old gift wrap. Tear these pieces and paste them creatively, mixing colors and embracing a slightly playful, even messy, approach to achieve a vibrant and unique look.
Adding a Personal Touch
To make your Eidi envelope truly unique and thoughtful, add personal touches that show you've put extra care into your gift. Start by writing the recipient's name clearly on the envelope. Consider including a small, heartfelt message inside. For instance, you could write 'For your Eid treats' or a lighthearted note like 'Don't spend it all at once.' If you're giving the Eidi to a younger family member or friend, drawing something they particularly like – perhaps a favorite animal, a sports icon like a football, or even a funny cartoon face – demonstrates that you've considered their interests specifically. This personalization transforms the monetary gift into a memorable gesture.
Finishing the Flap
The final step in creating your Eidi envelope involves closing the top flap. Fold the upper section of the paper down to seal the envelope. You have the option to leave it as a simple closure, or you can once again infuse it with creativity. For a unique touch, consider cutting the flap into an interesting shape, such as a gentle curve instead of a straight edge. You could also affix a small decorative element, like a star sticker, to keep the flap secured. Some people even opt to tie a small ribbon or thread around the flap for an added decorative flair, which, while not essential, certainly enhances the envelope's visual appeal and festive charm.
The Joy of Giving
There's a distinct and heartwarming feeling associated with presenting Eidi in a handmade envelope. It elevates the simple act of giving money into a more profound exchange. Instead of merely handing over cash, it becomes a gesture of 'I made this for you,' which is incredibly meaningful. This personal touch resonates deeply, not just with children, but with adults too. You'll likely find that once you start making one, you'll be inspired to create several more, experimenting with different colors and designs. This process often shifts the focus from just the Eidi itself to the broader enjoyment of the celebration, making the entire experience richer and more memorable.
Embracing Imperfection
The beauty of a handmade Eidi envelope lies in its inherent uniqueness and the absence of rigid rules. Don't be discouraged if your envelope turns out slightly larger or smaller than anticipated, or if traces of glue are visible, or even if a drawn crescent moon bears a resemblance to a banana. These imperfections are precisely what lend charm and character to handmade items. The ultimate goal isn't flawless precision, but rather to create something that evokes a smile before the Eidi is even revealed. This sentiment is the true essence of the endeavor, making the act of giving and receiving a more joyful and personal experience during Eid Ul Fitr.