


Gather Your Supplies
Before embarking on your crop top transformation, it's crucial to gather all the necessary supplies. You'll need an oversized shirt, preferably one you're
ready to repurpose. A pair of sharp scissors is essential for cutting the fabric accurately. Additionally, a measuring tape will help you determine the desired length of your crop top, ensuring it fits you perfectly. Pins are helpful for securing the fabric before cutting or sewing, ensuring a clean and neat finish. A ruler can be useful for creating straight lines and precise measurements, enhancing the overall look. Finally, a sewing machine or needle and thread are required if you plan to hem the edges or add any decorative elements to your new crop top, providing a polished and professional touch. Having these materials readily available will streamline the transformation process, resulting in a fashionable and customized crop top.
Measure and Mark
The next stage in your crop top transformation involves precise measurement and marking. First, put on the oversized shirt and determine the desired length of your crop top. Use the measuring tape to gauge where you want the shirt to end, marking this point with a pin or fabric marker. Next, lay the shirt flat on a clean surface, smoothing out any wrinkles. Using the ruler, draw a straight line across the shirt at the marked point, ensuring it is even and aligned. This line serves as your cutting guide, so accuracy is key. If you want a more fitted crop top, you can also measure and mark the width, deciding how much fabric you want to remove from the sides. Keep in mind that the measurements may vary depending on your preference and the shirt's original design. Correct measuring and marking are vital for a well-proportioned and fashionable crop top.
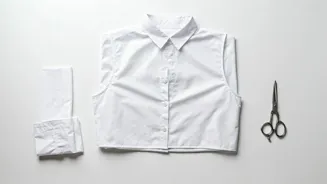
Cutting the Shirt
After measuring and marking, carefully cut the shirt along the line you've created. Place the shirt flat on a stable surface. Using sharp scissors, follow the marked line precisely, making sure you cut through both layers of the fabric evenly. Take your time to ensure a clean, straight cut; this will impact the final appearance of your crop top. If you are removing fabric from the sides for a more fitted look, cut along the lines you marked for width. Once you've made the initial cut, double-check the length and alignment before discarding the excess fabric. This step is critical; a well-executed cut ensures the shape of the crop top is accurate and stylish. Avoid rushing and maintain steady hands, as this is a key to a successful DIY crop top.
Hemming the Edges
Once you've cut the shirt, it's time to hem the raw edges to prevent fraying and give your crop top a polished look. There are a couple of options for this step. You can fold the raw edge of the fabric inwards, towards the inside of the shirt. Double-fold the fabric to create a clean, finished edge, securing it with pins. Then, use a sewing machine to stitch the hem in place, maintaining a consistent seam allowance for uniformity. If you don't have a sewing machine, you can hand-sew the hem using a needle and thread, using a simple stitch like a running stitch or a backstitch. If you prefer a more decorative touch, you can use a decorative stitch on your sewing machine. Ironing the hem before sewing will help make the process smoother and give a more professional finish. Careful hemming makes your crop top look neat and refined.
Adding Custom Touches
Now it's time to add some personal touches to your newly crafted crop top. Consider adding embellishments to enhance its style. You might add decorative stitching along the hem or around the edges for added detail. Experiment with embroidery, creating a custom design on the fabric. If you have old patches or iron-on letters, incorporate these to personalize the top further. You can also try dyeing or bleaching the crop top to create unique patterns and colors. Another popular customization is to add fringe or tassels to the hem for a bohemian look. Add buttons, ribbons, or even beads to make the crop top more attractive. These small details enhance your creation, letting you express your unique style.
Styling Your Crop Top
Now that your crop top is ready, it's time to explore different ways to style it. Pair it with high-waisted jeans or skirts for a chic, balanced look. Layer it with a blazer or a cardigan for a more polished look. Experiment with different bottom options, such as shorts or leggings, for casual outfits. Accessorize your crop top with necklaces, bracelets, and earrings to reflect your personality. To create a balanced silhouette, choose bottoms that complement the crop top's style. For example, a fitted crop top can go with wide-leg pants for an interesting contrast. In warm weather, wear it with sandals, and in cooler weather, put on boots and a jacket. Mastering the art of styling enhances your outfit and showcases your confidence.