


Prep Your Lashes
Before you even touch the curler, prep is key. Begin with clean, dry lashes. Any mascara residue or oils will hinder the curling process. If you use an eyelash
primer, apply it now and let it dry. This creates a base that helps hold the curl and protects your lashes from damage. Think of it as building a strong foundation for a lasting look. Taking this simple step will enhance your results significantly.
Choose Your Curler
Selecting the right eyelash curler is essential for achieving the desired effect. There are different types available. Consider the shape of your eye; some curlers are better suited for round eyes, while others work well with almond or hooded eyes. A quality curler with a soft pad will minimize the chance of pinching and damage. Make sure the curler is clean and in good condition before each use. It is worth investing in a good-quality curler. Remember, a good tool makes all the difference.
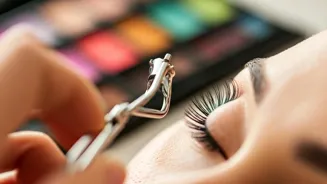
The Classic Method
For this popular method, position the curler at the base of your upper lashes, getting as close to the lash line as possible without pinching your eyelid. Squeeze the curler gently for about 5–10 seconds. Do not tug or pull. If you have straight or downward-pointing lashes, consider curling in sections. Repeat this process in the middle of your lashes and at the tips for a more pronounced curl. The classic method creates a natural lift, making your eyes look brighter. It is simple, effective, and a must-know technique.
Heat It Up!
For added impact, consider warming up your curler slightly. You can use a hairdryer on a low setting for a few seconds, ensuring it is not too hot. Test the temperature on your hand to prevent burns. A warm curler works more efficiently, setting the curl quickly and providing a long-lasting effect. Be cautious, though, to avoid overheating and damaging your lashes. Proceed with care to prevent any issues.
Mascara Application Tips
Apply mascara after curling your lashes. Start by wiggling the mascara wand at the base of your lashes and moving upwards, coating each lash from root to tip. Apply one or two coats, allowing the first coat to dry slightly before applying the second. For a more voluminous look, use a mascara specifically designed for volume. If you use waterproof mascara, you might need a dedicated eye makeup remover. Using mascara in this manner complements the curl for maximum effect.
Layer Mascara Properly
Build the length and volume with multiple coats of mascara for a captivating look. After the first coat has dried, apply a second coat. Focusing on the outer lashes can help create a more lifted, open-eye effect. Let each coat dry before applying the next to prevent clumping. Apply the second coat only to the tips of the lashes, and a third coat may be applied if you wish. This layering technique provides both volume and definition to the lashes.
Try Reverse Curling
For a different approach, try reverse curling. Instead of curling upwards, place the curler under the lashes and curl them downwards. This technique helps to open up the eyes and create a more defined, dramatic look. It can work well if you have downward-pointing lashes. Combine this with the standard curling technique for a more pronounced result. This technique works well in conjunction with regular curling methods.
Maintenance and Care
Keep your eyelash curler clean to prevent eye infections. Wipe it down after each use. Replace the rubber pad regularly to maintain its effectiveness. When removing mascara, be gentle and use an eye makeup remover designed for sensitive eyes. Following these maintenance steps preserves the life of your lashes and maintains eye health. Regular care guarantees lasting results and prevents lash damage, keeping your eyes sparkling.