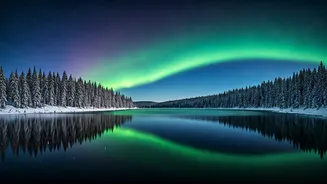


Understanding the Aurora
The aurora borealis, often called the Northern Lights, is a natural light display visible in the sky, primarily in the high-latitude regions (around the Arctic
and Antarctic). This captivating display is caused by collisions between electrically charged particles from the sun that enter the Earth's atmosphere. These particles, originating from solar flares and coronal mass ejections, are funneled towards the poles by the Earth's magnetic field. When these charged particles interact with the atmospheric gases like oxygen and nitrogen, they excite the atoms, causing them to emit light. The color of the light depends on the type of gas that is energized and the altitude at which the collision occurs. Green is the most common color, produced by oxygen at lower altitudes, while red is produced by oxygen at higher altitudes. Blue and purple hues result from the interaction with nitrogen. The intensity and frequency of the aurora vary, peaking during solar maximums, which occur roughly every 11 years. Planning your viewing around these peaks improves your chances of witnessing a spectacular display.
Where to See It
Observing the Northern Lights depends on geographical location and favorable conditions. Prime viewing areas include countries near the Arctic Circle, such as Iceland, Norway, Finland, Sweden, and Alaska in the United States. In Canada, regions like the Yukon, Northwest Territories, and parts of British Columbia offer excellent viewing opportunities. The visibility of the aurora also extends to areas further south, particularly during periods of intense solar activity. To increase your chances, seek locations with minimal light pollution and clear skies. Dark, remote areas away from cities are ideal. Consider the impact of weather conditions, such as cloud cover, which can obscure the lights. Keep an eye on aurora forecasts, which predict the intensity and location of the aurora based on solar activity. Websites and apps dedicated to aurora forecasting offer detailed information to help you plan your viewing adventure. It's also worth noting that the southern hemisphere has its own version, the aurora australis.
Timing is Everything
The best time to view the Northern Lights is typically during the winter months, from late September to early April. The long hours of darkness during this period provide ample opportunity for the aurora to be seen. Evenings, from around 10 PM to 2 AM, are often cited as the peak viewing hours, although the lights can appear at any time during the night. Furthermore, the timing depends on solar activity. The frequency and intensity of the aurora correlate with solar flares and coronal mass ejections. Therefore, monitoring space weather forecasts helps you determine the best times to venture out. You'll also want to avoid the full moon, as its brightness can diminish the visibility of the aurora. New moon periods and nights with minimal moonlight are optimal. Be patient, as the aurora can be unpredictable. Even on nights with high forecasts, the lights may be faint or hidden. Staying out for extended periods maximizes your chances of experiencing the aurora in all its glory.
Photographing the Lights
Photographing the aurora requires some basic equipment and techniques. A DSLR or mirrorless camera with manual settings is essential. These cameras let you adjust the settings needed to capture the low-light conditions. A wide-angle lens is also valuable for capturing a large portion of the sky, showcasing the vastness of the aurora. A sturdy tripod is a must-have item to prevent blurring from long exposure times. Manual focusing is key because autofocus systems often struggle in low-light environments. Set your camera to manual focus and focus on the stars. Start with a wide aperture (like f/2.8 or wider) to allow as much light as possible to reach the sensor. Set your ISO to a moderately high level, such as 800 to 3200, depending on the intensity of the aurora and the brightness of the night. Experiment with the shutter speed, typically starting around 5 to 15 seconds. Make minor adjustments to these settings to achieve the best exposure, considering the aurora's movement. Finally, use a remote shutter release or the camera's self-timer to avoid camera shake.
Tips for Viewing
To maximize your Northern Lights experience, preparation and comfort are key. Dress warmly, as viewing often takes place during cold winter nights. Wear layers, including thermal underwear, insulated outerwear, a warm hat, gloves, and waterproof boots. Bring a thermos of hot beverage and snacks to stay comfortable throughout the night. If you're traveling, plan your viewing location in advance. Research areas with minimal light pollution and clear skies. Check aurora forecasts before you head out. Websites and apps provide real-time updates and predictions based on solar activity. Consider joining a guided tour, especially if you're unfamiliar with the area or lack experience in aurora photography. Guides offer expertise on the best viewing spots and can provide tips. Finally, be patient and persistent. The aurora can be unpredictable, and viewing conditions change. It might take time and several attempts to witness the lights at their best. Enjoy the experience and marvel at the beauty of the celestial dance above.