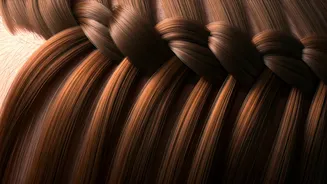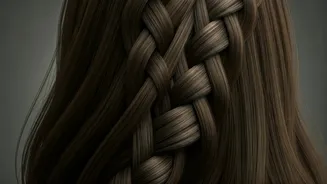


What Exactly Is a Waterfall Braid?
Think of the waterfall braid as a creative twist on the classic French braid. It’s a half-braid where you continuously add hair from the top but, instead of tucking in the bottom strand, you let it drop and fall loose. This simple change creates a beautiful
'waterfall' effect, with strands of hair cascading through the plait. The braid itself typically runs horizontally or diagonally across your head, acting as a delicate headband that holds back the top section of your hair while the rest flows freely. This technique gives it a dreamy, ethereal quality that’s hard to match, blending the structure of a braid with the softness of loose hair.
Why It’s the Perfect Style Upgrade
The beauty of the waterfall braid lies in its incredible versatility. It’s polished enough for a formal event like a wedding or prom, yet relaxed enough for a music festival or a casual brunch. It’s a style that keeps hair out of your face while still showing off your length and texture. This adaptability extends to different hair types and lengths. While it looks stunning on long, wavy hair, it’s also entirely possible to create a waterfall braid on short and curly hair. For those with curly hair, braiding while the hair is damp can help define the curls and prevent frizz, resulting in beautiful, ringlet-like cascades.
A Simple Guide to Creating Your Own
While it may look intricate, the waterfall braid is based on a repetitive motion that becomes simple with practice. Start by taking a section of hair near your hairline and splitting it into three strands, just like a standard braid. Begin with one or two stitches of a regular braid to secure it. Now for the key step: when you cross the top strand over the middle, add a small new piece of hair to it, just like a French braid. Then, when it’s the bottom strand's turn, simply drop it completely. Pick up a new section of hair from right behind where you dropped the last one, and this becomes your new bottom strand. Cross it over the middle, and repeat the process: add hair to the top strand, cross it over, then drop the bottom strand and pick up a new one. It can feel a little clumsy at first, but keeping the tension even is key. Many tutorials suggest practicing in front of a mirror can help you get the hang of it.
Endless Variations to Inspire You
Once you’ve mastered the basic technique, a world of variations opens up. For a classic half-updo, create a waterfall braid on each side and join them at the back of your head with a clear elastic. You could also try a double waterfall braid, where two parallel braids are created one below the other for added texture. Another option is to continue the braid all the way around your head to form a waterfall crown. For a more subtle look, a single, small waterfall braid on one side can act as a beautiful accent. You can even incorporate the cascading strands into a bun or ponytail for a more complex updo.
Tips for a Flawless Finish
To make your waterfall braid look its best, start with well-brushed, tangle-free hair. A smoothing serum can help tame flyaways, especially on straight hair. If you have fine hair, a texturizing spray or powder can provide more grip and make the braid look fuller. After securing the end, you can gently pull on the loops of the braid—a technique known as 'pancaking'—to give it a chunkier, more voluminous appearance. For curly hair, working with slightly damp hair and a leave-in conditioner will make the process smoother and help your curls stay defined as they dry.