


The Enduring Appeal of the Money Plant
The money plant, or Epipremnum aureum, is a superstar in the world of indoor gardening for good reason. It’s famously resilient, capable of thriving in a wide range of conditions, and forgiving of occasional neglect. This makes it the perfect starting
point for anyone new to houseplants. Its trailing vines and heart-shaped leaves bring a soft, natural element to any space. Beyond its good looks, the plant is often associated with good fortune and positivity in many Indian households, making it a meaningful addition to your personal environment. Propagating it in water allows you to watch its roots develop, offering a fascinating and satisfying glimpse into the lifecycle of a plant right on your desk.
Gathering Your Simple Supplies
You don’t need a fancy gardening kit for this project. The beauty of water propagation lies in its simplicity. Here’s all you’ll need to get started: * **A Healthy Mother Plant:** Find a mature, lush money plant from which to take a cutting. You can ask a friend for a cutting if you don’t have one. * **Clean, Sharp Scissors or Pruners:** Using a clean cutting tool prevents the transfer of diseases to both the mother plant and the new cutting. * **A Glass Jar or Bottle:** Any clear vessel will do. A small glass bottle, a jam jar, or even a simple drinking glass works perfectly. Transparency is key to watching the roots grow. * **Water:** Regular tap water is usually fine. If your water is heavily chlorinated, let it sit out for 24 hours before using it to allow the chlorine to dissipate.
How to Make the Perfect Cutting
Taking a cutting is the most crucial step, but it’s very straightforward. Follow these instructions for the best chance of success. First, identify a healthy vine on the mother plant that has at least four to six leaves. Look along the stem for small brown bumps or nubs — these are the aerial roots or 'nodes'. This is where new roots will sprout from. Your cutting needs to include at least one or two of these nodes. Using your clean scissors, make a cut about 1-2 cm below a node. A diagonal cut can increase the surface area for water absorption, but a straight cut works just as well. Once you have your cutting, gently remove the lowest leaf or two — the ones that would otherwise be submerged in water. This prevents the leaves from rotting and fouling the water, ensuring a healthy environment for root growth.
Caring for Your New Water-Based Plant
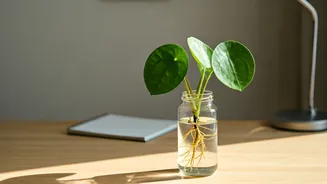
Place your cutting into the glass jar and fill it with enough water to cover the nodes. Now, find a good spot for it. A desk that receives bright, indirect sunlight is ideal. Avoid placing it in direct, harsh sunlight, which can scorch the leaves and promote algae growth in the water. The most important part of ongoing care is changing the water. To keep your cutting healthy and provide it with oxygen, replace the water every 5-7 days. This simple step prevents the water from becoming stagnant and ensures your plant has what it needs to thrive. Within a few weeks, you should start to see delicate white roots emerge from the nodes. It’s a truly magical moment!
Styling Your Desk with Greenery
Once your money plant cutting has established a healthy root system, it can live in its water-filled jar for a very long time. This is where the fun of styling comes in. The simplicity of a clear glass jar filled with water and a vibrant green plant is a minimalist statement in itself. You can choose jars of different shapes and sizes to create visual interest. Amber or green-tinted glass bottles can add a pop of colour. Grouping a few jars together can create a lovely 'green corner' on a larger desk or a nearby shelf. The sight of the intricate root system developing in the water adds a unique, almost scientific aesthetic to your decor, turning your simple plant into a living piece of art that truly brightens your workspace.