


Why Trailing Jade is Perfect for Propagation
The Trailing Jade, or *Kleinia petraea* (often confused with *Senecio jacobsenii*), is a dream plant for beginners and propagation enthusiasts alike. This hardy succulent is known for its beautiful, teardrop-shaped leaves and cascading stems that create
a stunning visual in hanging baskets. More importantly, it’s incredibly eager to grow. In its natural habitat, if a piece of the stem breaks off, it can easily take root in the soil and grow into a new plant. We're simply going to replicate this natural process in a controlled, and eco-friendly, home environment. Its resilience means it’s forgiving of minor mistakes, making this project an excellent entry point into the world of plant propagation.
Gathering Your Simple Supplies
You don't need a fancy gardening setup for this project. The beauty lies in its simplicity and sustainability. Before you begin, gather the following items: * **A Healthy Trailing Jade Plant:** Choose a mature, well-established plant to take a cutting from. This ensures the parent plant remains healthy and the cutting is robust enough to grow. * **Clean, Sharp Scissors or Shears:** Using a clean blade prevents the transfer of diseases to both the parent plant and the cutting. You can wipe your blades with rubbing alcohol for good measure. * **A Recycled Plastic Bottle:** A standard 500ml or 1-litre clear plastic water or soda bottle works perfectly. The clear plastic allows you to monitor root growth. * **Water:** Regular tap water is usually fine. If your water is heavily treated, you might consider letting it sit out overnight to allow chlorine to evaporate.
How to Take the Perfect Cutting
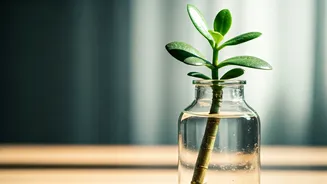
This is the most crucial step, but it’s very straightforward. Look for a healthy, vibrant stem on your parent plant that is at least 4-6 inches long. Using your clean shears, make a clean cut just below a leaf node (the little bump where a leaf grows from the stem). This is where the new roots will emerge. Once you have your cutting, gently remove the leaves from the bottom 1-2 inches of the stem. This part will be submerged in water, and removing the leaves prevents them from rotting. Now, for the most important part with succulents: patience. Place your cutting on a dry, shaded surface for 1-3 days. This allows the cut end to dry and form a 'callus'. This simple step is vital as it prevents the stem from rotting when you place it in water.
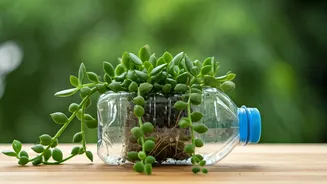
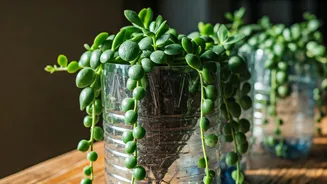
Prepping Your Recycled Bottle
Your recycled bottle will become a mini-propagation station. First, make sure it’s thoroughly cleaned with soap and water to remove any residue. Next, carefully use your scissors or a craft knife to cut the bottle in half, about two-thirds of the way up from the bottom. You will be using the bottom part of the bottle as your water reservoir. The top part can be discarded or used as a small funnel for other projects. Ensure the cut edge is relatively smooth to avoid any snags. This simple container is all you need to hold the cutting securely and provide the perfect environment for root development.
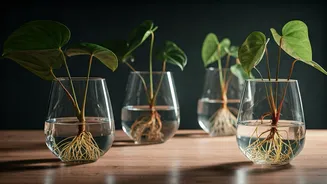
Setting Up Your Propagation Station
Once your cutting has callused over, it's time to set it up. Fill the bottom half of your plastic bottle with about an inch or two of water. You only want the very bottom, leafless part of the stem to be submerged. The rest of the stem and the leaves should be well above the waterline. The wide opening of the cut bottle should provide enough support to hold the cutting upright. If it's a bit wobbly, you can use the top part of the bottle, flipped upside down and placed in the base, to create a narrower neck for better support. Place your new propagation station in a spot that receives bright, indirect light. Direct sunlight can be too harsh for a new cutting and may encourage algae growth in the water.
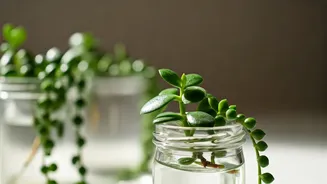
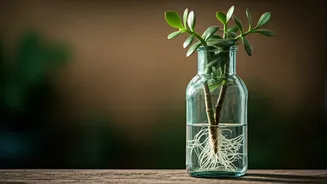
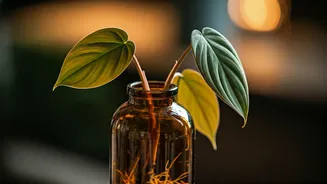
Patience, Aftercare, and Spotting Roots
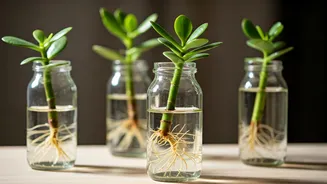
Now, the waiting game begins. Check the water level every few days and top it up as needed. To keep the water fresh and oxygenated, it's a good idea to completely replace it once a week. Within 2-4 weeks, you should start to see small, white roots emerging from the submerged part of the stem. This is the magic moment! It’s exciting to watch the root system develop. The clear plastic bottle makes it easy to check on progress without disturbing the cutting. Don't be discouraged if it takes a little longer; some cuttings are slower than others. As long as the stem and leaves look healthy and there's no sign of rot, you're on the right track.
Transplanting Your New Plant
When the new roots are about 1-2 inches long and look sturdy, your new Trailing Jade is ready for its permanent home. Choose a small pot with a drainage hole and fill it with a well-draining potting mix, ideally one formulated for succulents and cacti. Make a small hole in the center of the soil, gently place the rooted cutting inside, and backfill the soil around it, patting it down lightly. Water the soil thoroughly, allowing any excess to drain out. For the first week, keep it in the same bright, indirect light it enjoyed while propagating. You've now successfully turned one plant into two, all with a little effort and a recycled bottle.