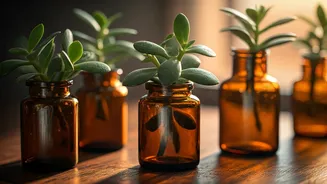


The Appeal of Amber
Before we grab the scissors, let’s talk about why this method is so effective and aesthetically pleasing. The Trailing Jade, or *Senecio jacobsenii*, is a stunning succulent with teardrop-shaped leaves that cascade beautifully. While you could propagate
it in any old jar, amber apothecary bottles offer a distinct advantage. The dark, warm-toned glass isn't just for looks; it filters out harsh sunlight, which helps to prevent algae from growing in the water. Algae competes with your cutting for nutrients and can cloud the water, creating an unhealthy environment. The amber hue provides a dark, protected space for delicate new roots to form, mimicking the conditions they’d find underground. Plus, let's be honest: a row of these vintage-style bottles with bright green cuttings looks incredibly chic on a windowsill or shelf.
Gather Your Simple Toolkit
This project requires minimal equipment, most of which you likely already have. Simplicity is part of its charm. Before you begin, gather the following: * **A healthy Trailing Jade plant:** Choose a mature, well-established mother plant to take cuttings from. * **Clean, sharp scissors or pruning shears:** A clean cut is crucial to prevent damaging the plant tissue and introducing disease. * **Amber apothecary bottles:** Select a few small to medium-sized bottles. Ensure they are thoroughly cleaned with soap and water to remove any residue. * **Water:** Room-temperature filtered water or tap water that has been left out for 24 hours (to allow chlorine to evaporate) is ideal.
How to Take the Perfect Cutting
Selecting and taking your cutting correctly is the most important step for success. Look for a healthy, vigorous stem on your mother plant. The ideal cutting should be at least 4-6 inches long and have several sets of leaves. Using your sharp, sterile scissors, make a clean cut just below a leaf node (the point on the stem where a leaf grows). This area is packed with the cells needed to produce new roots. Once you have your cutting, gently remove the leaves from the bottom 1-2 inches of the stem. This bare section will be submerged in water, and removing the leaves prevents them from rotting and fouling the water.
The Crucial Curing Period
Don't rush to put your cuttings in water! Like many succulents, Trailing Jade cuttings benefit from a 'curing' or 'callusing' period. This is a simple but vital step. After taking your cuttings, lay them on a paper towel in a dry, shaded area for 2 to 3 days. During this time, the cut end will dry out and form a protective callus. This small step dramatically reduces the risk of the stem rotting when you place it in water. It essentially creates a scar that seals the open wound, protecting the cutting from bacteria and fungus as it prepares to grow roots.
Propagation in the Bottle
Once your cuttings have callused over, it's time for the main event. Fill your clean amber bottles with room-temperature water. Place one or two cuttings into each bottle, ensuring the bare part of the stem is fully submerged but that no leaves are touching the water. The leaves need to stay dry to avoid rot. Position your bottles in a spot that receives bright, indirect light. A north-facing windowsill or a spot a few feet from a sunny window is perfect. Direct sunlight can be too intense and may scorch the leaves or heat the water too much.
Caring for Your New Cuttings
Now, patience is key. Your job for the next few weeks is to maintain a healthy environment for root growth. Change the water every 3-5 days, or whenever it starts to look cloudy. Fresh water provides oxygen and prevents bacteria from building up. Within 2 to 4 weeks, you should start to see small, white roots emerging from the submerged nodes on the stem. It's a magical moment! Wait until these roots are at least an inch long and have started to branch out before you consider moving them to soil. A strong root system is the foundation for a healthy new plant.
Transitioning to Soil
When your cuttings have developed a robust root system, they are ready for their permanent home. Prepare a small pot with a drainage hole and fill it with a well-draining succulent or cactus mix. You can make your own by mixing potting soil with perlite or sand. Make a small hole in the soil with your finger or a pencil, and gently place the rooted cutting inside. Carefully fill in the soil around the roots, patting it down gently. Water the plant lightly. For the first week, keep the soil slightly moist (but not soggy) to help the water-grown roots acclimate to their new soil environment. After that, you can switch to a typical succulent watering schedule, allowing the soil to dry out completely between waterings.