


The Green Benefits for Your Feline
You might have seen your cat nibble on houseplants and wondered why. Cats are often instinctively drawn to greens. Wheatgrass offers a safe, dedicated alternative to your potentially toxic decorative plants. More than just a distraction, it’s a nutritional
powerhouse. The primary benefit is digestive support; the natural fiber aids in smoother bowel movements and helps prevent constipation. This fiber also assists in the passage of swallowed fur through the digestive tract, which can help reduce the frequency of hairballs. Beyond digestion, wheatgrass is packed with essential nutrients that may be missing from commercial pet foods, including vitamins A, C, and E, as well as minerals and chlorophyll. Despite its name, wheatgrass is gluten-free because it's harvested before the grain forms, making it a safe treat for nearly all cats.
Gathering Your Simple Supplies
Growing wheatgrass is surprisingly easy and requires minimal materials, most of which you may already have. You don't need a green thumb to succeed. Here’s a basic list to get you started: * **Wheatgrass Seeds:** Also called hard winter wheat or wheatberries, these can be found at health food stores or ordered online. Ensure they are organic and intended for sprouting. * **A Shallow Container:** A small pot, a planter tray, or even a recycled food container will work perfectly. Just make sure it has drainage holes to prevent waterlogging and mold. * **Growing Medium:** Organic potting soil is a great choice. Alternatively, you can use a soil-free medium like coconut coir or a hydroponic growing kit for a cleaner, mess-free option. * **Water:** A spray bottle for misting is ideal for providing gentle, even moisture.
Step-by-Step Guide to a Lush Patch
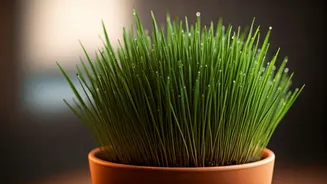
With your supplies ready, you're just a few simple steps away from a vibrant patch of cat grass. 1. **Soak the Seeds:** Start by soaking about two tablespoons of seeds in a jar of water for 8 to 12 hours. This kickstarts the germination process. 2. **Prepare Your Container:** Fill your chosen tray with about one to two inches of your potting mix. Lightly moisten the soil. 3. **Plant the Seeds:** After soaking, drain the seeds and spread them evenly in a single layer over the soil. Press them down gently to ensure they make good contact with the growing medium. 4. **Cover and Wait:** Lightly mist the seeds with water. To create a humid environment that encourages sprouting, you can cover the container with a clear plastic lid or plastic wrap with a few holes poked in it for airflow. Place the container in a spot that gets indirect sunlight. 5. **Water and Grow:** Mist the soil daily to keep it moist but not soggy. You should see sprouts appear within a few days. Once the grass is about an inch tall, you can remove the cover. The grass is typically ready for your cat when it reaches about 4 inches in height, which usually takes around a week to 10 days.
Serving and Safety
Once your wheatgrass is tall enough, simply place the pot in an area accessible to your cat and let them graze at their leisure. Most cats will instinctively know what to do. If your cat is hesitant, you can try snipping a few blades and mixing them into their food. While wheatgrass is safe, it's best consumed in moderation. A few minutes of nibbling a day is usually sufficient. Overconsumption can sometimes lead to mild stomach upset or vomiting, as cats are obligate carnivores and not designed to digest large amounts of plant matter. It's also important to monitor your cat for any signs of an allergic reaction, such as rashes or excessive drooling, though this is rare. If the grass begins to wilt or turn yellow after a week or two, it’s time to start a new patch to ensure freshness.