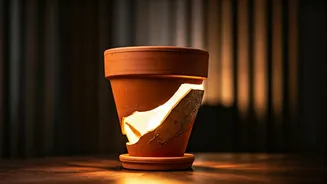


The Charm of Handcrafted Decor
There’s a unique satisfaction that comes from creating something beautiful with your own hands. Upcycling isn't just about saving money or being sustainable; it’s about personalising your space. A simple clay pot, often found cracked or discarded in a corner
of a balcony, holds immense potential. With a bit of effort, these humble terracotta vessels can be transformed into statement pieces that rival expensive designer lamps, adding warmth, texture, and a story to your living room, bedroom, or study.
Gathering Your Creative Toolkit
Before you begin, get all your materials in one place. This will make the process smooth and enjoyable. You will need: - **A Clay Pot:** Choose a terracotta pot ('gamla' or 'matka') with a shape you love. Ensure it's clean and has no major structural cracks. A pot with a drainage hole at the bottom is ideal. - **A Lamp Kit:** These are readily available online or at electrical hardware stores. A standard kit includes a socket, a cord with a plug, and a harp to hold the lampshade. - **A Drill with a Masonry Bit:** To widen the drainage hole for the cord. The bit size should match the diameter of your lamp cord. - **Paint & Primer:** Acrylic paint works wonderfully on terracotta. A primer will help the paint adhere better and look more vibrant. - **Sealant:** A clear matte or gloss sealant (spray or brush-on) will protect your paint job and give it a professional finish. - **A Lampshade:** Choose one that complements the size and shape of your pot base. - **Optional:** Sandpaper for smoothing, felt pads for the base, and a decorative finial for the top.
Step 1: Prepare the Pot
Your foundation needs to be solid. Start by thoroughly cleaning the pot with soap and water, scrubbing away any dirt. Let it dry completely—terracotta is porous and holds moisture, which can affect the paint. If your pot already has a drainage hole, you may need to widen it slightly to fit the lamp cord. To do this safely, place a piece of masking tape over the hole to prevent the drill bit from slipping. Using a masonry bit, drill slowly and gently. Do not apply too much pressure, as this can crack the pot. A little water on the drilling area can help reduce dust and heat.
Step 2: Paint Your Masterpiece
This is where your pot gets its personality. First, apply a thin coat of primer and let it dry. Now, unleash your creativity. For a minimalist, modern look, go for solid neutral colours like matte black, charcoal grey, or warm beige. To create a textured, stone-like effect, you can mix a little baking soda or fine sand into your first coat of paint. For a more bohemian vibe, try painting simple geometric patterns or traditional motifs. Apply two or three thin coats of your chosen colour, letting each coat dry fully before applying the next. Once you are happy with the design, finish with a clear sealant to protect it from dust and chipping.
Step 3: Assemble the Lamp
With the painted pot ready, it's time for the final assembly. Start by threading the lamp cord from the outside through the hole at the bottom of the pot. Pull it up through the top opening. Now, follow the instructions on your lamp kit to attach the socket to the end of the cord inside the pot's neck. Most kits have a simple screw-on mechanism. Secure the socket firmly. If the assembly feels wobbly, some lamp kits come with rubber washers to create a snug fit. Once the socket is in place, you can attach the lamp harp.
Finishing Touches for a Premium Look
The details are what elevate your DIY project from crafty to premium. Choose your lampshade wisely; a simple drum shade in a neutral fabric like linen or jute often works best with an earthy terracotta base. Consider the light bulb—an Edison-style or warm white LED bulb can create a cosy, inviting glow. Finally, stick a few small felt pads to the bottom of your pot. This small step prevents the rough base from scratching your furniture and gives the lamp a more finished, store-bought feel. Screw in your bulb, place the shade, and find the perfect spot for your new creation.