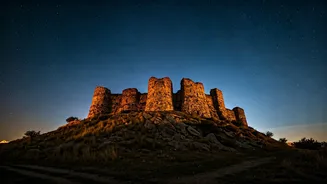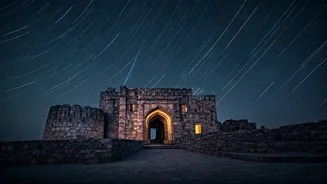

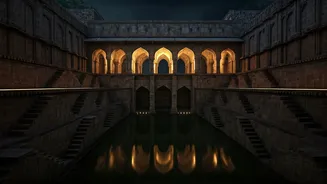


The Allure of the After-Dark Fort
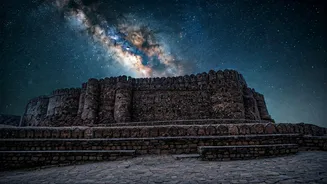
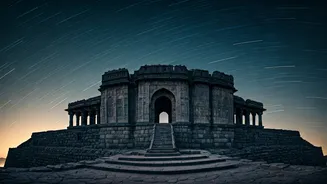
India’s hill forts are majestic by day, but at night, they transform. The crowds disappear, replaced by a profound silence broken only by the wind whistling through ancient ramparts. This is the world of the midnight photographer. Using long exposure
techniques, you don't just take a picture of a fort; you capture the passage of time. The camera's open shutter drinks in the faint starlight, revealing architectural details and textures that are invisible to the naked eye. It allows you to use torches and lights to 'paint' the scene, selectively illuminating crumbling walls, arched gateways, and lonely watchtowers, creating images that are dramatic, ethereal, and entirely your own. It's a unique blend of adventure, history, and creative expression.
Choosing Your Historic Canvas
The first step is selecting a location. India is dotted with countless forts, from the Sahyadri range in Maharashtra to the Aravallis in Rajasthan. For night photography, accessibility and safety are key. Forts popular for night treks, like those around Pune—Sinhagad, Rajgad, or Torna—can be good starting points, as paths are relatively well-trodden. However, always verify the current rules. Many forts are under the purview of the Archaeological Survey of India (ASI) and may have strict closing times. Trespassing is illegal and unsafe. The best approach is to look for forts in remote areas without official restrictions or, ideally, join organised and permissions-cleared photography groups. Always prioritise locations where you can legally and safely spend the night.
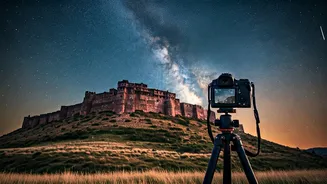
Your Essential Night Photography Kit
What you pack is crucial. Unlike daytime snapping, night photography requires specific gear.
* **A Sturdy Tripod:** This is non-negotiable. Your camera must remain perfectly still for seconds or even minutes.
* **A DSLR or Mirrorless Camera with Manual Mode:** You need full control over your settings.
* **A Wide-Angle Lens:** A lens between 14mm and 35mm is ideal for capturing the grand scale of the fort and the expansive night sky.
* **A Remote Shutter Release or Intervalometer:** Pressing the shutter button by hand can cause camera shake. A remote allows for hands-free operation.
* **Extra Batteries:** Long exposures drain batteries quickly, and the cold night air makes it worse. Bring at least two fully charged spares.
* **Light Sources:** This is your creative toolkit. Pack a variety of torches, from powerful beams to smaller, coloured LED lights. Headlamps are essential for navigating in the dark while keeping your hands free.
Demystifying Camera Settings
Don't be intimidated by manual mode. For long exposures, the logic is simple. Start with these settings and experiment:
* **ISO:** Set it to a low value, like 100 or 200, to minimise digital 'noise' and get a clean, smooth image.
* **Aperture:** Use a mid-range aperture like f/8 or f/11. This ensures that most of the scene, from the foreground rocks to the distant walls, is in sharp focus.
* **Shutter Speed:** This is your main creative tool. Set your camera to 'Bulb' mode. This means the shutter stays open for as long as you hold the button on your remote. An exposure of 30 seconds is a good starting point. For painting with light, you might need several minutes. Take a test shot to check your composition and basic exposure, then adjust.
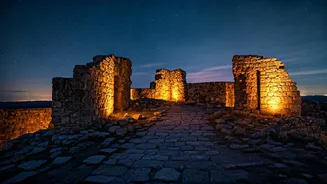
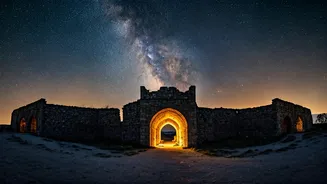
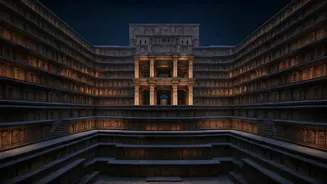
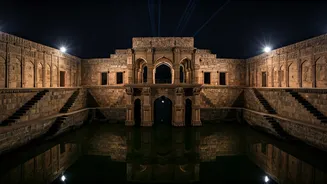
The Art of Painting with Light
This is where the magic happens. Once your shutter is open in Bulb mode, you are free to move around the scene (carefully!) with your torch. The trick is to keep moving and never point the light directly at the camera lens. Use sweeping motions to 'paint' the light onto the surfaces you want to highlight—a majestic bastion, the texture of a stone wall, an ancient tree. Use a powerful torch for distant objects and a softer light for things closer to the camera. You can even use coloured gels over your torch for creative effects. Each attempt will be different, a unique creation of light, shadow, and time.
Safety First, Respect Always
Exploring ancient ruins at night is an adventure, but it comes with responsibilities. Never go alone; a group of at least three is ideal. Inform someone back home about your exact location and expected return time. Wear sturdy trekking shoes and carry a basic first-aid kit. Be aware of your surroundings—the terrain can be treacherous in the dark, and you might be sharing the space with snakes or other wildlife. Finally, respect the heritage. These are not just photo props; they are monuments of historical significance. Follow the 'Leave No Trace' principle: take nothing but pictures, leave nothing but footprints.