


Why No-Bake is a Win
Let’s be honest: the idea of baking a cheesecake can be intimidating. Water baths, the risk of cracks, the long cooling times inside a hot oven—it’s enough to make you reach for a simple gulab jamun instead. But a no-bake cheesecake removes all that stress.
It’s a straightforward, mix-and-chill dessert that delivers a spectacular result. The texture is lighter and creamier than its baked cousin, almost like a mousse, melting beautifully on the tongue. It's the ideal dessert for India's climate, where avoiding the oven is often a blessing. Plus, it’s a dessert you can prepare a day or two in advance, making it perfect for parties, festivals like Diwali or Christmas, or a special weekend treat.
Gathering Your Ingredients
The magic of this cheesecake lies in using good quality ingredients. Here’s what you’ll need for an 8-inch springform pan. **For the Biscuit Crust:** * 200g digestive biscuits (like Britannia NutriChoice) or chocolate biscuits (like Oreo or Bourbon) * 100g unsalted butter, melted (about ½ cup) **For the Chocolate Filling:** * 400g full-fat cream cheese, softened to room temperature (brands like Philadelphia or D'lecta work well) * 250ml heavy whipping cream (30-35% fat), chilled * 200g good quality dark chocolate (50-70% cocoa), chopped (Amul dark chocolate is a great choice) * 100g powdered sugar (icing sugar), sifted * 1 teaspoon vanilla extract * 2 teaspoons agar-agar powder * 60ml (¼ cup) water **A Note on Agar-Agar:** We are using agar-agar as a vegetarian setting agent. It ensures the cheesecake holds its shape beautifully once chilled. You can find it easily online or in speciality food stores.
Building the Foundation: The Crust
The crust provides the crunchy contrast to the creamy filling. Getting it right is simple. First, crush your biscuits. You can place them in a zip-lock bag and go over them with a rolling pin for a rustic texture, or pulse them in a food processor for a fine, sandy crumb. Once you have your crumbs, place them in a bowl and pour over the melted butter. Mix with a fork until every crumb is coated and the mixture resembles wet sand. Tip this mixture into your 8-inch springform pan. Now, using the back of a spoon or the flat bottom of a glass, press the crumbs firmly and evenly across the base and slightly up the sides of the pan. A compact base is key to clean slices later. Place the pan in the refrigerator to firm up while you prepare the filling.
The Heart of the Matter: The Filling
This is where the silky, decadent magic happens. Start by melting your dark chocolate. You can do this in a microwave in 30-second bursts, stirring in between, or in a heatproof bowl set over a saucepan of simmering water (a double boiler). Once melted and smooth, set it aside to cool slightly. In a separate small saucepan, whisk the agar-agar powder into the ¼ cup of water until there are no lumps. Bring it to a boil over medium heat, stirring constantly, then let it simmer for one minute until it thickens slightly. Remove from heat and let it cool for a few minutes; you want it warm, not piping hot. In a large bowl, beat the softened cream cheese with an electric mixer until it's completely smooth and free of lumps. Add the sifted powdered sugar and vanilla extract, and beat again until combined. Pour in the slightly cooled melted chocolate and beat on low speed until just incorporated. Scrape down the sides to ensure everything is mixed. Now, quickly pour in the warm agar-agar mixture and beat it in. In another chilled bowl, whip the heavy cream until it forms stiff peaks. Gently fold the whipped cream into the chocolate-cheese mixture in two or three additions. Be careful not to overmix and deflate the cream. The final filling should be thick, airy, and uniform in colour.
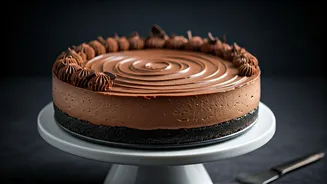
Assembly and The Patient Chill
Take your chilled crust out of the refrigerator. Pour the luscious chocolate filling over the base, spreading it evenly with a spatula to create a smooth, level top. Now comes the most important part: chilling. Cover the springform pan with cling film, making sure it doesn't touch the surface of the filling, and place it in the refrigerator. The cheesecake needs to chill for at least 6-8 hours, but overnight is even better. This allows the agar-agar to set completely and the flavours to meld together. Do not rush this step! A properly chilled cheesecake will slice cleanly and hold its shape perfectly.
Serving with Style
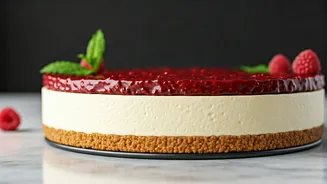
Once fully set, carefully run a thin knife around the edge of the cheesecake before undoing the springform pan's latch. For a final flourish, you can garnish it in several ways. A simple dusting of cocoa powder creates an elegant look. A pile of fresh berries like strawberries or raspberries in the centre adds a pop of colour and a touch of acidity to cut through the richness. You could also create chocolate shavings by running a vegetable peeler along the side of a bar of chocolate. Or, for a truly decadent finish, drizzle it with some extra melted chocolate or caramel sauce just before serving.