


What Exactly Are Microgreens?
Microgreens are not to be confused with sprouts or baby greens. They are young vegetable and herb seedlings harvested just 7 to 21 days after germination, right after the first true leaves have developed. Unlike sprouts, which are germinated in water
and eaten root, seed, and all, microgreens are typically grown in soil or a growing medium and are snipped at the stem, just above the soil line. This short growth cycle means you can go from seed to salad topping in as little as a week, enjoying the intense flavours and delicate textures that chefs have prized for years.
The Superfood Factor in a Tiny Package
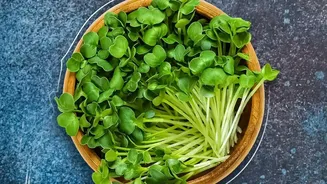
The term "superfood" is used often, but microgreens have the research to back it up. Studies have shown that these tiny plants can contain significantly higher concentrations of vitamins, minerals, and antioxidants than their mature counterparts—sometimes up to 40 times more. For example, red cabbage microgreens are packed with Vitamin C, while other varieties like green daikon radish are rich in Vitamin E. These nutrients contribute to everything from a healthy immune system to improved skin health. Because their nutritional content is so concentrated, a small amount can provide a substantial boost.
Your Simple Windowsill Setup
You don’t need expensive or complicated equipment to get started. A successful windowsill setup can be incredibly simple and compact, often taking up less than two square feet. All you really need are a few basic items: a shallow tray with drainage holes (a recycled plastic takeout container works well), a tray without holes to catch water, a growing medium like potting soil or a coconut coir mat, a spray bottle, and, of course, seeds. A bright, sunny windowsill that receives at least six hours of light is ideal.
A Step-by-Step Guide to Your First Harvest
Growing microgreens is a straightforward process. Start by filling your tray with about one to two inches of your chosen growing medium. Lightly moisten the soil with your spray bottle. Next, sprinkle your seeds evenly across the surface; you want them to be dense but not overlapping. Lightly press them into the soil and give them another quick mist of water. For the first few days, you can cover the tray to keep it dark, which aids germination. Once they sprout, uncover them and place them on your sunny windowsill. Water them daily, ideally from the bottom tray to avoid disturbing the delicate seedlings. In about 7 to 14 days, when the greens are one to three inches tall, they are ready to be harvested with a clean pair of scissors.
Easy Greens for Beginners
If you're new to growing, some varieties are more forgiving and faster-growing than others. Radish, broccoli, kale, arugula, and mustard microgreens are excellent choices for a first-time grower. Many of these are ready to harvest in under 10 days, providing nearly instant gratification. Pea shoots are another fantastic windowsill option, known for being robust and flavorful. These varieties not only grow quickly but also have distinctive, delicious flavours, from the spicy kick of radish to the nutty taste of broccoli.
Enjoying Your Indoor Harvest
Once you’ve harvested your vibrant little greens, the fun really begins. Their concentrated flavours make them a perfect addition to a wide array of dishes. Sprinkle them over salads for an extra nutritional punch and a burst of flavour. Use them to top sandwiches, wraps, and avocado toast for a fresh, peppery bite. They also make a beautiful and professional-looking garnish for soups, main courses, and even smoothies. Because they are best eaten raw, you get to enjoy their full nutritional benefits and crisp texture.