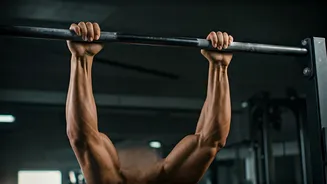


The Foundation: Perfecting the Standard Pull-Up
Before chasing elite status, you must have a rock-solid foundation. Many athletes who think they’ve mastered the pull-up are often using momentum or incomplete ranges of motion. A perfect pull-up starts from a dead hang with arms fully extended. Engage
your core and pull your shoulder blades down and back. Drive your elbows toward the floor to pull your chin above the bar. Your body should remain in a straight line, avoiding any swinging or kipping. The descent is just as important; lower yourself under control until your arms are straight again. Aim for at least 10-15 clean reps before you even consider attempting the more advanced moves on this list. [9, 22] This foundational strength is non-negotiable for both performance and injury prevention.
The L-Sit Pull-Up: A Core and Power Combination
The L-Sit pull-up is your first step into a world where pulling strength meets intense core stabilization. [16] It transforms the pull-up into a full-body exercise. To perform it, hang from the bar and raise your legs straight out in front of you, parallel to the floor, forming an 'L' shape with your body. [13] From this position, perform a strict pull-up. This move relentlessly targets your lats, biceps, upper back, abs, and hip flexors. [12] Maintaining the L-sit position forces your core to work isometrically to prevent your legs from dropping, creating incredible body tension and control. [23] If you can't hold the full L-sit, start by tucking your knees to your chest and progressing to a one-leg-extended variation. [12]
The Archer Pull-Up: Building Unilateral Strength
The Archer Pull-Up is a crucial stepping stone toward the one-arm pull-up, designed to build serious single-arm strength. [7] Start with a wide grip on the bar. As you pull up, focus on pulling your body toward one hand, while the other arm remains as straight as possible, extending out to the side like an archer drawing a bow. [1, 7] At the top, your chin should be close to your pulling hand. Lower yourself back to the center and repeat on the other side. This exercise heavily overloads the primary pulling arm and lat, while the assisting arm works to stabilize. [17] Common mistakes include bending the assisting arm too much or not keeping your core tight, which can cause swinging. [1]
The Typewriter Pull-Up: Mastering Control and Tension
Once you're comfortable with Archer Pull-Ups, you can progress to the Typewriter Pull-Up. This variation adds a lateral movement that builds incredible time under tension, a key driver of muscle growth. [8] Pull your chin above the bar, just as you would for a wide-grip pull-up. Then, keeping your chin above the bar, shift your entire body horizontally toward one hand, straightening the opposite arm. [2, 6] Without lowering yourself, slide smoothly across to the other side, bending the straight arm and straightening the other, like an old-school typewriter carriage. [8] This move hammers your lats, biceps, and forearms while demanding extreme control and shoulder stability. [2, 4]
The One-Arm Pull-Up: The Ultimate Test of Strength
The one-arm pull-up is the pinnacle of bodyweight pulling strength. [5, 26] Achieving it requires dedicated progression. Before you can conquer it, you must be proficient in the previous variations. Start with one-arm hangs to build grip strength and shoulder stability. [9] Then, move to assisted one-arm pull-ups; you can do this by holding your pulling wrist with your free hand. [28] As you get stronger, grip lower down your forearm to increase the difficulty. [24] Another effective method is finger-assisted pull-ups, where you use fewer and fewer fingers from your assisting hand on the bar. [11] Negative one-arm pull-ups, where you get into the top position and lower yourself slowly with one arm, are also excellent for building the required strength, but be cautious as they put significant strain on the elbow. [14]