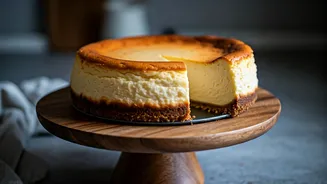


Start With Soft Ingredients
The first secret to a lump-free, velvety cheesecake batter happens before you even touch the mixer. Every single one of your cold ingredients—especially the cream cheese, but also the eggs and any sour cream or heavy cream—must be at true room temperature.
Cold cream cheese is firm and will create small, stubborn lumps when mixed, which you’ll be tempted to over-beat (more on that later). Take your ingredients out of the fridge at least two hours before you begin. If you're short on time, you can cut the cream cheese into smaller cubes and spread them on a plate to soften faster. This single step is the foundation for the smooth, luxurious texture that defines a bakery-quality cheesecake.
Mix, Don’t Whip
One of the most common mistakes in cheesecake making is over-mixing the batter, particularly after the eggs are added. When you beat the batter on high speed, you're whipping excess air into it. This air causes the cheesecake to puff up dramatically in the oven like a soufflé and then collapse as it cools, leading to the dreaded giant crack down the middle. Mix your softened cream cheese and sugar on a low-to-medium speed until just smooth. Scrape down the bowl. Then, add your eggs one at a time, mixing on low speed only until the yellow yolk disappears into the batter. The goal is to combine, not to aerate. A gentle hand is the secret to a dense, rich, and stable cheesecake.
The Bain-Marie is Non-Negotiable
If there is one ‘secret’ that separates amateurs from pros, it’s the water bath, or *bain-marie*. Baking a cheesecake in a steamy, humid environment is crucial for two reasons. First, the steam prevents the cheesecake from drying out and forming a crust, which would inevitably crack. Second, the water insulates the cake, ensuring it bakes gently and evenly from the outside in. This prevents the edges from overbaking before the centre is set, resulting in a uniformly creamy texture instead of a rubbery one. To prepare a water bath, wrap the outside of your springform pan tightly with two or three layers of heavy-duty aluminum foil to prevent leaks. Place it in a larger roasting pan, pour in the batter, and then fill the roasting pan with about an inch of hot water. It may seem like an extra step, but it is the single most effective technique for a perfect cheesecake.
The Art of the Slow Cool
Just as a cheesecake needs gentle heat to bake, it needs a gentle transition back to cool temperatures. A sudden change in temperature will cause the cheesecake to contract too quickly, causing it to... you guessed it, crack. When the baking time is up (the edges should be set but the centre should still have a slight wobble), don't immediately pull it from the oven. Instead, turn the oven off, crack the door open with a wooden spoon, and let the cheesecake cool down inside the oven for one hour. This gradual cooling process allows the cake to set slowly and evenly. After an hour, remove it from the water bath and let it continue to cool on a wire rack until it reaches room temperature before even thinking about putting it in the fridge.
Patience is the Final Ingredient
You’ve done everything right—your cake is golden, crack-free, and has cooled perfectly. Now comes the hardest part: waiting. A cheesecake is not truly 'done' when it comes out of the oven. The chilling process is essential for the flavour and texture to fully develop and set. A warm or room-temperature cheesecake will be soft, overly rich, and won't slice cleanly. It needs to be refrigerated, covered, for at least six hours, but overnight is even better. During this time, the filling will become firm, dense, and creamy, and the flavours will meld and deepen. That clean, satisfying slice you get at a bakery is only possible because the cheesecake has been thoroughly chilled. Your patience will be rewarded with the perfect texture and taste.