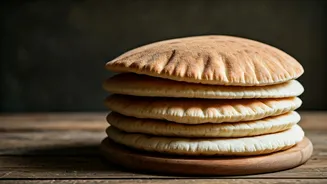


Your Weeknight Bread-Making Hero
Let's be honest: traditional bread-making can be a chore. The long proofing times, the intensive kneading, the specialized equipment—it's often too much for a tired Tuesday. This recipe sidesteps all of that. The goal here is maximum satisfaction for minimum
work. We're talking about a dough that comes together in minutes, requires a very short rest, and cooks in a simple frying pan on your stovetop. It’s a process so straightforward you can decide you want pita for dinner and have a warm stack ready in well under an hour. Forget waiting for dough to double in size; a brief 15-to-20-minute rest is all you need to relax the gluten, making it easy to roll.
The Simple Pantry-Ready Ingredients
You won’t need a special trip to the store for this recipe. It relies on basic ingredients that you likely already have in your kitchen. This is all it takes to make about six to eight wonderfully soft pitas:
2.5 cups (about 320g) of all-purpose flour, plus a little extra for dusting
1 cup (240ml) of warm water
1.5 teaspoons of instant yeast
1 teaspoon of sugar
1 teaspoon of salt
1 tablespoon of olive oil, plus more for the bowl
The warm water helps to activate the yeast quickly, and the sugar gives it a little boost to get started. The olive oil adds flavour and helps create a soft, pliable dough.
Step 1: The Five-Minute Dough
This is where the “lazy” part really shines. In a large bowl, whisk together the flour, instant yeast, sugar, and salt. Add the warm water and olive oil. Mix everything with a spoon or spatula until a shaggy, slightly sticky dough forms. There's no need for a stand mixer unless you want to use one. Once it comes together, turn the dough out onto a lightly floured surface and knead for just two to three minutes. You’re not trying to develop massive gluten structures; you just want to bring it together into a smooth, cohesive ball. The dough should feel soft and slightly tacky. Place it in a lightly oiled bowl, cover it with a cloth, and let it rest.
Step 2: A Short and Sweet Rest
This isn't a sourdough that needs to be nurtured for hours. Let the covered dough rest in a warm spot for about 15–20 minutes. This short period allows the yeast to get to work and, more importantly, lets the gluten in the flour relax. If the gluten is relaxed, the dough will be much easier to roll out without springing back. After the rest, the dough should feel a little softer and puffier, but it won't have doubled in size—and that's perfectly fine.
Step 3: Shaping and Cooking the Pitas
Divide the rested dough into six or eight equal pieces and roll each one into a ball. On a lightly floured surface, use a rolling pin to roll each ball into a circle about 6-7 inches wide and roughly 1/4 inch thick. While you roll one, keep the others covered so they don’t dry out.
Now for the cooking. Heat a heavy-bottomed skillet or cast-iron pan over medium-high heat. It needs to be properly hot to get the puff. Don’t add any oil. Place a rolled-out pita onto the hot, dry pan. Cook for about 30-60 seconds, until you see bubbles start to form. Flip it and cook for another 1-2 minutes. The pita should start to puff up like a balloon. Flip it one more time and cook for another 30 seconds. That magical puff creates the all-important pocket inside.
Tips for the Perfect Pocket
The most thrilling part of making pita is watching it inflate. If yours aren't puffing, don't worry. The most common culprit is the pan not being hot enough. Ensure your skillet is thoroughly preheated before the first pita goes in. Another key is not to roll the dough too thin or handle it too aggressively, which can press out the air that helps form the steam pocket. If a pita doesn't puff, it will still be a delicious flatbread, perfect for dipping. As you cook the pitas, stack them and wrap them in a clean kitchen towel. The trapped steam will keep them soft and pliable.