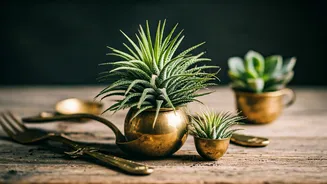


The Allure of Vintage Brass
There's a special warmth to vintage brass that modern materials often struggle to replicate. Whether it’s a gleaming, polished piece or one with a rich, dark patina earned over decades, brass adds a touch of timeless elegance to any space. In many Indian
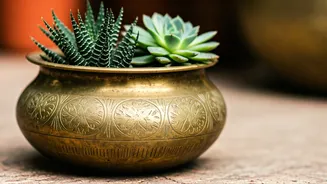
homes, these items—be it an old paan daan, a small tiffin carrier, a set of spice bowls, or a traditional water pot (lota)—are often relegated to storage. Upcycling them into planters is not just a nod to sustainability; it’s about celebrating heritage. Each scratch and imperfection tells a story, and when paired with the vibrant green of a living plant, it creates a decorative piece that is uniquely yours and full of character.
Gathering Your Supplies
Before you begin, you’ll need to assemble your toolkit. The beauty of this project is its simplicity, and you likely have many of these items at home. **For the Planter:** * **Vintage Brass Items:** Look for deep bowls (katoris), old mugs, small lotas, or even sections of a tiered tiffin box. Ensure they are sturdy and free of major cracks. * **A Drill with a Small Bit:** A 3-5mm bit suitable for metal is ideal for creating drainage holes. * **Brass Cleaner:** Optional, if you prefer a shiny finish over a vintage patina. **For the Planting:** * **Small Pebbles or Gravel:** For drainage. * **Potting Mix:** A well-draining mix, preferably one formulated for succulents or cacti. * **Your Chosen Plants:** Small succulents, cacti, air plants, or slow-growing herbs work best.
Step 1: Clean and Prepare Your Brass
First, decide on the look you want. Do you love the dark, moody look of aged brass, or do you prefer a bright, golden shine? If you want to preserve the patina, simply wash the item with mild soap and water and dry it thoroughly. If you're aiming for a polished finish, use a commercial brass cleaner or a homemade paste of lemon juice and baking soda. Apply the cleaner with a soft cloth, rub gently until the tarnish lifts, and then rinse and dry completely. This is the moment to appreciate the form and feel of the utensil before it begins its new life.
Step 2: The Crucial Drainage Hole
Proper drainage is the single most important step for ensuring your plant thrives. Without it, water will pool at the bottom, leading to root rot. Place your brass item upside down on a stable, non-slip surface, like a wooden block. Using a drill fitted with a metal-drilling bit, carefully and slowly drill one to three small holes in the base. Apply steady, gentle pressure; don't force it. The brass is a soft metal, so it should be relatively easy to pierce. **No Drill? No Problem:** If you don't have a drill or are hesitant to use one, you can create a false drainage layer. Fill the bottom quarter of your utensil with a generous layer of small pebbles or gravel before adding soil. This creates a reservoir for excess water to collect away from the plant's roots. However, you must be extremely careful not to overwater.
Step 3: Potting Your Plant
With your container prepped, it's time for the fun part. If you drilled holes, you can place a small piece of mesh or a coffee filter over them to prevent soil from washing out. Add a thin layer of pebbles for extra drainage, then fill the container about two-thirds full with your potting mix. Gently remove your chosen plant from its nursery pot, loosen the root ball slightly, and place it in the centre of your brass planter. Add more soil around the sides, pressing down lightly to secure the plant. Leave a little space at the top to make watering easier. Water lightly to help the soil settle.
Choosing the Perfect Green Companion
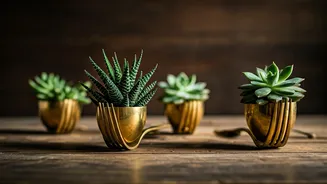
The size and depth of your brass utensil will dictate the best plant for it. Since these planters are typically small and may have limited drainage, drought-tolerant plants are your best bet. Succulents like Echeveria, Haworthia, or Sedum are excellent choices due to their shallow root systems and low water needs. Their fascinating shapes and colours create a beautiful contrast with the warm metal. Small cacti also work well. For a zero-maintenance option, consider an air plant (Tillandsia). Simply place it in the brass container—no soil needed—and mist it every week or so.
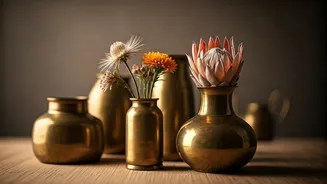
Styling Your Upcycled Creations
Your new planters are more than just pots for plants; they are miniature sculptures. Group them in clusters of three or five for a stunning centrepiece on your dining table or coffee table. A single, elegant brass lota with a trailing succulent can look beautiful on a bookshelf or a bedside table. Mix and match different shapes and sizes of brassware for a collected, eclectic look. The combination of aged metal and fresh greenery brings an organic, sophisticated, and deeply personal touch to your decor.