


Gathering Your Creative Toolkit
Before you begin this rewarding weekend project, a little preparation goes a long way. Having all your materials ready ensures a smooth and enjoyable process from start to finish. You don’t need a professional art studio, just a few key items. Here’s
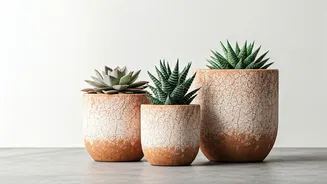
what you’ll need: - **Weathered Clay/Terracotta Pots:** Any size will do. The more varied, the more interesting your final station will look. - **Stiff-bristled Brush:** For cleaning away dirt and mineral deposits. - **Soap and Water:** A simple solution is all that’s required. - **Sandpaper (Optional):** A medium-grit sandpaper can help smooth very rough surfaces. - **Primer (Optional but Recommended):** A spray-on or brush-on primer helps the paint adhere better and provides a more even finish. - **Paint:** Acrylic craft paint or chalk paint works wonderfully on terracotta. For a minimalist look, choose a cohesive palette of whites, greys, blacks, or soft pastels. - **Paint Brushes or Foam Brushes:** A variety of sizes helps with both base coats and details. - **Clear Sealant:** A matte or satin finish acrylic sealer will protect your design from water and wear. - **Succulents:** Choose a few different types with interesting shapes and textures. - **Cactus/Succulent Potting Mix:** This specialised soil ensures proper drainage. - **Small Stones or Gravel:** For the bottom of the pots to aid drainage.
The Art of Preparation
The secret to a professional-looking finish lies in proper preparation. Don't be tempted to skip this step! Start by emptying your old pots and giving them a thorough scrub with a stiff-bristled brush, soap, and water. You want to remove all the caked-on dirt, grime, and any white, chalky mineral deposits (efflorescence). If the deposits are stubborn, a solution of one part white vinegar to ten parts water can help dissolve them. Once clean, rinse the pots thoroughly and let them dry completely in the sun. Terracotta is porous and holds moisture, so it needs to be bone-dry before you apply any paint. If the surface is particularly rough or flaking, a light sanding can create a smoother canvas for your design.
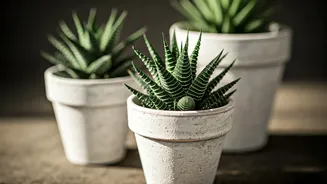
Painting with a Minimalist Vision
Now for the fun part. The minimalist aesthetic is all about ‘less is more’. Think clean lines, simple geometric patterns, and a restrained colour palette. Before you paint, applying a thin coat of primer can prevent the porous clay from soaking up all your paint and will give you a truer colour. Once the primer is dry, apply your base coat. Two thin coats are always better than one thick, gloopy one. Let the first coat dry completely before adding the second. For design ideas, consider these minimalist approaches: - **Colour Blocking:** Paint the bottom half of the pot one colour and leave the top half natural, or use two complementary colours. - **Monochrome Magic:** Use shades of white, grey, and black for a sophisticated, modern look. - **Simple Geometry:** A single horizontal stripe, a few clean vertical lines, or a series of dots can make a powerful statement. - **The Dip-Dye Effect:** Create the illusion that the pot has been dipped in paint by creating a clean, crisp line about a third of the way up. Allow your painted designs to cure for at least 24 hours. Afterwards, apply one or two thin coats of a clear matte or satin sealant. This is crucial for protecting your artwork from watering and general wear, especially if the pots will be grouped closely together.
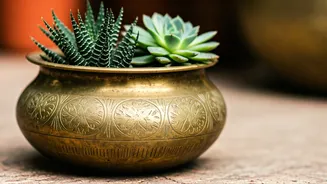
Choosing Your Perfect Succulents
The plants you choose are just as important as the pots themselves. For a minimalist station, look for succulents with strong architectural shapes and interesting textures. Varieties like Haworthia (Zebra Plant), with its stark white stripes, or the sculptural Echeveria, which grows in beautiful rosettes, are excellent choices. Gasteria, often called 'Ox Tongue', offers unique speckled patterns, while the trailing 'String of Pearls' can add a soft, cascading element to your arrangement. When selecting your plants, consider their light requirements. Most succulents love bright, indirect light, making them perfect for a sunny windowsill or a well-lit corner of your room. In the Indian climate, ensure they are protected from the harsh afternoon sun, which can scorch their leaves.
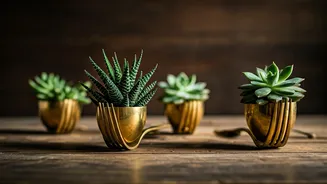
Assembling Your Succulent Station
With your pots painted and your succulents selected, it’s time to bring it all together. Begin by placing a small layer of gravel or broken pot shards at the bottom of each pot. This creates a drainage reservoir and prevents the roots from sitting in water, which is the number one enemy of succulents. Next, fill the pots with a specialised cactus and succulent potting mix. Create a small well in the soil, gently remove your succulent from its nursery pot, loosen the root ball slightly, and place it in the well. Backfill with soil, gently pressing it down around the base of the plant. Once all your succulents are potted, arrange them together on a tray, shelf, or windowsill. Play with height and spacing. Grouping pots of different sizes but with a unified colour scheme creates a cohesive and visually striking ‘station’ that feels intentional and curated.