







Why Sorting by the Label Matters
Tossing everything into one load may feel efficient, but it's a recipe for disappointment. Modern clothing is made from a vast array of fabrics, each with unique needs. Ignoring the care label is one of the most common laundry mistakes. Heavy fabrics like
denim can damage delicate materials, while different dyes can bleed and transfer onto lighter garments. Furthermore, washing clothes with different temperature and cycle requirements together means some items won't get properly cleaned while others might be damaged by water that's too hot or a cycle that's too aggressive. By taking a few extra minutes to sort correctly, you protect your clothes from shrinking, fading, and stretching, ensuring they last longer and look better.
Decoding Care Label Symbols
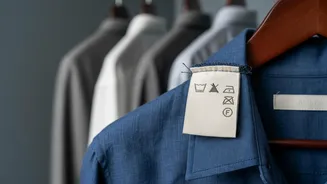
Those tiny symbols on your clothing tags are a universal language for laundry care. Understanding them is the first step to success. The washtub symbol indicates the washing method. A number inside the tub specifies the maximum water temperature in Celsius, while dots represent temperature ranges (one dot for cold, more dots for hotter). A line underneath the washtub symbol means the item requires a gentler cycle, like permanent press, and two lines indicate a delicate cycle. A hand in the tub means hand-wash only, and an 'X' through the tub means do not wash. Similarly, triangles relate to bleaching, squares to drying, and circles to dry cleaning. Familiarising yourself with these symbols is the most reliable way to know what your clothes need.
Step 1: The Initial Sort by Colour
The classic rule of separating clothes by colour still holds true and should be your first step. This prevents dark or bright dyes from bleeding onto lighter fabrics. Create three main piles: whites, lights, and darks. The whites pile should contain only pure white items like t-shirts, socks, and sheets. The lights pile can include pastels, light greys, and other soft hues. The darks pile is for blacks, navies, deep reds, and other rich colours that are more likely to transfer dye. For the first few washes, brand-new, deeply coloured items (like new jeans or a bright red sweatshirt) should be washed completely separately to test for colourfastness.
Step 2: Sub-sort by Fabric Weight and Texture
Once your colours are separated, the next step is to sort by fabric type and weight. This is crucial because heavy, abrasive fabrics can damage lighter ones during the wash cycle. For example, you should never wash heavy towels or denim jeans with delicate silk blouses or lightweight t-shirts. Heavy items absorb more water and require more agitation to get clean, which can cause pilling, snagging, and excessive wear on finer fabrics. Create separate groups for heavy items (towels, jeans, thick sweatshirts), medium-weight items (t-shirts, cotton trousers), and delicates (lingerie, silk, lace, thin synthetics). Keeping lint-producing items like towels away from lint-attracting fabrics like corduroy is also a smart move.
Step 3: Group by Care Instructions
This final sort is where you align everything with your washing machine's settings. Look at the piles you've created and group them based on their care labels. You might end up with a load of 'darks, heavy fabrics, cold wash, normal cycle' (like jeans and dark hoodies) and another load of 'lights, delicates, cold wash, gentle cycle' (like pastel synthetic blouses). This ensures that every item in a single load can tolerate the same water temperature and wash cycle. For instance, cottons can often handle warmer water, but wool and certain synthetics may shrink or be damaged by heat. Grouping by care instructions is the ultimate way to prevent mistakes and give every garment the specific treatment it needs.