


Why This Idea Is a Winner
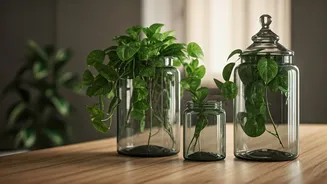
In the world of desk customisation, complexity often gets in the way. We see elaborate setups online but lack the time or budget to replicate them. This idea, however, cuts through the noise. It combines three powerful elements: the resilience of the money
plant (Epipremnum aureum), the vintage charm of apothecary bottles, and the sheer simplicity of water propagation. The result is a desk accessory that is not only beautiful but also incredibly low-maintenance. It adds a living, breathing element to a space often dominated by screens and plastic, tapping into the concept of biophilia—our innate need to connect with nature. Studies have shown that even small plants in a workspace can reduce stress, improve focus, and boost creativity. Plus, in many Indian households, the money plant is considered a harbinger of good fortune and prosperity according to Vastu Shastra, making it a meaningful addition to your work environment.
Gathering Your Simple Supplies
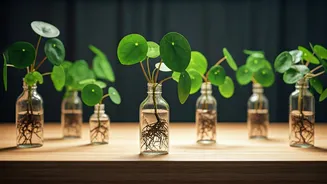
The beauty of this project lies in its accessibility. You don’t need a long shopping list or specialised tools. Here’s everything you’ll require: 1. Money Plant Cuttings: If you already have a money plant, you're all set. If not, a friend, neighbour, or local nursery can surely spare a few vines. You only need a few healthy stems. 2. Apothecary Bottles: These small, often brown or clear glass bottles with narrow necks are perfect. You can find them online or in craft stores. Don’t have any? No problem. Small perfume bottles, old-fashioned inkwells, thin glass vases, or even clean, label-free sauce or jam jars work wonderfully. The key is to use clear or semi-clear containers so you can see the roots develop. 3. Water: Regular tap water will do, but it's best to let it sit out for 24 hours. This allows chlorine, which can be harsh on new roots, to evaporate. 4. Scissors or Pruners: A clean, sharp pair is needed to take your cuttings without crushing the plant's stems.
Your Step-by-Step Guide
This entire process will take you less than ten minutes. It’s genuinely that easy. Step 1: Take Your Cuttings. Look for a healthy money plant vine. Identify a 'node'—it’s the small brown bump or nub on the stem from which leaves and roots grow. Using your sharp scissors, make a clean cut about one centimetre below a node. Your cutting should be about 4-6 inches long and have at least one or two leaves, in addition to the node. Step 2: Prepare the Leaves. Remove any leaves on the part of the stem that will be submerged in water. This is crucial because submerged leaves will rot, fouling the water and harming the plant. Step 3: Prepare the Bottles. Wash your chosen bottles thoroughly with soap and water to remove any dust or residue. A clean environment gives your cuttings the best chance to thrive. Step 4: Add Water and Arrange. Fill your bottles with the dechlorinated water, leaving a little space at the top. Gently place one or two cuttings into each bottle, ensuring the nodes are fully submerged but the remaining leaves are well above the water line. And that's it! You're done.
Placement and Ongoing Care
Where you place your new green companions matters. Money plants are famously forgiving, but they do have preferences. They thrive in bright, indirect sunlight. A spot on your desk that gets light from a nearby window but isn't in a direct, scorching sunbeam is perfect. Too much direct sun can burn the leaves. Caring for your new setup is just as simple as creating it. The only real task is to change the water every 7-10 days to keep it fresh and oxygenated. This also prevents algae from forming. When you change the water, give the bottle a quick rinse. In a few weeks, you'll be rewarded with the sight of delicate white roots sprouting from the nodes—a satisfying sign of your success. There's no need for fertilizer when growing in water, especially in the initial stages. The plant will happily pull what it needs from the water.