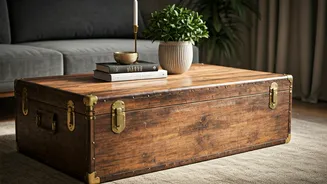


The Hunt for the Perfect Trunk
The first step is an adventure in itself. Forget mainstream furniture stores and dive into the world of second-hand treasures. Flea markets in cities like Delhi, Mumbai, or Kolkata are fantastic hunting grounds. Keep an eye out at local antique shops,
kabadiwalas who specialise in old furniture, or even online marketplaces. Look for a trunk with 'good bones' — a sturdy frame, intact hardware (even if rusty), and interesting details like old travel stickers or embossed patterns. Don't be deterred by surface dirt, peeling paint, or a musty smell; these can be fixed. Avoid trunks with major structural damage like large cracks in the wood or severe water rot, as these are much harder to repair.
Gather Your Restoration Toolkit
Before you begin, assemble your supplies. Having everything ready will make the process smoother and more enjoyable. You don’t need a professional workshop, just a few key items: * **Cleaning Supplies:** Mild soap or detergent, warm water, buckets, soft cloths, a soft-bristle brush, and a vacuum cleaner with a brush attachment. * **Safety Gear:** Gloves, a dust mask, and safety glasses are non-negotiable, especially for sanding and cleaning. * **Repair & Refinishing:** Sandpaper (medium and fine grit), wood filler, metal polish (for brass or steel hardware), paint stripper (if needed), paint or wood stain, and a clear sealant (polyurethane or wax finish). * **Optional Additions:** New fabric for the interior lining, castor wheels or furniture legs for added height.
The Deep Clean and Preparation
This is where the transformation truly begins. Start by thoroughly vacuuming the inside and outside of the trunk to remove loose dust and debris. Next, tackle the interior. If it has a paper or fabric lining that's mouldy or badly damaged, it's best to carefully remove it. To eliminate musty odours, try leaving an open container of baking soda or activated charcoal inside for a few days. For the exterior, use a damp cloth with a bit of mild soap to wipe down all surfaces. For stubborn grime on wood or metal, a soft brush can be effective. Use metal polish and a soft cloth to bring the shine back to hinges, latches, and studs. Be patient; this stage sets the foundation for a beautiful finish.
Restore, Repaint, or Retain?
Now, decide on the final look. Do you want to restore the original finish or give it a completely new identity? * **For a Natural, Rustic Look:** If the wood is in good condition, simply sand it lightly with fine-grit sandpaper to smooth it out. Then, apply a clear wax or a polyurethane sealant to protect it and bring out the natural grain. This honours the trunk's history. * **For a Pop of Colour:** If the surface is too damaged or you prefer a modern aesthetic, painting is a great option. Sand the surface to create a key for the paint to adhere to. Apply a coat of primer, followed by two coats of your chosen colour. Chalk paint is an excellent choice for a vintage, matte finish. * **Protect the Finish:** Whichever path you choose, finishing with a durable topcoat is crucial for a coffee table. It will protect the surface from spills and scratches.
Making It a Functional Coffee Table
A trunk's top surface is often not perfectly flat. To create a stable, usable surface for cups and glasses, a custom-cut piece of glass or clear acrylic is the perfect solution. It protects the restored top while providing a level plane. Have a local glass cutter measure the top of your trunk and create a piece with smooth, bevelled edges for safety. Another consideration is height. Many trunks are too low to be comfortable coffee tables. You can easily add height and a more finished look by screwing furniture legs or castor wheels onto the bottom four corners. This also makes the heavy trunk easier to move for cleaning.