



The 'Tech Neck' Connection to Back Pain
It seems counterintuitive, but the way you hold your head while scrolling through your phone directly impacts your lower back. The human head is heavy, weighing about 10 to 12 pounds. When you tilt it forward by just 15 degrees, the force on your cervical
spine increases to nearly 30 pounds. At a 45-degree angle, common for phone use, it's about 50 pounds. To keep you from toppling over, your body compensates. Your shoulders round forward, and your upper back hunches. This, in turn, can cause your pelvis to tilt, putting abnormal stress on the muscles and vertebrae of your lower back. This chain reaction of poor posture, starting from the neck, is a primary contributor to the nagging lower back pain many people experience after long hours of screen time. Fortunately, targeted yoga poses can help counteract this pattern by strengthening key muscles and promoting healthy spinal alignment.
Cat-Cow Pose (Marjaryasana-Bitilasana)
This foundational yoga sequence is a gentle way to awaken and increase the flexibility of your entire spine. It helps relieve tension from your neck all the way down to your tailbone, making it a perfect starting point for back-pain relief. The movement encourages postural awareness and can help bring the spine into correct alignment. How to do it: 1. Start on all fours, with your hands directly under your shoulders and your knees directly under your hips. Keep your back in a neutral, flat position. 2. Inhale as you drop your belly toward the floor, lifting your chin and chest to gaze upward. This is Cow Pose. Broaden your shoulder blades and draw your shoulders away from your ears. 3. Exhale as you round your spine toward the ceiling, tucking your chin toward your chest and drawing your navel in. This is Cat Pose, resembling a cat stretching its back. 4. Continue flowing between Cow on the inhales and Cat on the exhales for at least one minute, moving with your breath.
Child’s Pose (Balasana)
Child's Pose is a resting posture that offers profound benefits for a tight lower back. It gently elongates and decompresses the spine, creating space between the vertebrae and relieving pressure. This pose also provides a wonderful stretch for the hips, thighs, and ankles while calming the nervous system. How to do it: 1. Begin on your hands and knees. 2. Bring your big toes to touch and spread your knees slightly wider than your hips. 3. Sit your hips back toward your heels, folding your torso forward and down between your thighs. 4. Extend your arms out in front of you or rest them alongside your body with palms facing up. Rest your forehead on the mat. 5. Breathe deeply into your back, feeling the muscles expand and release with each breath. Hold for 30 to 90 seconds, or for as long as it feels restorative.
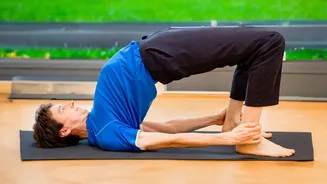
Bridge Pose (Setu Bandhasana)
While stretching is crucial, strengthening is equally important for long-term relief. Bridge Pose strengthens the glutes, hamstrings, and back muscles, which are all essential for supporting the lower back and maintaining good posture. By activating these muscles, you counteract the effects of prolonged sitting and slouching. How to do it: 1. Lie on your back with your knees bent and your feet flat on the floor, hip-distance apart. Your feet should be close enough that you can touch your heels with your fingertips. 2. Rest your arms alongside your body, palms down. 3. Press firmly through your feet and inhale as you lift your hips off the floor. 4. Engage your core and glutes to keep your pelvis stable. Try to create a straight line from your shoulders to your knees. Avoid arching your lower back excessively. 5. Hold for 20 to 30 seconds, breathing steadily, then slowly lower your hips back to the floor on an exhale.
Sphinx Pose (Salamba Bhujangasana)
As a direct antidote to the forward hunch of tech neck, Sphinx Pose offers a gentle backbend that helps restore the natural curve of the lower spine. It strengthens the back while stretching the chest, shoulders, and abdomen. Unlike the deeper Cobra Pose, Sphinx is performed on the forearms, making it more accessible and putting less pressure on the lower back, which is ideal for beginners or those with sensitivity. How to do it: 1. Lie on your stomach with your legs extended behind you. 2. Place your elbows directly under your shoulders and your forearms on the floor, parallel to each other. 3. Inhale and gently lift your head and chest off the floor, pressing your forearms and palms down. Keep your navel on the floor. 4. Draw your shoulder blades together and press your heart forward to open the chest. Keep your neck relaxed and in line with your spine. 5. Hold for 30 seconds to a minute, breathing into the gentle arch. To release, slowly lower your chest and head back to the floor.