




Why Cotton Sarees Are Perfect for This Project
Before you start snipping, let's appreciate why cotton sarees are an ideal choice. Their fabric is naturally breathable, making the cushions comfortable for lounging on a warm afternoon. Unlike heavier silks, cotton is easy to wash and manage. More importantly,
each saree has a unique story, with prints, colours, and borders that can't be found in a store. Repurposing them is a beautiful act of sustainability that preserves sentiment and craft. By transforming them, you are not just making a cover; you are creating a piece of functional art filled with personal history. The project is incredibly beginner-friendly and requires minimal sewing skills.
Gathering Your Tools and Materials
A good project starts with good preparation. You won't need much, and you might already have most of these items at home. Here’s a quick checklist: - Old Cotton Saree Scraps: Choose ones with colours and patterns you love. - Cushion Inserts: Square or rectangular inserts of your desired size. - Fabric Scissors: A sharp pair makes all the difference. - Measuring Tape: For accurate cutting. - Sewing Machine: This will make the job quicker, but a needle and thread work perfectly well for a hand-sewn project. - Matching Thread: Choose a colour that blends with your saree fabric. - Pins: To hold the fabric in place while you sew. - Iron: For pressing fabric and seams flat.
Step 1: Prepare and Cut Your Fabric
First, prepare your saree fabric. It's essential to wash and iron the material to pre-shrink it and get rid of any wrinkles. Carefully inspect the saree and cut away any torn or heavily worn sections, saving the strongest parts for your project. For this guide, we'll create a simple envelope-style cover, which requires no zippers or buttons. For a standard 16x16 inch cushion, you will need to cut three pieces of fabric: 1. Front Piece: One square measuring 17x17 inches. This extra inch accounts for a half-inch seam allowance on all sides. Try to centre an interesting motif or part of the border here. 2. Back Pieces (x2): Two rectangular pieces, each measuring 17x12 inches. These will overlap to create the 'envelope' opening.
Step 2: Sew the Envelope Closure
Take your two rectangular back pieces. On one of the 17-inch-long edges of each piece, create a clean hem. To do this, fold the edge over by about half an inch, press it flat with an iron, and then fold it over again by another half-inch to hide the raw edge. Stitch this hem down on both rectangular pieces. This will form the neat, finished opening of your cushion cover. This simple step is crucial for a professional look and prevents the fabric from fraying with use.
Step 3: Assemble and Stitch Your Cushion Cover
Lay your 17x17 inch front piece on a flat surface with the 'right' side (the patterned side) facing up. Now, place one of your hemmed back pieces on top, with its 'right' side facing down. Align its raw edges with the top and sides of the front piece; its hemmed edge should be somewhere in the middle. Next, place the second hemmed back piece on top of that, aligning its raw edges with the bottom and sides of the front piece. Its hemmed edge will overlap with the first back piece in the centre. Pin all four sides securely. Using your sewing machine or a needle and thread, stitch all the way around the perimeter with a half-inch seam allowance. Trim any excess fabric from the corners, and then turn the cover right-side out through the envelope opening. Push out the corners to get a crisp shape, and give it a final press with the iron.
Festive Touches and Balcony-Ready Care
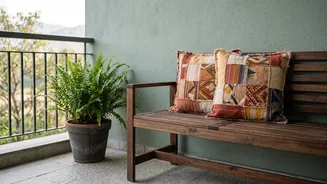
To make your cushion covers truly festive, consider adding some simple embellishments. You can create tassels or pom-poms from leftover saree threads or add a contrasting border using a different saree scrap. For balcony use, remember that while cotton is breathable, it is not weatherproof. These covers are perfect for covered or semi-enclosed balconies. To make them more durable, you can apply a fabric-protectant spray which helps repel water and stains. However, it's always best to bring them indoors during heavy rain or harsh weather to preserve their colour and integrity.