


The Rise of Miniature Greenery
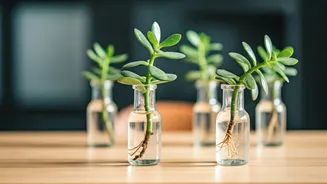
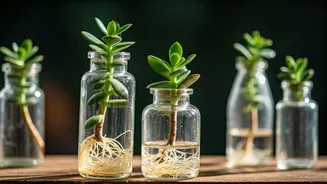
In the world of interior design, small details often make the biggest impact. The trend of propagating trailing jade plants in apothecary vials is a perfect example. It taps into several popular aesthetics at once: the biophilia movement (our innate need
to connect with nature), the rising popularity of vintage and scientific-inspired decor, and the satisfaction of nurturing something new. Unlike large statement plants, these miniature propagation stations offer a subtle, almost magical touch to a bookshelf, windowsill, or desk. They look like tiny experiments in progress, bringing a dynamic, living element to forgotten corners of a room. On platforms like Instagram and Pinterest, hashtags related to 'plant propagation' and 'vintage decor' are filled with images of these little green setups, inspiring a new wave of plant parents to try their hand at creating life in miniature.
Meet the Trailing Jade
The star of this trend is the Trailing Jade, scientifically known as *Senecio jacobsenii* (though sometimes other trailing succulents are used). This plant is not a true jade (*Crassula ovata*) but gets its name from its fleshy, teardrop-shaped leaves that grow along a trailing stem. As the plant matures, the leaves overlap, creating a beautiful, braided, or stacked appearance that resembles a green pinecone or a dragon's tail. Its hardy nature and willingness to root from cuttings make it an ideal candidate for propagation. The stems naturally want to creep and hang, making them look particularly graceful as they spill from the narrow neck of a small vial. Its vibrant green colour provides a stunning contrast against the clear or amber glass of an apothecary bottle, making it as much a piece of art as a gardening project.
Finding the Perfect Vial
The vessel is just as important as the plant. Apothecary vials, with their vintage charm and scientific feel, are the go-to choice. These small glass bottles, once used by pharmacists to hold tinctures and medicines, are perfect for holding a single cutting. Look for clear or amber glass, which allows you to watch the roots develop while protecting them from harsh, direct sunlight. The narrow neck is also a key feature, as it provides just enough support to hold the cutting upright without submerging its leaves. You can find authentic vintage vials at flea markets and antique shops, or purchase modern reproductions from craft stores and online retailers. Don’t be afraid to collect a few different shapes and sizes to create a beautiful, clustered display on a shelf or tray.
How to Take a Cutting
Propagating a trailing jade is surprisingly simple. First, identify a healthy, mature mother plant. Look for a stem that is at least a few inches long and has plenty of healthy leaves. Using a clean, sharp pair of scissors or a blade, make a cut just below a leaf node (the point where a leaf grows from the stem). This area contains the cells that will differentiate into new roots. After you take your cutting, gently remove the bottom-most leaf or two. This exposes the nodes that will be submerged in water and prevents the leaves from rotting, which could contaminate the water and hinder root growth. Let the cutting sit out in a dry, shaded spot for a day or two. This allows the cut end to 'callous' over, which helps prevent it from rotting when you place it in water.
Water Propagation and Care
Once your cutting has calloused, it's time for its new home. Fill your apothecary vial with room-temperature water—filtered or distilled water is best to avoid any chemicals that might be in tap water. Place the cutting into the vial, ensuring that the bare nodes are submerged but the remaining leaves are well above the waterline. Find a spot for your vial that receives bright, indirect light. A north-facing windowsill or a spot a few feet from a sunnier window is ideal. Direct sunlight can be too intense and may scorch the cutting or encourage algae to grow in the water. Now, the hardest part: be patient! Check the water level every few days and top it up as needed. Change the water completely once a week to keep it fresh and oxygenated.
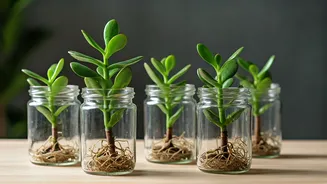
From Vial to Pot
Within a few weeks, you should start to see thin, white roots emerging from the submerged nodes. It’s a truly rewarding sight! Wait until the roots are at least an inch long and have started to develop smaller, secondary roots. This indicates the new plant is strong enough to transition to soil. Prepare a small pot with a well-draining succulent or cactus mix. Gently remove the rooted cutting from the vial and plant it in the soil, burying the roots completely. Water it lightly and place it back in its bright, indirect light spot. Your tiny experiment is now a fully-fledged plant, ready to grow and eventually provide cuttings for your next propagation project.