






It All Begins with the Flour
The foundation of any great roti is the flour, and not all flours are created equal. For the softest results, you need high-quality, finely ground whole wheat flour, known as 'atta'. Unlike coarse or low-quality flour which can result in dense, hard rotis,
a fine atta absorbs water more effectively, creating a smoother, more pliable dough. Freshness also matters; freshly milled atta contains more natural moisture and oils, contributing to a softer end product. While whole wheat flour is the traditional choice for its nutritional benefits, including fiber, iron, and B vitamins, some cooks add a small amount of all-purpose flour for an even softer texture. However, using only all-purpose flour (maida) is generally avoided as it can lead to dense rotis. The key is to select a quality chapatti atta specifically designed for this purpose.
The Importance of Proper Hydration
Getting the water-to-flour ratio right is perhaps the most crucial and often trickiest part of making soft rotis. A dough that is too dry will produce stiff rotis, while a dough that is too wet will be sticky and difficult to handle. Many experienced cooks recommend using warm water, as it helps soften the flour and activate the gluten more efficiently, resulting in a more elastic dough. The ideal hydration can vary depending on the brand and type of flour, but a good starting point for beginners is often cited as around 60-80% hydration by weight, meaning for every 100 grams of flour, you would use 60 to 80 grams of water. The goal is to achieve a dough that is soft, pliable, and slightly tacky but not sticky. It takes practice, but mastering dough hydration is a game-changer.
Why Patience and Resting Are Key
In the rush to get dinner on the table, it’s tempting to skip the resting period, but this step is non-negotiable for soft rotis. Kneading the dough develops gluten, the protein network that gives the roti its structure. However, this process also makes the dough tense. Resting the dough, typically for at least 15-30 minutes, allows the gluten strands to relax. This makes the dough much easier to roll out without it springing back. Beyond just making it easier to handle, this relaxation period allows the flour to fully hydrate, distributing moisture evenly throughout the dough. This leads to a more tender and pliable final product. After kneading, cover the dough with a damp cloth or a lid to prevent it from drying out while it rests.
Mastering the Heat
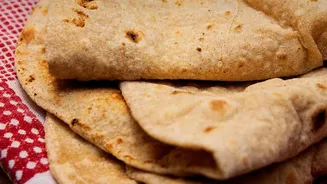
The final piece of the puzzle is the cooking process, which hinges on mastering heat. An inadequately heated pan, or tawa, is a common culprit for hard rotis. The pan should be preheated over medium-high heat. A good test is to sprinkle a few drops of water on the surface; if they sizzle and evaporate immediately, the tawa is ready. Cooking at the right temperature is a delicate balance. If the heat is too low, the roti cooks slowly, causing moisture to escape and resulting in a dry, hard flatbread. If it's too hot, the outside will burn before the inside is cooked. The magic of a puffed-up roti, or phulka, happens when the high heat turns the trapped moisture inside the thin dough into steam, causing it to inflate. This rapid puffing cooks the roti from the inside out, keeping it light and soft.