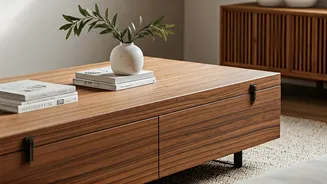


Embracing the Japandi Philosophy
Before you pick up a sander, it's worth understanding what makes Japandi design so captivating. It’s a beautiful hybrid of Japanese minimalism and Scandinavian functionality. The style celebrates clean lines, natural materials, and a sense of calm. Think
muted colour palettes (beiges, greys, soft whites), raw textures like wood and stone, and a deep appreciation for craftsmanship. A core concept is 'wabi-sabi'—finding beauty in imperfection. This makes an old wooden trunk, with its unique history of scratches and dents, a perfect candidate. The goal isn't to make it look brand new, but to honour its story while giving it a modern, purposeful form.
To Transform or To Preserve?
This is the most important step. Transforming an heirloom is an emotional decision. Before you proceed, ask yourself a few questions. What is its sentimental value? Is it a priceless antique or a sturdy, well-loved family piece? If it’s a true antique with significant monetary value, or if its original state is deeply precious to other family members, it’s best to preserve it. Consult an antique dealer if you're unsure. However, if it’s a beautiful but underused piece whose purpose has faded, upcycling it is a wonderful way to bring its story into your daily life. The best heirlooms are the ones we can live with and love every day.
Planning Your Project
A successful project starts with a good plan. First, decide on the final look. Will you keep the original wood finish, or give it a light wash? What kind of legs will you add? For a Japandi aesthetic, simple is best. Look for short, tapered wooden legs or minimalist black metal hairpin legs. Your shopping list will likely include: * A gentle wood cleaner * Fine-grit sandpaper (around 220-grit) * A clear, matte or satin polyurethane sealant * A set of four furniture legs with mounting plates * A drill and screws * Tack cloths or microfiber cloths for dusting
Step 1: The Gentle Clean-Up
Start by thoroughly cleaning the trunk, inside and out. Use a mild wood cleaner and a soft cloth, following the product's instructions. Be gentle; the goal is to remove decades of dust and grime, not to strip the wood's character. Avoid harsh chemicals or soaking the wood, which can cause it to warp or swell. If there are old stickers or residue, use a small amount of citrus-based remover and a plastic scraper. Once clean, let the trunk air dry completely in a well-ventilated area away from direct sunlight.
Step 2: Sand and Seal
This step is about feel, not just looks. You want a surface that’s smooth to the touch but still looks aged. Lightly sand the top and sides with fine-grit sandpaper, always moving in the direction of the wood grain. This will smooth out any roughness without erasing the patina. Your goal is a touchable surface, not a factory-perfect one. Wipe away all the dust with a tack cloth. Now, apply a thin, even coat of a matte or satin polyurethane sealant. This protects the wood from spills and stains—essential for a coffee table—without adding an unnatural high-gloss shine that would clash with the Japandi vibe. Apply two or three thin coats, letting each one dry completely.
Step 3: Giving It a Lift
Adding legs is what truly transforms the trunk into a coffee table. Most furniture legs come with mounting plates. Flip your trunk upside down onto a soft surface (like an old blanket) to prevent scratching your newly sealed top. Position the mounting plates at the four corners, setting them in slightly from the edge for stability and a clean look—about 2-3 inches is a good rule of thumb. Use a pencil to mark the screw holes. Drill small pilot holes to prevent the wood from splitting, then securely screw the mounting plates into place. Finally, screw the legs into the plates. Flip it over and admire your work!