



The Dangers of Too Much Space
Giving a plant a pot that is too large, a practice known as 'overpotting', can do more harm than good. The primary risk is root rot. A large volume of soil holds more water than a small root system can absorb. This excess moisture creates a soggy, low-oxygen
environment where roots can suffocate and decay. Instead of encouraging growth, the plant may enter a state of shock or stress, showing signs like yellowing leaves, wilting, or stunted growth. The plant will also expend its energy trying to grow roots to fill the vast new space rather than producing the lush foliage you want to see. A gradual increase in pot size ensures the root-to-soil ratio remains balanced, allowing for proper water absorption and aeration.
Signs Your Plant Needs a New Home
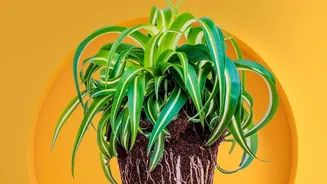
How do you know when growth actually requires a new pot? Your plant will give you several clear signals. One of the most obvious signs is roots growing out of the drainage holes at the bottom of the pot. You might also see roots pushing up against the top of the soil. Another key indicator is how quickly the soil dries out. If you find yourself needing to water far more frequently than you used to, it's a strong sign the pot is full of roots with little soil left to retain moisture. Other signs include slowed or stunted growth during the growing season, a top-heavy appearance where the plant looks disproportionately large for its container, or water that seems to run straight through the pot without being absorbed.
The Just-Right Rule of Thumb
When you've determined it's time to repot, the guiding principle is to go up only one size at a time. For most houseplants, this means choosing a new pot that is just one to two inches larger in diameter than the current one. For very large, fast-growing plants, you might go up by two to three inches, but the gradual approach is almost always best. This small increase provides enough new space for roots to expand without creating a large, unused volume of soil that can become waterlogged. It may seem like a small step, but it’s the perfect amount of room to encourage healthy development until the next upgrade is needed in a year or two.
A Step-by-Step Guide to Repotting
Once you have your slightly larger pot, it’s time to make the move. First, water your plant a day or two before repotting to help reduce stress. To remove the plant, gently tip the pot on its side and tap the bottom and sides to loosen the soil. Carefully slide the plant out, supporting its base. Once it's out, gently tease or loosen any roots that are tightly wound in the shape of the old pot; this encourages them to grow into the new soil. Place a layer of fresh, high-quality potting mix in the new pot. Set the plant inside, ensuring the top of its root ball sits about an inch below the rim of the new pot. Fill in the space around the root ball with more fresh soil, gently patting it down to eliminate large air pockets. Finally, give the plant a thorough watering to help the new soil settle around the roots.
Choosing the Right Materials
Pot size is critical, but the material also matters. The most important feature of any pot is a drainage hole, which is non-negotiable for preventing root rot. Terracotta pots are porous, meaning they dry out faster, which is great for succulents and plants that prefer drier conditions. Plastic and glazed ceramic pots retain moisture longer, making them suitable for tropical plants and others that like consistently moist soil. When it comes to soil, always use a fresh, high-quality potting mix designed for indoor plants, not garden soil, which is too dense and can carry pests. Mixes containing ingredients like perlite, pumice, or coco coir improve aeration and drainage, creating a healthy environment for roots.