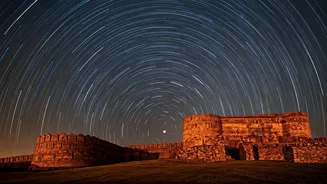


The Magic of Film Grain
Before digital sensors, there was film. And film had grain—tiny, random particles of metallic silver that created the image. The result wasn't perfectly smooth; it was textured, alive. Adding digital 'film grain' to a photo is the most common way to fight
back against the sterile perfection of modern cameras. It introduces a fine, gritty texture that softens sharp digital edges, unifies colours, and adds a tangible sense of mood and nostalgia. A heavy grain effect can make a photo feel raw, documentary-style, and immediate, like a still from an old film. A subtler grain can simply add a layer of sophistication and depth, preventing a picture from looking too 'digital'. Think of it as the visual equivalent of the warm crackle on a vinyl record. It’s a flaw that feels more authentic than flawlessness. **Pro Tip:** Apply grain last in your editing process. Don't go overboard; the goal is to add texture, not to obscure the details of your image. Most apps have a slider—start low and increase it until it feels right.
Chasing the Light Leak
A light leak is exactly what it sounds like: an accident. On old film cameras, a crack in the body or a poorly sealed film door would let stray light 'leak' onto the film, creating unpredictable streaks of orange, red, or white across the image. Photographers used to dread them, but these happy accidents often produced ethereal, dreamlike results. Today, digital light leak overlays are incredibly popular for a reason. They wash a photo in warm, hazy light, evoking feelings of a sun-drenched memory or a forgotten summer afternoon. Unlike grain, which adds texture, a light leak adds a blast of colour and emotion. It’s perfect for portraits where you want a soft, romantic feel, or for landscapes that could use a touch of vintage magic. The key is to make it look unintentional, as if you just caught the light at the perfect, fleeting moment. **Pro Tip:** Position the light leak logically. They usually originate from the edge of the frame. Use an app that allows you to rotate and resize the overlay so it complements your photo's composition instead of distracting from it.
Mastering the Lens Flare
Made famous by directors like J.J. Abrams, the lens flare is a cinematic staple that has found its way into still photography. A real lens flare happens when a bright light source (like the sun or a streetlamp) hits the camera lens directly, causing light to scatter and reflect inside it. This creates rings, starbursts, and hazy streaks of light. While an overly aggressive flare can be distracting, a well-placed one can dramatically enhance an image. It adds a sense of scale, energy, and cinematic grandeur. A subtle flare peeking from behind a subject can add a warm, backlit glow, making them look heroic or angelic. It tells the viewer: this is a big, important moment. It’s less about nostalgia and more about adding a blockbuster feel to your everyday shots. **Pro Tip:** Use lens flares to enhance an existing light source in your photo. Don't add a bright flare to a dimly lit indoor scene—it will look fake. The best flares work *with* the light you already have.
The Subtle Arts: Vignettes and Aberrations
This is where we get into the finer details of analog imperfection. A vignette is a darkening of the corners and edges of a photo, a common flaw in older lenses. In modern editing, a subtle vignette is a powerful tool. It draws the viewer's eye towards the centre of the frame, focusing their attention on the main subject. Chromatic aberration is another old-lens quirk, appearing as a subtle fringe of colour (often magenta or green) along high-contrast edges. While professional photographers spend a fortune on lenses that eliminate this 'flaw', adding a tiny amount back in digitally can enhance the vintage aesthetic. These effects are the seasoning, not the main dish. When used sparingly, they work with grain and light leaks to build a cohesive, retro-inspired look that feels thoughtfully crafted rather than just filtered. **Pro Tip:** The best vignettes are invisible. If you can immediately tell a photo has a vignette, you’ve used too much. For chromatic aberration, find an app like VSCO or RNI Films that simulates it subtly and focus on using it for specific, high-concept vintage edits.