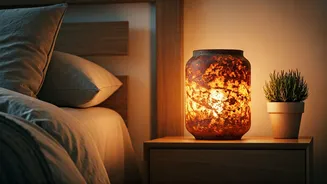


Why Terracotta Works Wonders
There's an undeniable charm to terracotta. Its natural, earthy tones and slightly porous texture bring a sense of warmth and history to any room. When used as a lampshade, the clay material casts a soft, downward glow that is perfect for creating a relaxing
and intimate atmosphere in a bedroom. This project isn't just about making a lamp; it's about introducing a piece of handcrafted, rustic elegance into your personal sanctuary. It’s an upcycling project that is both sustainable and incredibly stylish, proving that high-end design can be achieved with the most humble of materials.
Gather Your Materials
Before you begin, you’ll need to assemble a few key items. Most are available at your local hardware or home goods store. You will need: a terracotta pot of your desired size, a pendant light cord set or a lamp kit [2, 19], a power drill, a carbide masonry or diamond-tipped drill bit [4, 12], masking or painter's tape, a bucket of water, and some sandpaper or a file. For the electrical components, a simple pendant cord set is often the easiest solution, sometimes called a swag cord. [1] For customization, you might also want to have acrylic craft paint, brushes, and a clear sealant on hand.
Step 1: Prepare the Pot
Proper preparation is key to preventing the clay from cracking. The most important step is to soak the pot. [4] Place your terracotta pot in a bucket and cover it completely with water. Let it soak for at least an hour, though overnight is even better. [4] This saturates the clay, which acts as a lubricant and coolant, making it much easier and safer to drill through. [4] Once it has soaked, remove the pot from the water and pat it dry. Then, locate the drainage hole at the base—this is where you will be drilling to widen it for the lamp cord.
Step 2: Drill the Hole Safely
This is the most crucial part of the process. Place a piece of masking tape over the drainage hole; this will help prevent the drill bit from slipping. [17] Start with a small masonry bit and drill at a slow, steady speed with light pressure. [4, 6] Let the drill do the work; forcing it will almost certainly crack the pot. [4, 17] You can start drilling at a 45-degree angle to create a small groove, then gradually straighten the drill to a 90-degree angle. [12, 21] If you need a larger hole, gradually increase the size of your drill bit until the lamp socket fits snugly through the opening. [4] A little water on the drilling area can also help keep things cool. [12] Once done, use sandpaper or a file to smooth any rough edges around the new opening.
Step 3: Personalise Your Shade
Now for the creative part. You can leave the terracotta in its natural, rustic state or customize it to match your bedroom decor. Before painting, make sure the pot is completely dry. You can apply a coat of primer or start directly with acrylic craft paint. [16] Consider a solid color, a geometric pattern, or a distressed, aged finish by dry-brushing layers of different paint shades. [16] Once you are happy with your design and the paint is dry, you can apply a clear matte or satin sealant to protect the finish, although this is optional. [1]
Step 4: Assemble Your Lamp
With your pot prepped and decorated, it's time to install the lighting. Unplug the cord set before you begin. Gently thread the socket end of your pendant cord through the hole you drilled in the pot. [1] Many lamp kits have retaining rings or clips that secure the socket in place from the inside. [1] Ensure it’s firmly attached so the pot hangs securely. If the fit is slightly loose, you can apply a bead of strong sealant around the socket for extra stability. [1] Always follow the specific instructions that come with your lamp kit for the safest and most secure assembly. [19]
Step 5: Choose the Right Bulb
The final touch is choosing the right light bulb. This is extremely important for safety. Because terracotta can retain heat, you must use an LED bulb. [3, 23] LED bulbs produce significantly less heat than traditional incandescent or halogen bulbs, which minimizes any risk of the pot overheating or cracking. [3, 23] Look for an LED bulb rated for use in enclosed fixtures. [20, 25] A warm white bulb (around 2700K) will enhance the cozy, amber glow of the terracotta, perfecting the warm ambiance you set out to create.