





Diagnosing the Drowning Plant
The primary cause of a waterlogged planter is poor drainage. This happens when water enters the pot faster than it can exit, leaving the soil saturated and cutting off oxygen to the roots. The tell-tale signs above ground are often misleading; a wilting
plant with yellowing leaves looks thirsty, but in this case, it's actually drowning. The roots, deprived of air, begin to rot and can no longer absorb water or nutrients effectively, causing the plant to decline even when the soil is wet. To confirm, you may need to gently inspect the roots. Healthy roots are typically firm and white or light-colored. If they are brown, black, soft, or mushy, and give off an unpleasant odor, root rot has set in.
The Smart Blend: More Than Just Sand
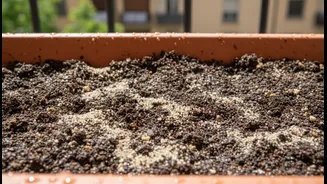
The key to recovery and prevention is a soil blend that promotes excellent drainage. The term "smart coarse sand soil conditioning blend" refers to a mix where coarse sand is a key player, but not the only one. It's crucial to use the right kind of sand. Horticultural sand—also called sharp sand or coarse sand—is made of large, gritty particles of crushed granite or quartz. This texture creates air pockets in the soil, allowing water to flow through freely. Never use fine play sand or beach sand; their small, rounded particles compact when wet and can turn your soil into something resembling concrete, making drainage worse. To create a truly smart blend, you'll combine this coarse sand with other ingredients that improve aeration and nutrient retention, such as perlite, vermiculite, and rich organic compost.
Step 1: Rescue and Root Triage
First, carefully remove the plant from its waterlogged pot. Lay it on its side and gently slide the root ball out. Once free, shake off as much of the old, soggy soil as you can and examine the roots. Using a clean pair of scissors or pruning shears, you must trim away any parts that are clearly rotted—the brown, mushy sections. Be thorough but gentle; this surgical step is vital to stop the rot from spreading further and gives the healthy roots a chance to recover. Don't be afraid to remove a significant portion of the root ball if the damage is extensive. The plant’s survival depends on removing the diseased tissue.
Step 2: Create Your New Soil Blend
Now it's time to mix your superior soil. There is no single perfect recipe, but a reliable blend for most balcony plants can be made by combining three main components. On a tarp or in a large bucket, mix together two parts standard potting mix, one part coarse horticultural sand, and one part perlite or pumice. The potting mix provides a base, the coarse sand ensures rapid drainage, and the perlite—a lightweight volcanic rock—adds even more aeration without adding significant weight, which is a bonus for balconies. For an extra nutrient boost and improved water retention (without waterlogging), you can also add a scoop of well-rotted compost or worm castings to your blend. Mix these ingredients thoroughly until you have a light, fluffy, and evenly combined medium.
Step 3: Repotting and Future-Proofing
Before you repot, check the planter itself. Ensure its drainage holes are clear and numerous enough for the pot's size. You can add a piece of mesh over the holes to prevent them from getting clogged with soil. Place a shallow layer of your new soil mix in the bottom of the pot. Position your plant in the center, and begin filling in around the root ball with your custom blend, gently firming the soil as you go to eliminate large air pockets. Water the plant lightly, just enough to settle the new soil. Moving forward, change your watering habits. Always check the soil moisture before watering again; the top inch or two should feel dry to the touch. This simple check is the best way to prevent your balcony planters from ever becoming waterlogged again.