

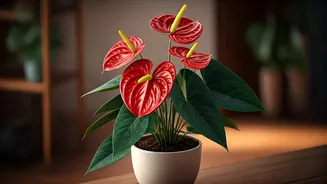


The Allure of the 'Black Velvet'
Before we get our hands dirty, let's appreciate the subject. The Alocasia 'Black Velvet' isn’t your average, leafy green friend. It's a 'jewel alocasia', a group known for its compact size and stunning, intricate foliage. The leaves are its main event:
a deep, near-black green with a texture like crushed velvet, dramatically offset by crystalline, silver-white veins. Unlike its larger Alocasia cousins that can dominate a room, the 'Black Velvet' remains relatively petite, making it a perfect statement piece for a desk or a well-lit shelf. Its dramatic, high-contrast look has made it an icon on social media and a must-have for anyone curating a home with a strong aesthetic point of view. It’s less of a plant and more of a living sculpture.
Why It's a Worthy Challenge
So, what makes propagating this plant a 'badge of honor'? In a word: fussiness. Alocasias are notoriously particular, and the 'Black Velvet' is no exception. They demand a delicate balance that many common houseplants don’t. Give it a little too much water, and you risk the dreaded root rot, which can take down the plant with alarming speed. Provide too little humidity, and it becomes a magnet for spider mites, tiny pests that can mar its perfect leaves. They also dislike being moved or having their roots disturbed. This inherent sensitivity means that successfully keeping one alive and thriving is an accomplishment. Taking the next step—braving the repotting process to harvest its precious corms and nurture them into new, independent plants—is a true test of a plant parent's skill, patience, and intuition.
Gathering Your Propagation Tools
Ready to earn your badge? Success starts with preparation. You don’t need a science lab, but having the right materials on hand will make the process smoother and increase your chances of success. First, you need a healthy, mature 'Black Velvet' that has been in its pot for a while—this increases the likelihood of finding corms. You’ll also need a fresh, well-draining potting mix; an 'aroid mix' containing orchid bark, perlite, and coco coir is ideal. For incubating the corms, you'll need a clear container with a lid (a takeaway box works perfectly) and a propagation medium. Sprouted sphagnum moss is the gold standard as it holds moisture while providing airflow, but perlite or even water can work too. Finally, have a small bowl for your harvested corms and a gentle touch—this is a delicate operation.
The Hunt for Plant Treasure
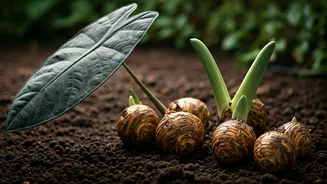
The main method of propagating a 'Black Velvet' is by harvesting its corms. These are small, energy-storing bulbs that the plant produces in its root system. Think of them as baby plants in waiting. The best time to do this is when you’re repotting your plant anyway, to minimise stress. Carefully slide the plant out of its pot. Gently shake and massage the root ball to loosen the old soil. As you do, keep your eyes peeled for the corms. They look like small, dark, woody beads, often no bigger than a pea, attached to the roots or loose in the soil. Plant enthusiasts lovingly call them 'cormfetti'. Gently pluck any corms you find and set them aside. They may have a papery outer husk, which you can carefully peel off to help encourage sprouting, but be gentle. Once you've collected your treasures, you can repot the mother plant into its fresh soil.
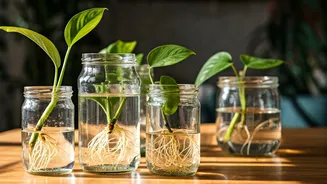
Creating the Perfect Nursery
Now for the most crucial phase: incubation. Your harvested corms need a warm, humid environment to wake up and sprout. Take your clear container and fill the bottom with your chosen medium—slightly damp (not soaking wet) sphagnum moss is highly recommended. Place the corms on top of the moss, ensuring they have a little space between them. Some people like to place them pointy-side up, but it's not strictly necessary. Put the lid on the container to create a mini-greenhouse. This will trap humidity, which is the single most important factor for success. Place the container in a spot that receives bright, indirect light and is consistently warm. A spot near a window but out of direct sun is perfect. Now, the waiting game begins. Don't be tempted to open the container too often; just check every few days to ensure the moss is still damp.
Patience, Troubleshooting, and Victory
Propagating Alocasia corms is a marathon, not a sprint. It can take anywhere from a few weeks to several months for a corm to sprout a root and its first tiny leaf. During this time, your main enemy is rot. If you see any corms turning mushy or mouldy, remove them immediately to prevent it from spreading. If the air in your container seems too stagnant, you can open it for a few minutes every couple of days to get some fresh air in. Once a corm has a healthy root system (a few centimetres long) and its first leaf, you can carefully transplant it into a tiny pot with a proper aroid mix. Watching that first miniature, velvety leaf unfurl is an unparalleled moment of triumph. You didn't just buy a beautiful plant—you created one.