



Is It Time for a Bigger Pot?
Before you get your hands dirty, it’s important to know if your plant actually needs repotting. Uprooting a plant is a stressful process, so you should only do it when necessary. The most obvious sign is roots growing out of the drainage holes at the bottom
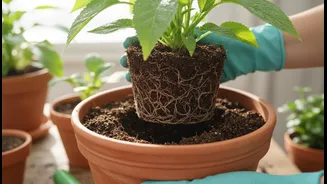
of the pot. Another clear indicator is a root-bound plant, where the roots have formed a dense, tangled mass, sometimes circling the inside of the pot. You might also notice that the soil dries out much faster than it used to, forcing you to water more frequently. Stunted growth, where new leaves are smaller than older ones, or a complete lack of new growth during the growing season can also signal that the plant has run out of space and nutrients. If your plant looks top-heavy and unstable, it's a good sign it needs a larger, more stable base.
Gathering Your Supplies
Proper preparation makes the repotting process smoother. You’ll need a new pot, fresh potting mix, and a small trowel. When choosing a new pot, select one that is just one to two inches larger in diameter than the current one. A pot that is too large holds excess soil, which can retain too much moisture and lead to root rot. Ensure the new pot has adequate drainage holes to prevent waterlogging. For Bengaluru’s climate, which sees both intense sun and heavy monsoons, a good potting mix is essential. Avoid using plain garden soil, which compacts easily in pots and suffocates roots. A balanced mix of garden soil, compost like vermicompost, and cocopeat provides structure, nutrients, and moisture retention. Adding sand or perlite will improve drainage, which is crucial during the monsoon season.
The Repotting Process: A Step-by-Step Guide
First, water your plant a day before repotting to reduce stress. To remove the plant, turn the pot on its side and gently tap the edges; it should slide out easily. Avoid pulling the plant by its stem. Once out, inspect the root ball. Gently loosen any tightly bound or circling roots with your fingers. You can trim any dead, mushy, or rotting roots with clean shears. Place a layer of fresh potting mix at the bottom of the new pot. Center the plant so that the top of the root ball sits about an inch below the rim of the pot. Fill the surrounding space with your new potting mix, gently pressing it down to eliminate large air pockets, but don't pack it too tightly. The soil level should be the same as it was in the old pot; don't bury the stem.
Common Mistakes to Avoid
Many first-time gardeners make a few common errors. The most frequent is choosing a pot that is much too large, which increases the risk of root rot. Another mistake is using old, depleted soil or heavy garden soil that lacks drainage. When you repot, it's vital to gently detangle the root ball. If you place a root-bound plant directly into a new pot, the roots may continue to grow in a circle and fail to expand into the new soil. Also, avoid the temptation to add a layer of gravel or stones at the bottom for drainage; this old advice has been debunked and can actually hinder water from escaping by creating a perched water table. Proper drainage comes from a good soil mix and holes in the pot itself.
Aftercare and Managing Transplant Shock
After repotting, give the plant a thorough watering until it runs from the drainage holes, which helps settle the soil. It's normal for a plant to show signs of stress, known as transplant shock, for a few days or weeks. Symptoms can include wilting, yellowing leaves, or leaf drop. To help it recover, place the plant in a spot with indirect sunlight for about a week, as direct sun can add more stress. Hold off on fertilizing for at least a month; the fresh soil has plenty of nutrients, and fertilizing can burn the sensitive, recovering roots. Once you see signs of new, healthy growth, you can move it back to its original spot and resume your normal care routine.