


The quest for a perfectly crispy, golden-brown dosa right in your own kitchen can feel like a challenge. This guide not only introduces a unique and healthy Rajgira Paneer Dosa but also unlocks the simple secrets to achieving that elusive crunch.
Your Guide to a Perfect Dosa
There
are few culinary joys greater than the sound of a shattering-crisp dosa. Yet, for many home cooks, the reality is often a dosa that is more soft and foldable than crunchy. The disappointment is real, but the solution is surprisingly straightforward. This article will guide you through making a delightful Rajgira Paneer Dosa, a gluten-free and often vrat-friendly option made from amaranth flour. More importantly, it will demystify the process of getting that coveted crispy texture, moving you from novice attempts to restaurant-quality results. Whether it's for a special fast or just a healthy meal, mastering this dish is easier than you think.
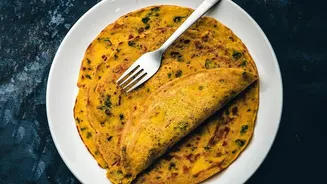
The Recipe: Rajgira Paneer Dosa
This recipe uses amaranth flour (rajgira), making it a popular choice during Navratri and other fasting periods. The filling is a simple, flavourful mix of crumbled paneer.
For the Dosa Batter:
- 1 cup Rajgira (amaranth) flour.
- Sendha namak (rock salt) to taste.
- 1/4 tsp Ajwain (carom seeds).
- Water, as needed to form a smooth, flowing batter.
For the Paneer Filling:
- 1 cup Paneer, crumbled.
- 1 Green chilli, finely chopped.
- Fresh coriander, finely chopped.
- Sendha namak to taste.
Method:
1. In a bowl, combine the rajgira flour, ajwain, and rock salt. Gradually add water while whisking to create a smooth, pourable batter that's free of lumps. It should not be too thick. Let it rest for about 20-30 minutes.
2. In a separate bowl, mix the crumbled paneer, chopped green chilli, coriander, and a pinch of salt to create your filling.
3. Heat a non-stick or well-seasoned cast-iron tawa over medium heat.
4. Once hot, pour a ladle of the rajgira batter onto the centre and quickly spread it outwards in a thin, circular motion.
5. Drizzle a little oil or ghee around the edges and cook until the bottom turns golden brown and the edges begin to lift.
6. Place a portion of the paneer filling on one half of the dosa, then fold it over.
7. Serve immediately with your favourite chutney.
Secret 1: Perfect Batter Consistency
The single most common reason for a soft dosa is a batter that is too thick. A heavy batter will never spread thinly enough to become crisp. The ideal consistency is smooth and pourable, but not watery. Think of the texture of buttermilk or a thin pancake batter. If you are using refrigerated batter, always bring it to room temperature for 15-20 minutes before cooking. Cold batter has trouble spreading and often results in a lumpy, sticky dosa.
Secret 2: Master Your Tawa Temperature
The temperature of your pan, or tawa, is critical. A tawa that is too cold will cause the dosa to stick, while one that is scalding hot will cook the batter in one spot before you can spread it, resulting in a thick, uneven dosa. The sweet spot is a wellheated tawa on a medium to mediumhigh flame. To check if it's ready, sprinkle a few drops of water on the surface. They should sizzle and evaporate almost immediately. If they do, your tawa is at the perfect temperature for spreading the batter.
Secret 3: Seasoning and Spreading Technique
For those using a castiron tawa, proper seasoning is nonnegotiable to prevent sticking. This involves creating a natural nonstick layer by heating oil on the surface. A popular trick for both castiron and nonstick pans is to rub the hot surface with half an onion dipped in a little oil before making each dosa. This cleans the surface and helps the dosa release easily. When you pour the batter, start from the centre and use the back of a ladle to spread it outwards in swift, concentric circles. The goal is to make the layer as thin as possible, as a thinner dosa leads to a crispier result.
Secret 4: The Role of Fat and Patience
Don't be afraid to use a little oil or ghee. Once the batter is spread, drizzling a few drops around the edges helps the dosa to brown beautifully and develop a crisp texture. Then, be patient. Let the dosa cook undisturbed on medium heat. You will know it's ready when the edges start to turn golden brown and naturally lift away from the pan. Flipping too early is a common mistake that ruins the texture. For most thin dosas, you only need to cook one side.