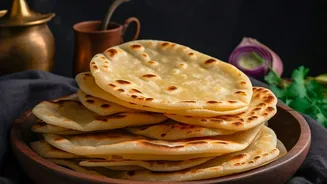






That stack of leftover rotis doesn't have to mean another mundane meal. With a little creativity and heat, those humble flatbreads can be transformed into exciting, crunchy vessels for tacos, salads, and snacks, reducing waste and upgrading your menu.
Crafting the Crunchy Roti Taco Shell
Turning a soft roti into a hard-shell taco is simpler than you think. There are two main approaches: baking or pan-frying. For the baked method, preheat your oven to 180°C. Lightly brush each roti with oil and drape it over the rungs of your oven rack to create that classic U-shape. Bake for about 8-10 minutes, or until golden and rigid. Alternatively, you can achieve a similar effect on the stovetop. Heat a little oil in a pan and place the roti in it. Once it starts to warm up, use tongs to fold it in half. Press down gently and cook both sides until the roti is firm and crispy. For an extra flavour kick, feel free to sprinkle your rotis with spices like chaat masala, chilli powder, or a taco seasoning blend before heating.
Filling Your Roti Tacos
Once your crispy shells are ready, the fun begins. These homemade taco shells are a perfect vehicle for a variety of Indian-inspired fillings. Think beyond the usual and stuff them with flavourful options like spicy paneer bhurji, mashed masala-spiced potatoes, or a simple yet delicious mix of boiled rajma (kidney beans) and finely chopped onions, tomatoes, and capsicum. For a quick snack, you can even fill them with a crunchy vegetable stir-fry seasoned with herbs and spices. Garnish with a dollop of mint-coriander chutney, some tangy tamarind sauce, or a sprinkle of sev for that extra crunch and authentic chaat-like experience.
The Edible Roti Salad Bowl
An edible bowl adds a dramatic and delicious flair to any salad. To make one, you will need an oven and a small, oven-safe bowl (a steel katori works perfectly). Preheat your oven to 180°C. Take a leftover roti and lightly brush it with oil or melted butter. Gently press the roti into the oven-safe bowl, allowing the edges to fold and crinkle naturally to form a bowl shape. Place it in the oven and bake for 10-15 minutes, or until it’s golden brown and completely firm. Let it cool for a few minutes before carefully removing it from the mould. The result is a sturdy, edible container ready to be filled with your favourite salad creation.
Building the Perfect Roti Bowl Salad
These roti bowls are perfect for holding salads that are vibrant and full of texture. You can fill them with a classic kachumber salad made from chopped onions, tomatoes, and cucumbers, seasoned with a squeeze of lemon and a pinch of salt. For a more substantial meal, consider a protein-packed chickpea salad with corn, bell peppers, and a light vinaigrette. The crispiness of the bowl provides a wonderful contrast to the fresh ingredients inside. You can even create a fusion taco salad by filling the bowl with lettuce, beans, corn, and a zesty dressing. The best part is that once you've finished the salad, you get to eat the bowl, leaving no waste behind.
Quick and Easy Roti Crisps
Perhaps the easiest and quickest transformation is turning leftover rotis into savoury crisps, also known as roti nachos. Simply use a knife or a pizza cutter to cut the rotis into triangles or any desired shape. Toss these pieces with a little oil or ghee and your choice of seasonings. Classic choices include salt, red chilli powder, and chaat masala, but you can also experiment with Italian herbs, garlic powder, or peri-peri seasoning for a different flavour profile. Once coated, you can bake them in a preheated oven or an air fryer at 180°C for 5–10 minutes, flipping halfway through, until they are golden and crunchy. If you prefer, they can also be deep fried for a more indulgent snack.
These homemade roti crisps are a healthier alternative to store bought chips and are incredibly versatile. They are perfect for scooping up a variety of dips. Serve them alongside a cool mint yogurt dip , classic hummus , or a zesty tomato salsa . They also make a fantastic base for a quick plate of nachos ; just top with grated cheese , chopped vegetables , and bake for a minute or two until the cheese melts . For a simple evening snack , they pair wonderfully with a hot cup of masala chai . Store the crisps in an airtight container , and they will stay fresh for a couple of days , ready for whenever a snack craving hits .