




Why Your Current Setup Causes Pain
Your spine has a natural 'S' curve that helps distribute pressure evenly. When you slouch in a poorly adjusted chair or crane your neck to see a low monitor, you disrupt this balance. Slouching flattens the curve in your lower back, increasing pressure on your spinal
discs. This forces the small muscles in your back and neck to work overtime just to hold you up, leading to muscle fatigue, stiffness, and chronic pain. The problem isn't just the chair; it's how it's calibrated to your body. Without proper adjustment, even the most expensive ergonomic chair can contribute to spinal compression. Taking five minutes to create a personalized setup is the first step toward relief.
Step 1: Set Your Chair Height and Feet
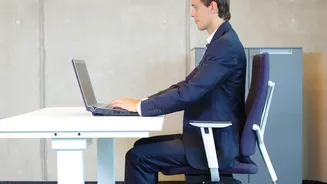
The foundation of good posture starts from the ground up. Before anything else, adjust your chair's height so that your feet can rest flat on the floor. Avoid the common mistake of letting your feet dangle or tucking them under your chair. Your knees should be bent at roughly a 90-degree angle, and your thighs should be parallel to the floor. If your desk is too high to achieve this, use a footrest to bring the floor up to you. This position stabilizes your pelvis and provides a solid base, taking significant pressure off your lower back.
Step 2: Adjust Seat Depth and Back Support
Now, ensure you are sitting all the way back in your chair, so your hips and lower back are making full contact with the backrest. You should be able to fit two or three fingers between the back of your knees and the front edge of the seat. If the seat is too deep, it will press against your calves and may force you to slide forward, losing that crucial back support. Next, position the lumbar support. The most pronounced part of the chair's cushion should fit snugly into the natural curve of your lower back, roughly at your belt line. This maintains the gentle inward curve of your lumbar spine and prevents you from slumping into a C-shape.
Step 3: Position Your Monitor for a Neutral Neck
Your monitor position is critical for preventing neck and shoulder strain. It should be placed directly in front of you, not off to one side. Adjust the height so the top of the screen is at or slightly below your eye level. This allows you to view the entire screen by looking slightly downward without bending your neck. To check the distance, sit back comfortably and extend your arm; your fingertips should just about touch the screen. If you wear bifocals, you may need to lower the monitor a bit more and tilt it back to find a comfortable viewing angle.
Step 4: Align Your Keyboard, Mouse, and Arms
With your chair and monitor set, the final piece is your arm position. Your keyboard and mouse should be close enough that you don't have to reach for them. Adjust your armrests so that your shoulders are relaxed, not hunched, and your elbows are bent at a 90 to 110-degree angle. Your forearms should be roughly parallel to the floor, and your wrists should be in a neutral, straight position, not bent up or down. This alignment prevents strain not just in your wrists but all the way up through your shoulders and neck. If your armrests get in the way, it's better to lower them or remove them completely.
Your Best Posture Is Your Next Posture
Even a perfectly ergonomic setup has its limits if you remain in a fixed position all day. The human body is designed for movement. Experts emphasize the importance of 'dynamic sitting'—changing your position frequently. Aim to get up, stretch, and move around for a few minutes at least every hour. Some ergonomic guidelines even suggest a rhythm of 20 minutes of sitting, 8 minutes of standing, and 2 minutes of moving. These small breaks promote blood flow, reduce muscle fatigue, and give your spine a rest from the static load of sitting.