



A Taste of Divine History
The Mathura Peda is more than just a sweet; it is a taste of tradition, deeply intertwined with the story of Lord Krishna. Hailing from Mathura in Uttar Pradesh, the holy city where Lord Krishna is believed to have been born, this milk-based fudge is a quintessential
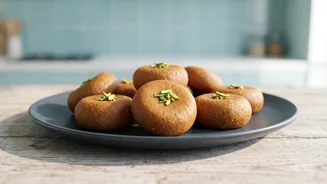
offering, or 'bhog', during Janmashtami. Legend holds that this creamy, delectable sweet was a favourite of the young god, making it a beloved prasad among devotees today. The connection is intuitive: Krishna's childhood stories are filled with tales of milk, butter, and curd, making dairy-based sweets like peda a natural fit for the festivities. Its unique dark, caramelised colour and grainy texture come from the art of slowly roasting milk solids, a process that imbues it with a flavour that is both simple and profoundly divine.
Gather Your Sacred Ingredients
The beauty of the Mathura Peda lies in its simplicity. While instant versions using milk powder exist, the authentic flavour comes from traditional ingredients. For this recipe, which yields about 15-20 pedas, you will need: Khoya (Mawa/Milk Solids): 250 grams, grated. This is the heart of the peda. You can find it at most Indian grocery stores. Ghee: 3-4 tablespoons. Desi ghee is essential for the authentic aroma and flavour. Sugar: 1/2 cup of 'Bura' or 'Tagar' (a specific type of porous, less-sweet sugar) is traditional for the perfect texture. If unavailable, you can use finely powdered sugar. You'll also need a little extra for coating. Cardamom Powder: 1/2 teaspoon, freshly ground for the best fragrance. Milk: 2-3 tablespoons, only if needed to adjust the consistency. Nutmeg Powder (Optional): A small pinch for a hint of warmth and complexity.
The Art of Roasting the Khoya
The secret to the distinctive brown colour and nutty flavour of Mathura Peda is the patient roasting of the khoya. Begin by grating your khoya. In a heavy-bottomed pan or kadai, heat 2 tablespoons of ghee on a low-to-medium flame. Add the grated khoya and begin to roast it, stirring continuously to prevent it from sticking or burning. This step requires patience. After about 10-15 minutes, the khoya will start to turn a light golden colour and release a rich aroma. Continue to roast, adding the remaining ghee as you go. You are looking for a deep, uniform, dark-brown colour. This entire process can take up to 20-25 minutes on a low flame. Once the desired colour is achieved, turn off the heat and transfer the roasted khoya to a separate plate or bowl to let it cool down slightly. It should be just warm to the touch, not completely cold.
Bringing It All Together
Once the roasted khoya mixture is warm (not hot), it's time to add the flavour and sweetness. If the mixture looks too crumbly or dry, you can add a tablespoon or two of warm milk to bring it together. Add the bura sugar and freshly ground cardamom powder (and nutmeg, if using) to the khoya. Do not add sugar to hot khoya, as this will cause it to melt and turn the mixture watery, making it impossible to shape. Using your hands, mix everything together thoroughly until it forms a uniform, pliable dough.
Shaping Your Devotional Offering
Lightly grease your palms with a little ghee. Take small, lemon-sized portions of the mixture and roll them smoothly between your palms to form round balls. Then, gently flatten each ball to create the characteristic disc shape of a peda. You can also press your thumb lightly in the centre to create a small indentation. Once all the pedas are shaped, take the extra bura or powdered sugar in a shallow plate and gently roll each peda in it, coating it lightly on all sides. This gives them their classic finish. Let the pedas air dry for an hour or two to firm up slightly before serving or storing.