


Why Emmer and Sourdough?
This isn't just another bread recipe; it's a return to wholesome, traditional baking. Emmer, known in India as 'khapli' wheat, is an ancient grain celebrated for its nutty, slightly sweet flavour. Unlike modern, highly processed wheat, emmer has a different
gluten structure that many people find easier to digest. Its protein is high, but its gluten is weaker and more delicate. When you pair this remarkable grain with the magic of sourdough fermentation, you get something truly special. The wild yeasts and bacteria in a sourdough starter work to pre-digest the flour. During the long, slow fermentation, they break down phytic acid, an anti-nutrient that can block mineral absorption. They also degrade some of the gluten proteins, making the final loaf gentler on your digestive system. This natural process is what makes it 'gut-friendly' — not a medical cure, but a more digestible and nutritious option for many.
Your Simple Sourdough Starter
Every great sourdough starts with a starter, which is a living culture of flour and water. If you don't have one, you can easily make one by mixing equal parts flour and water and 'feeding' it daily for about a week. You can also ask for a spoonful of 'discard' from a friend who bakes, or even find some online or at specialty bakeries. For this recipe, your starter should be 'active'—bubbly, risen, and smelling pleasantly tangy. To check if it’s ready, drop a small spoonful into a glass of water. If it floats, it's ready to use.
The Recipe: Ingredients & Method
Emmer flour behaves differently from regular maida or atta. It absorbs water more slowly and creates a stickier, less elastic dough. Don't be alarmed; this is normal. We'll use a simple 'stretch and fold' technique instead of vigorous kneading. **Ingredients:** - 100g active sourdough starter - 350g lukewarm water - 450g whole emmer (khapli) flour - 10g sea salt **Method:** 1. **Mix:** In a large bowl, whisk your active starter into the lukewarm water until milky. Add the emmer flour and salt. Mix with a spatula or your hands until no dry flour remains. The dough will be shaggy and sticky. Cover the bowl and let it rest for 30-45 minutes. This initial rest is called the 'autolyse'. 2. **Stretch and Fold:** Instead of kneading, we will strengthen the dough with folds. Wet your hands to prevent sticking. Grab a portion of the dough from the side of the bowl, stretch it upwards, and fold it over the centre. Rotate the bowl a quarter turn and repeat. Do this four times (one full set). Cover and rest for 30 minutes. Repeat this process 3-4 more times over the next 2-3 hours.
Fermentation and Shaping
3. **Bulk Ferment:** After your last set of folds, cover the dough and let it rest at room temperature for another 2-4 hours, or until it has increased in volume by about 50% and you see some bubbles on the surface. Emmer doesn't rise as dramatically as modern wheat, so don't wait for it to double. 4. **Shape:** Lightly flour your work surface. Gently tip the dough out of the bowl. It will be soft. Gently fold the edges into the centre to form a round or oval shape (a 'boule' or 'bâtard'). Try to create some surface tension by dragging the shaped loaf towards you on the counter for a few inches. This tightens its outer 'skin'. 5. **Final Proof:** Place the shaped loaf, seam-side up, into a bowl lined with a well-floured cloth (a banneton is great if you have one). Cover it and place it in the refrigerator for at least 8 hours, or up to 24. This cold ferment develops flavour and makes the dough easier to handle.
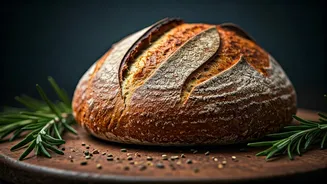
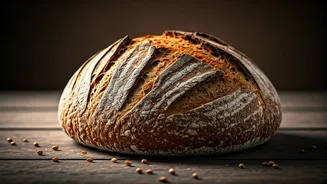
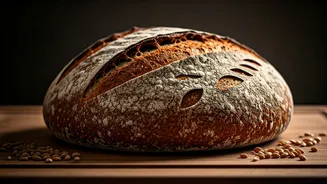
Baking Your Loaf
6. **Preheat:** Place a Dutch oven (a heavy, lidded pot like a cast-iron one) in your oven and preheat to 230°C (450°F) for at least 45 minutes. A screaming hot oven is crucial for a good crust. 7. **Score and Bake:** Carefully remove the hot Dutch oven from the oven. Take your dough straight from the fridge and gently turn it out onto a piece of parchment paper. Using a sharp blade or knife, make one confident slash across the top, about half an inch deep. This 'score' allows steam to escape and the bread to expand. 8. **Bake:** Lift the parchment paper with the dough on it and lower it into the hot Dutch oven. Cover with the lid and bake for 20 minutes. Then, remove the lid—this is the 'big reveal'!—and bake for another 20-25 minutes, until the crust is a deep golden brown and the internal temperature reaches at least 96°C (205°F). 9. **Cool:** This is the hardest part! Transfer the baked loaf to a wire rack and let it cool completely (at least 2-3 hours) before slicing. Slicing into hot bread can result in a gummy texture. Patience will be rewarded with a perfect crumb.