



Know When It's Time for a New Pot
Before you get your hands dirty, it's important to know if your plant actually needs a new home. Repotting too soon can stress a plant, so look for a few key signs. The most obvious clue is roots peeking out of the drainage holes at the bottom of the pot.
You might also see roots circling the top of the soil. Another telltale sign is how quickly the soil dries out; if you have to water every day or two because the soil is parched, the pot is likely full of roots with little soil left to hold moisture. Stalled or stunted growth, especially during the spring and summer growing season, can also indicate that your plant is root-bound and has no more room to expand. As a general rule, many common houseplants benefit from having their soil refreshed every 12 to 18 months to replenish nutrients, even if they don't need a bigger pot.
Gather Your Simple Toolkit
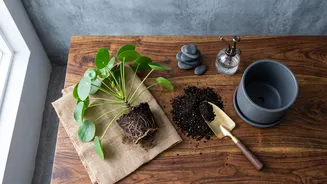
You don't need a lot of fancy equipment to successfully repot a plant. The most important item is the new pot. Choose one that is just one to two inches larger in diameter than the current one. Picking a pot that’s too big is a common mistake; excess soil can hold too much moisture, leading to a risk of root rot. Make sure the new pot has drainage holes. You'll also need fresh, high-quality potting mix appropriate for your specific plant. Other helpful items include gloves, a small trowel or shovel, and a surface protector like newspaper or a plastic mat to contain the mess. For a simple hack, place a single coffee filter or a small piece of mesh over the drainage hole before adding soil. This prevents soil from washing out but still allows water to escape.
The Step-by-Step Repotting Process
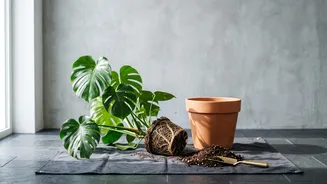
Once you have your supplies, it's time for the main event. First, gently remove the plant from its current pot. Turn the pot on its side and tap the bottom and sides to loosen it. Hold the base of the plant and gently slide it out. Next, inspect the root ball. If the roots are tightly wound in a circle, gently tease them apart with your fingers to encourage them to grow outward into the new soil. Don't be afraid if a few small roots break; most plants can handle it. Add a layer of fresh potting mix to the bottom of the new pot. Place the plant inside, making sure it sits at the same depth it was in the old pot—the base of the stem should be about an inch below the rim to leave room for watering. Fill in the space around the root ball with more potting mix, gently patting it down to eliminate large air pockets, but don't pack it too tightly. A great hack is to place the empty old pot into the new one, fill soil around it, then remove the old pot to leave a perfect-sized hole for your plant.
Aftercare Is Key for a Happy Plant
Your plant’s journey isn't over once it's in the new pot. The aftercare you provide is crucial for its recovery. After repotting, give the plant a thorough watering until you see water run out of the drainage holes. This helps settle the soil around the roots. It's normal for a plant to experience some 'transplant shock,' which can look like wilting or yellowing leaves for a week or two. To help it recover, place your plant back in its usual spot with the appropriate light conditions. Avoid placing it in harsh, direct sunlight, which can add more stress. Hold off on fertilizing for at least a few weeks to a month. The fresh potting mix has plenty of nutrients to get it started, and adding fertilizer too soon can burn the sensitive, recovering roots. Just give it time and patience, and soon you'll see signs of new growth.