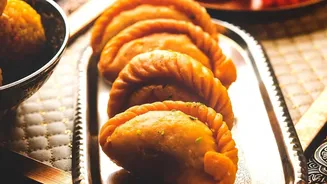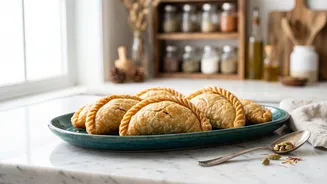







The aroma of freshly fried gujiya is the scent of celebration in countless Indian homes. This sweet, crescent-shaped pastry, filled with delightful mixtures, is a festive staple. Let’s break down the process into simple, manageable steps.
Crafting the Perfect Dough
The secret to
a great gujiya is its casing: it should be crisp and flaky, not hard or chewy. The key lies in the right proportion of flour, fat, and water. For the dough, you will need 2 cups of all-purpose flour (maida), 4 to 5 tablespoons of ghee (clarified butter), and about half a cup of water. Start by rubbing the ghee into the flour with your fingertips until the mixture resembles breadcrumbs. This process, known as 'moyan', is crucial for creating a flaky texture. Once combined, slowly add water, a little at a time, and knead into a firm, but pliable dough. It should not be soft like a roti dough. Cover it with a damp cloth and let it rest for at least 30 minutes. This resting period allows the gluten to relax, making the dough easier to roll out.
The Heart of the Gujiya: The Filling
The soul of the gujiya is its rich and aromatic filling. While there are many variations, the classic is made with khoya (mawa or dried milk solids). To prepare it, you'll need 1 cup of crumbled khoya, half a cup of powdered sugar, a quarter cup of chopped nuts (like almonds, cashews, and pistachios), a tablespoon of desiccated coconut, and half a teaspoon of cardamom powder. Gently roast the khoya in a pan over low heat for a few minutes until it loosens up and becomes aromatic. Take it off the heat and let it cool down completely. This is a critical step; if the khoya is even slightly warm when you mix in the sugar, the sugar will melt and make the filling runny. Once cool, mix in the powdered sugar, chopped nuts, coconut, and cardamom powder. Your filling is now ready.
An Alternative Suji Filling
If you don't have khoya, a suji (semolina) filling is a wonderful and equally traditional alternative. For this version, you will need half a cup of fine suji, a few tablespoons of ghee, half a cup of sugar, a quarter cup of chopped nuts, and half a teaspoon of cardamom powder. Heat the ghee in a pan and roast the suji on low heat until it turns light golden and emits a nutty aroma. Remove from heat and allow it to cool completely before mixing in the sugar and other ingredients. This filling provides a lovely granular texture that contrasts beautifully with the crisp outer layer of the gujiya.
The Art of Folding and Sealing
This is often the most intimidating part, but it can be mastered with a little practice. After the dough has rested, knead it once more and divide it into small, equal-sized balls. Roll each ball into a thin circle, about 4 inches in diameter. Place a spoonful of the cooled filling onto one half of the circle, leaving the edges clear. Gently apply a little water to the edges with your fingertip. Fold the other half over to create a semi-circle, pressing the edges firmly to seal. To create the traditional pleated design, start at one end. Pinch and fold a small part of the edge inwards, then continue this pinching and folding motion all along the sealed edge. If this seems too difficult, a gujiya mould is your best friend. Simply place the rolled dough circle over the open mould, put the filling in the centre, and press the mould shut. It creates a perfect shape with a sealed edge every time.
Frying to Golden Perfection
The final step is frying. The trick to getting a crisp gujiya without bubbles or blisters is to fry it on low to medium heat. Heat ghee or oil in a deep kadai. To check if the oil is ready, drop a small piece of dough into it; it should sizzle and rise to the top slowly. If it rises too quickly, the oil is too hot. Carefully slide a few gujiyas into the oil, ensuring not to overcrowd the pan. Fry them on a low flame, turning them occasionally, until they are golden brown and crisp on both sides. This slow frying process can take 8 to 10 minutes per batch, but your patience will be rewarded with perfectly cooked pastries. Once done, remove them with a slotted spoon and place them on a paper towel to drain any excess oil.