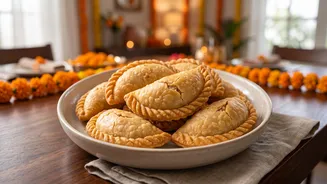



The mere mention of gujiya evokes the festive spirit of Holi and Diwali. These crescent-shaped sweet dumplings, filled with rich khoya and nuts, are a delight. This guide demystifies the process, focusing on the two most crucial stages: shaping and cooking.
The Foundation: A Flawless Dough
The journey to a perfect gujiya begins with its outer layer. The dough must be just right—not too soft, not too stiff. For a classic dough, you will need all-purpose flour (maida), a generous amount of ghee for 'moyan' (fat incorporated into the flour), and a little water. The key to a flaky, crisp crust lies in the moyan. Rub the ghee into the flour with your fingertips until the mixture resembles breadcrumbs. When you press a portion in your fist, it should hold its shape. This step is non-negotiable for achieving that coveted texture. Once the moyan is perfect, add water little by little to knead a firm, yet pliable dough. Cover it with a damp cloth and let it rest for at least 30 minutes. This resting period allows the gluten to relax, making the dough easier to roll and shape without shrinking.
The Heart: A Rich and Aromatic Filling
While the dough rests, prepare the soul of the gujiya: its filling. The most traditional filling uses khoya (mawa or dried milk solids). To prepare it, sauté the khoya on low heat until it turns a light pinkish-brown and releases its aroma. Let it cool completely. Once cool, mix in powdered sugar, finely chopped nuts like almonds, pistachios, and cashews, some desiccated coconut, and a hint of cardamom powder for fragrance. Some recipes also include semolina (suji), which should be lightly roasted before being added. A crucial tip is to ensure the filling is completely cool before you start shaping the gujiyas. A warm filling can make the dough soggy and cause the gujiyas to break open while frying.
The Art of Shaping: Sealing the Deal
This is often where home cooks feel the most pressure. A perfectly shaped and sealed gujiya is a mark of pride. First, roll out small, thin discs from your rested dough. Place a spoonful of filling on one half of the disc, leaving the edges clear. Be careful not to overfill, as this is a primary reason for gujiyas bursting in oil. To seal, apply a little water along the edges with your fingertip. Fold the other half over to form a semi-circle, gently pressing the edges to seal the filling inside. Now, you can either use a gujiya mould for a quick, uniform shape or create the traditional pleated design ('gothna') by hand. To do this, pinch and twist the sealed edge inwards to create a decorative, rope-like pattern. A secure seal is paramount to prevent the filling from leaking out during frying.
The Golden Rule of Cooking: Low and Slow
Cooking the gujiya is a test of patience. The secret to a crisp gujiya with a beautiful, bubbly texture is frying it on low heat. Heat ghee or oil in a kadai on a low flame. To test the temperature, drop a small piece of dough into the oil; it should sizzle gently and rise to the surface slowly. If it rises instantly, the oil is too hot. High heat will cook the outside too quickly, leaving the inside raw and resulting in a soft, rather than crisp, crust. Gently slide a few gujiyas into the oil at a time, ensuring not to overcrowd the pan. Fry them undisturbed for a few minutes until the bottom is a pale gold, then flip and cook the other side. Continue frying, turning occasionally, until they are a uniform golden brown. This slow process can take up to 10–12 minutes per batch, but the reward is a perfectly cooked, flaky pastry.
The Final Touch: A Sweet Glaze
Once fried to golden perfection, the gujiyas can be enjoyed as is or taken a step further with a sugar syrup bath. For the glazed version, prepare a simple sugar syrup ('chashni') of one–string consistency. Dip the warm, fried gujiyas into any warm syrup for just about 30 seconds, ensuring they are coated evenly. Remove them with a slotted spoon and place them on a wire rack to let any excess syrup drip off. The gujiyas will absorb the sweetness and develop a delicate glaze as they cool. Whether you prefer them plain or glazed, allow them to cool completely before storing them in an airtight container. They will stay fresh and delicious for over a week, ready to be shared and enjoyed.