


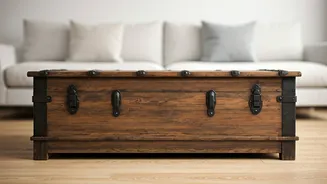


The Hunt for Hidden Treasure
The first step is finding the right chest. These old wooden boxes, often called a 'sandook' or 'petti', are hiding in plain sight. Check with older relatives who might have one stored away. Otherwise, your best bet is scouring local flea markets, kabadiwalas,
or antique shops in your city’s old quarters. Don't be deterred by layers of dust or a coat of garish paint. Look for the 'bones' of the piece. Is the wood solid (teak and sheesham are fantastic finds)? Are the basic structure and joints intact? Avoid anything with extensive rot or active termite damage, but don't worry about surface scratches, peeling varnish, or broken hardware—those are all fixable.
Prep Work and Assessment
Once you have your chest home, the real work begins. First, give it a thorough cleaning. Use a damp cloth and a mild soap solution to wipe away decades of grime. Use a vacuum with a brush attachment to clean the inside. This is also when you do a detailed assessment. Open and close the lid, check the hinges, and identify any loose panels or deep gouges. Make a plan. Do you want to strip it back to bare wood, or paint it a new colour? Will you keep the original hardware or replace it? Deciding this now will guide the entire restoration process. Remember to work in a well-ventilated area, especially if you suspect the chest was treated with old, lead-based paints.
The Art of Stripping and Sanding
This is the most transformative, and most labour-intensive, part. To remove old paint or varnish, you have two options: chemical strippers or a heat gun. A chemical stripper is effective but requires caution and protective gear (gloves, goggles, mask). Apply it as directed, wait for the paint to bubble, and then scrape it off. A heat gun is a less messy alternative, softening the paint so you can scrape it away. Once the old finish is gone, it’s time to sand. Start with a coarse-grit sandpaper (around 80-grit) to smooth out imperfections and remove any remaining finish. Then, move to a medium-grit (120-grit) and finally a fine-grit (220-grit) paper for a silky-smooth surface. Always sand in the direction of the wood grain to avoid scratching the surface.
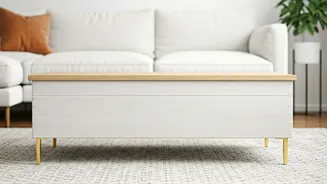
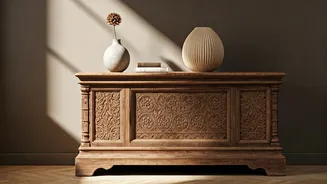
Choosing Your Minimalist Finish
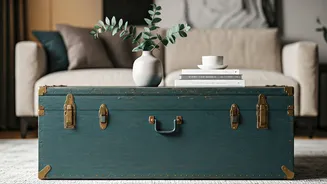
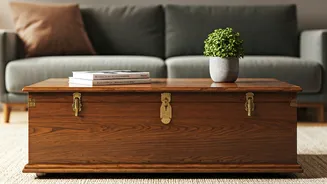
With your chest stripped and sanded, it’s a blank canvas. For a true minimalist aesthetic, your colour and finish choices are key. For a sleek, modern look, consider a matte black or a crisp white chalk paint. These finishes are forgiving and provide a non-reflective surface that feels contemporary. If you love the natural wood grain you’ve just uncovered, enhance it. A light, clear Danish oil will nourish the wood and give it a subtle sheen, while a dark walnut stain can provide a dramatic, sophisticated contrast in a light-coloured room. The goal is to create a clean, uncluttered look. Avoid distressed finishes or overly decorative stencils, as they detract from the minimalist vibe.
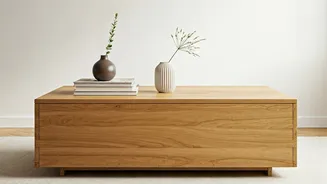
Hardware and Final Touches
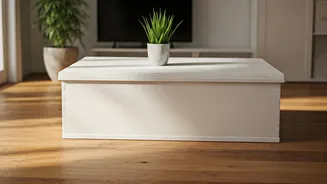
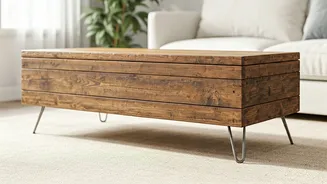
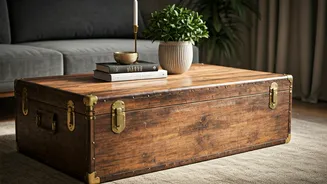
Hardware is the jewellery of your furniture. If the original hinges and handles are beautiful and functional, you can clean them up with a metal polish. If they’re broken or don't fit your minimalist vision, replace them. Simple, clean-lined hardware in matte black, brushed brass, or stainless steel works beautifully. Avoid anything too ornate. This is also a good time to add legs if you want to elevate the chest to a more comfortable coffee table height. Simple hairpin legs or blocky wooden feet can be easily screwed into the base, instantly modernising its profile. Once the hardware is on, your transformation is nearly complete.
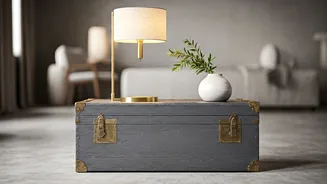
Sealing and Styling Your Masterpiece
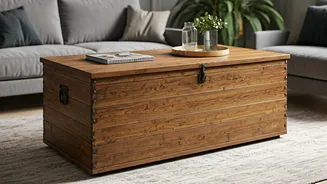
The final step in the workshop is to protect your hard work. Apply two to three thin coats of a clear sealant like a water-based polyurethane in a matte or satin finish. This will protect the table from spills and everyday wear and tear, making it a functional piece of living room furniture. Once it’s fully cured, bring it inside. The beauty of a minimalist piece is that it doesn't need much adornment. Style it simply with a small stack of books, a single sculptural vase, or a beautiful tray to corral remotes. Let the form and history of the chest speak for itself.